Deploy artifact updates to on-premises Amazon EC2 instances using AWS CodePipeline
Akash Kumar and Sandeep Reddy Jogammagari, Amazon Web Services
Summary
This pattern provides code samples and steps to create a pipeline in the Amazon Web Services (AWS) Cloud and deploy updated artifacts to on-premises Amazon Elastic Compute Cloud (Amazon EC2) instances in AWS CodePipeline. The pattern is based on the continuous integration practice. This practice automates the building and testing of code with a Git-based version control system. In this pattern, you create and clone a code repository by using AWS CodeCommit. Then, you create a project and configure your source code by using AWS CodeBuild. Finally, you create your application and configure its target environment for on-premises EC2 instances by using AWS CodeDeploy.
Prerequisites and limitations
Prerequisites
An active AWS account
User-defined tags to identify EC2 instances during deployment
CodeDeploy agent, installed on EC2 instances
Your required runtime software, installed on EC2 instances
Amazon Corretto 8 for the Java Development Kit
Apache Tomcat
web server, installed Amazon CloudWatch Events (optional)
A key pair to log in to the web server (optional)
An Apache Maven application project for a web application
Architecture
The following diagram shows an example Java web application that’s deployed to on-premises EC2 instances by using this pattern’s architecture.
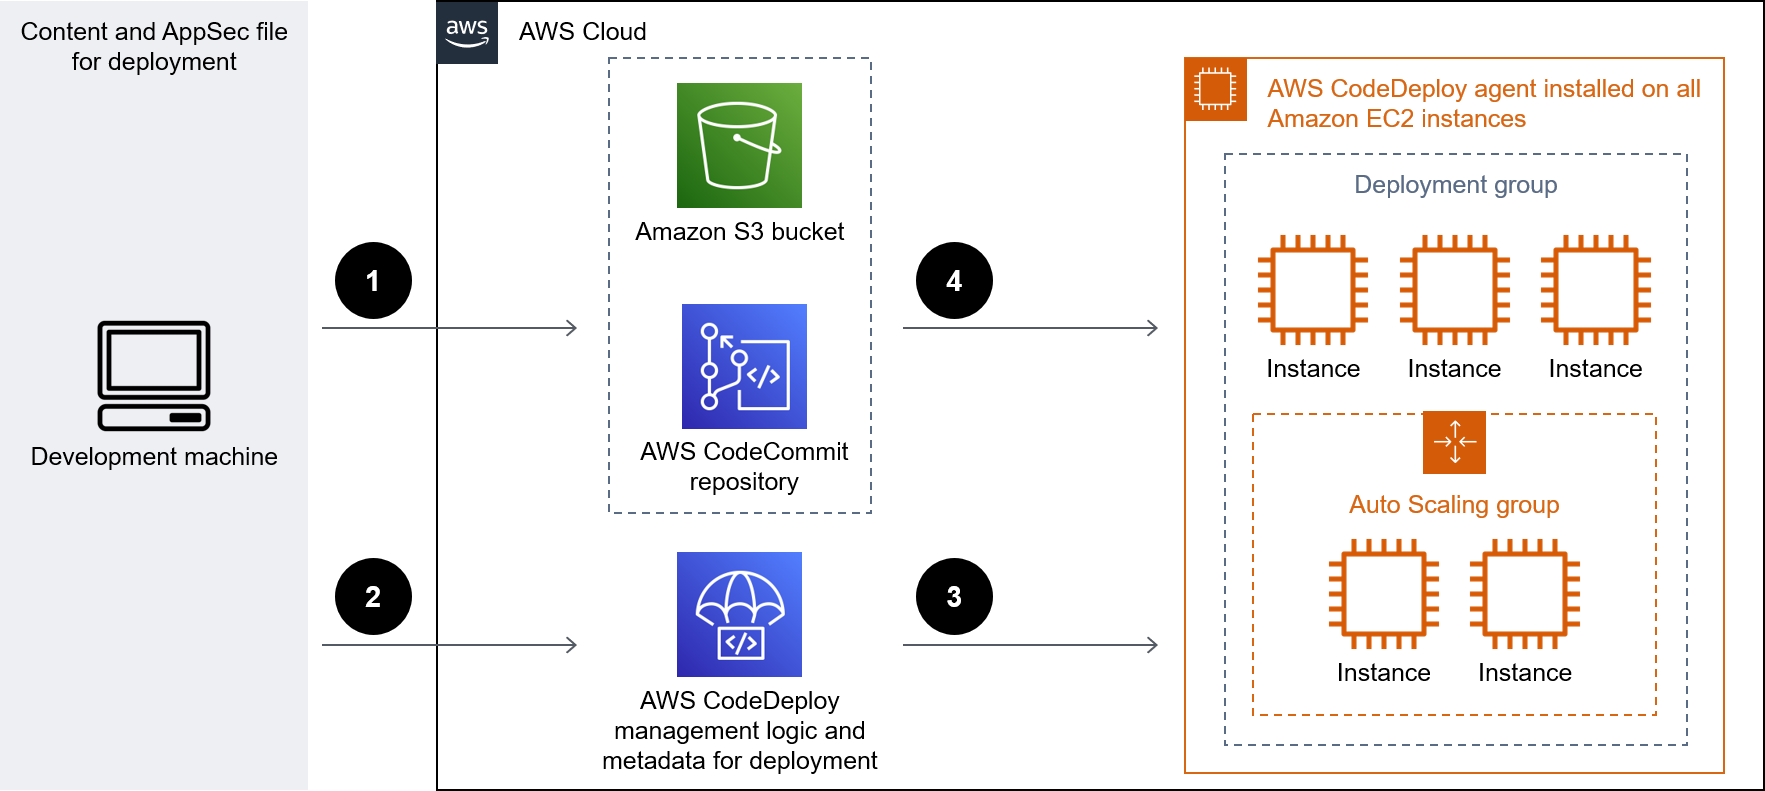
The diagram shows the following workflow:
The developer commits code changes to a private CodeCommit Git repository.
CodePipeline uses CodeBuild to initiate the build and add new artifacts that are ready for deployment in the Amazon Simple Storage Service (Amazon S3) bucket.
CodePipeline uses the CodeDeploy agent to pre-install any dependencies required for the deployment artifact changes.
CodePipeline uses the CodeDeploy agent to deploy the artifacts from the S3 bucket to target EC2 instances. If enabled, CloudWatch Events can automatically start the pipeline when a change occurs in the source code.
Technology stack
CodeBuild
CodeCommit
CodeDeploy
CodePipeline
CloudWatch Events (optional)
Tools
AWS CodeBuild is a fully managed build service that helps you compile source code, run unit tests, and produce artifacts that are ready to deploy. CodeBuild compiles your source code, runs unit tests, and produces artifacts that are ready to deploy.
AWS CodeCommit is a version control service that helps you privately store and manage Git repositories, without needing to manage your own source control system.
AWS CodeDeploy automates deployments to Amazon Elastic Compute Cloud (Amazon EC2) or on-premises instances, AWS Lambda functions, or Amazon Elastic Container Service (Amazon ECS) services.
AWS CodePipeline helps you quickly model and configure the different stages of a software release and automate the steps required to release software changes continuously.
Code
This pattern includes the following attachments:
buildspec.yml– This file specifies the actions that CodeBuild requires to build and create an artifact for deployment.appspec.yml– This file specifies the actions that CodeDeploy requires to create an application and configure a target environment for on-premises EC2 instances.install_dependencies.sh– This file installs dependencies for the Apache Tomcat web server.start_server.sh– This file starts the Apache Tomcat web server.stop_server.sh– This file stops the Apache Tomcat web server.
Epics
| Task | Description | Skills required |
|---|---|---|
Create the repository. | AWS systems administrator | |
Clone the repository. | Connect to the CodeCommit repository by cloning the repository. | App developer |
Push the source code to the remote repository. |
| App developer |
| Task | Description | Skills required |
|---|---|---|
Create a build project. |
| AWS administrator, App developer |
| Task | Description | Skills required |
|---|---|---|
Create the application. |
| AWS systems administrator, App developer |
| Task | Description | Skills required |
|---|---|---|
Create the pipeline. |
| AWS systems administrator, App developer |
Related resources
Attachments
To access additional content that is associated with this document, unzip the following file: attachment.zip
