The AWS SDK for JavaScript V3 API Reference Guide describes in detail all the API operations for the AWS SDK for JavaScript version 3 (V3).
Creating scheduled events to execute AWS Lambda functions
You can create a scheduled event that invokes an AWS Lambda function by using an Amazon CloudWatch Event. You can configure a CloudWatch Event to use a cron expression to schedule when a Lambda function is invoked. For example, you can schedule a CloudWatch Event to invoke an Lambda function every weekday.
AWS Lambda is a compute service that enables you to run code without provisioning or managing servers. You can create Lambda functions in various programming languages. For more information about AWS Lambda, see What is AWS Lambda.
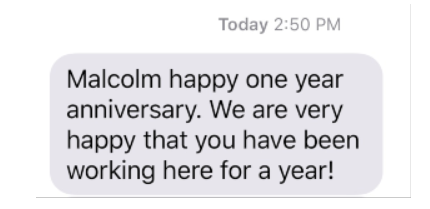
In this tutorial, you create a Lambda function by using the Lambda JavaScript runtime API. This example invokes different AWS services to perform a specific use case. For example, assume that an organization sends a mobile text message to its employees that congratulates them at the one year anniversary date, as shown in this illustration.
The tutorial should take about 20 minutes to complete.
This tutorial shows you how to use JavaScript logic to create a solution that performs this use case. For example, you'll learn how to read a database to determine which employees have reached the one year anniversary date, how to process the data, and send out a text message all by using a Lambda function. Then you’ll learn how to use a cron expression to invoke the Lambda function every weekday.
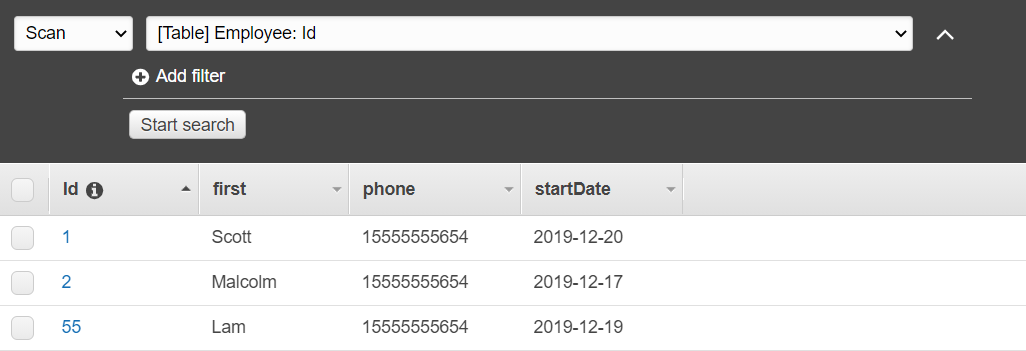
This AWS tutorial uses an Amazon DynamoDB table named Employee that contains these fields.
id - the primary key for the table.
firstName - employee’s first name.
phone - employee’s phone number.
startDate - employee’s start date.
Important
Cost to complete: The AWS services included in this document are included in the AWS Free Tier. However, be sure to terminate all of the resources after you have completed this tutorial to ensure that you are not charged.
To build the app:
Prerequisite tasks
To set up and run this example, you must first complete these tasks:
-
Set up the project environment to run these Node.js TypeScript examples, and install the required AWS SDK for JavaScript and third-party modules. Follow the instructions on GitHub
. -
Create a shared configurations file with your user credentials. For more information about providing a shared credentials file, see Shared config and credentials files in the AWS SDKs and Tools Reference Guide.
Create the AWS resources
This tutorial requires the following resources.
-
An Amazon DynamoDB table named Employee with a key named Id and the fields shown in the previous illustration. Make sure you enter the correct data, including a valid mobile phone that you want to test this use case with. For more information, see Create a Table.
-
An IAM role with attached permissions to execute Lambda functions.
-
An Amazon S3 bucket to host Lambda function.
You can create these resources manually, but we recommend provisioning these resources using the CloudFormation as described in this tutorial.
Create the AWS resources using CloudFormation
CloudFormation enables you to create and provision AWS infrastructure deployments predictably and repeatedly. For more information about CloudFormation, see the AWS CloudFormation User Guide.
To create the CloudFormation stack using the AWS CLI:
Install and configure the AWS CLI following the instructions in the AWS CLI User Guide.
Create a file named
setup.yamlin the root directory of your project folder, and copy the content here on GitHubinto it. Note
The CloudFormation template was generated using the AWS CDK available here on GitHub
. For more information about the AWS CDK, see the AWS Cloud Development Kit (AWS CDK) Developer Guide. Run the following command from the command line, replacing
STACK_NAMEwith a unique name for the stack.Important
The stack name must be unique within an AWS Region and AWS account. You can specify up to 128 characters, and numbers and hyphens are allowed.
aws cloudformation create-stack --stack-name STACK_NAME --template-body file://setup.yaml --capabilities CAPABILITY_IAMFor more information on the
create-stackcommand parameters, see the AWS CLI Command Reference guide, and the CloudFormation User Guide.View a list of the resources in the console by opening the stack on the CloudFormation dashboard, and choosing the Resources tab. You require these for the tutorial.
When the stack is created, use the AWS SDK for JavaScript to populate the DynamoDB table, as described in Populate the DynamoDB table.
Populate the DynamoDB table
To populate the table, first create a directory named libs, and in it create
a file named dynamoClient.js, and paste the content below into it.
const { DynamoDBClient } = require( "@aws-sdk/client-dynamodb" );
// Set the AWS Region.
const REGION = "REGION"; // e.g. "us-east-1"
// Create an Amazon DynamoDB service client object.
const dynamoClient = new DynamoDBClient({region:REGION});
module.exports = { dynamoClient };
This code is available
here on GitHub
Next, create a file named populate-table.js in the root directory of your
project folder, and copy the content
here on GitHubphone property with a valid mobile phone number in the E.164 format, and the value for the
startDate with today's date.
Run the following command from the command line.
node populate-table.js
const {
BatchWriteItemCommand } = require( "aws-sdk/client-dynamodb" );
const {dynamoClient} = require(  "./libs/dynamoClient" );
// Set the parameters.
const params = {
  RequestItems: {
    Employees: [
      {
        PutRequest: {
          Item: {
            id: { N: "1" },
            firstName: { S: "Bob" },
            phone: { N: "155555555555654" },
            startDate: { S: "2019-12-20" },
          },
        },
      },
      {
        PutRequest: {
          Item: {
            id: { N: "2" },
            firstName: { S: "Xing" },
            phone: { N: "155555555555653" },
            startDate: { S: "2019-12-17" },
          },
        },
      },
      {
        PutRequest: {
          Item: {
            id: { N: "55" },
            firstName: { S: "Harriette" },
            phone: { N: "155555555555652" },
            startDate: { S: "2019-12-19" },
          },
        },
      },
    ],
  },
};

export const run = async () => {
  try {
    const data = await dbclient.send(new BatchWriteItemCommand(params));
    console.log("Success", data);
  } catch (err) {
    console.log("Error", err);
  }
};
run();
This code is available
here on GitHub
Creating the AWS Lambda function
Configuring the SDK
First import the required AWS SDK for JavaScript (v3) modules and commands:
DynamoDBClient and the DynamoDB ScanCommand, and SNSClient and the Amazon SNS PublishCommand
command. Replace REGION with the AWS Region. Then calculate today's date and assign it to a parameter.
Then create the parameters for the ScanCommand.Replace TABLE_NAME with the name of the table you created in the
Create the AWS resources section of this example.
The following code snippet shows this step. (See Bundling the Lambda function for the full example.)
"use strict";
// Load the required clients and commands.
const { DynamoDBClient, ScanCommand } = require("@aws-sdk/client-dynamodb");
const { SNSClient, PublishCommand } = require("@aws-sdk/client-sns");

//Set the AWS Region.
const REGION = "REGION"; //e.g. "us-east-1"

// Get today's date.
const today = new Date();
const dd = String(today.getDate()).padStart(2, "0");
const mm = String(today.getMonth() + 1).padStart(2, "0"); //January is 0!
const yyyy = today.getFullYear();
const date = yyyy + "-" + mm + "-" + dd;

// Set the parameters for the ScanCommand method.
const params = {
  // Specify which items in the results are returned.
  FilterExpression: "startDate = :topic",
  // Define the expression attribute value, which are substitutes for the values you want to compare.
  ExpressionAttributeValues: {
    ":topic": { S: date },
  },
  // Set the projection expression, which the the attributes that you want.
  ProjectionExpression: "firstName, phone",
  TableName: "TABLE_NAME",
};
Scanning the DynamoDB table
First create an async/await function called sendText to publish a text message using the Amazon SNS PublishCommand. Then, add a try block
pattern that scans the DynamoDB table for employees with their work anniversary today, and then calls the sendText function to send these employees a text message. If an error
occurs the catch block is called.
The following code snippet shows this step. (See Bundling the Lambda function for the full example.)
exports.handler = async (event, context, callback) => {
  // Helper function to send message using Amazon SNS.
  async function sendText(textParams) {
    try {
      const data = await snsclient.send(new PublishCommand(textParams));
      console.log("Message sent");
    } catch (err) {
      console.log("Error, message not sent ", err);
    }
  }
  try {
    // Scan the table to check identify employees with work anniversary today.
    const data = await dbclient.send(new ScanCommand(params));
    data.Items.forEach(function (element, index, array) {
      const textParams = {
        PhoneNumber: element.phone.N,
        Message:
          "Hi " +
          element.firstName.S +
          "; congratulations on your work anniversary!",
      };
      // Send message using Amazon SNS.
      sendText(textParams);
    });
  } catch (err) {
    console.log("Error, could not scan table ", err);
  }
};
Bundling the Lambda function
This topic describes how to bundle the mylambdafunction.js and the required AWS SDK for JavaScript modules for this example into a
bundled file called index.js.
If you haven't already, follow the Prerequisite tasks for this example to install webpack.
Note
For information aboutwebpack, see Bundle applications with webpack.
Run the the following in the command line to bundle the JavaScript for this example into a file called
<index.js>:webpack mylamdbafunction.js --mode development --target node --devtool false --output-library-target umd -o index.jsImportant
Notice the output is named
index.js. This is because Lambda functions must have anindex.jshandler to work.Compress the bundled output file,
index.js, into a ZIP file namedmy-lambda-function.zip.Upload
mylambdafunction.zipto the Amazon S3 bucket you created in the Create the AWS resources topic of this tutorial.
Here is the complete browser script code for mylambdafunction.js.
"use strict";
// Load the required clients and commands.
const { DynamoDBClient, ScanCommand } = require("@aws-sdk/client-dynamodb");
const { SNSClient, PublishCommand } = require("@aws-sdk/client-sns");

//Set the AWS Region.
const REGION = "REGION"; //e.g. "us-east-1"

// Get today's date.
const today = new Date();
const dd = String(today.getDate()).padStart(2, "0");
const mm = String(today.getMonth() + 1).padStart(2, "0"); //January is 0!
const yyyy = today.getFullYear();
const date = yyyy + "-" + mm + "-" + dd;

// Set the parameters for the ScanCommand method.
const params = {
  // Specify which items in the results are returned.
  FilterExpression: "startDate = :topic",
  // Define the expression attribute value, which are substitutes for the values you want to compare.
  ExpressionAttributeValues: {
    ":topic": { S: date },
  },
  // Set the projection expression, which the the attributes that you want.
  ProjectionExpression: "firstName, phone",
  TableName: "TABLE_NAME",
};

// Create the client service objects.
const dbclient = new DynamoDBClient({ region: REGION });
const snsclient = new SNSClient({ region: REGION });

exports.handler = async (event, context, callback) => {
  // Helper function to send message using Amazon SNS.
  async function sendText(textParams) {
    try {
      const data = await snsclient.send(new PublishCommand(textParams));
      console.log("Message sent");
    } catch (err) {
      console.log("Error, message not sent ", err);
    }
  }
  try {
    // Scan the table to check identify employees with work anniversary today.
    const data = await dbclient.send(new ScanCommand(params));
    data.Items.forEach(function (element, index, array) {
      const textParams = {
        PhoneNumber: element.phone.N,
        Message:
          "Hi " +
          element.firstName.S +
          "; congratulations on your work anniversary!",
      };
      // Send message using Amazon SNS.
      sendText(textParams);
    });
  } catch (err) {
    console.log("Error, could not scan table ", err);
  }
};
Deploy the Lambda function
In the root of your project, create a lambda-function-setup.js file, and paste the content below into it.
Replace BUCKET_NAME with the name of the Amazon S3 bucket you uploaded the ZIP version of your Lambda function to. Replace
ZIP_FILE_NAME with the name of name the ZIP version of your Lambda function. Replace IAM_ROLE_ARN with the Amazon Resource Number (ARN) of the IAM role
you created in the Create the AWS resources topic of this tutorial.
Replace LAMBDA_FUNCTION_NAME with a name for the Lambda function.
// Load the required Lambda client and commands.
const {
   CreateFunctionCommand,
} = require("@aws-sdk/client-lambda");
const {
   lambdaClient
} = require("..libs/lambdaClient.js");

// Instantiate an Lambda client service object.
const lambda = new LambdaClient({ region: REGION });

// Set the parameters.
const params = {
  Code: {
    S3Bucket: "BUCKET_NAME", // BUCKET_NAME
    S3Key: "ZIP_FILE_NAME", // ZIP_FILE_NAME
  },
  FunctionName: "LAMBDA_FUNCTION_NAME",
  Handler: "index.handler",
  Role: "IAM_ROLE_ARN", // IAM_ROLE_ARN; e.g., arn:aws:iam::650138640062:role/v3-lambda-tutorial-lambda-role
  Runtime: "nodejs12.x",
  Description:
    "Scans a DynamoDB table of employee details and using Amazon Simple Notification Services (Amazon SNS) to " +
    "send employees an email the each anniversary of their start-date.",
};

const run = async () => {
  try {
    const data = await lambda.send(new CreateFunctionCommand(params));
    console.log("Success", data); // successful response
  } catch (err) {
    console.log("Error", err); // an error occurred
  }
};
run();
Enter the following at the command line to deploy the Lambda function.
node lambda-function-setup.js
This code example is available here on GitHub
Configure CloudWatch to invoke the Lambda functions
To configure CloudWatch to invoke the Lambda functions:
-
Open the Functions page on the Lambda console.
-
Choose the Lambda function.
-
Under Designer, choose Add trigger.
-
Set the trigger type to CloudWatch Events/EventBridge.
-
For Rule, choose Create a new rule.
-
Fill in the Rule name and Rule description.
-
For rule type, select Schedule expression.
-
In the Schedule expression field, enter a cron expression. For example, cron(0 12 ? * MON-FRI *).
-
Choose Add.
Note
For more information, see Using Lambda with CloudWatch Events.
Delete the resources
Congratulations! You have invoked a Lambda function through Amazon CloudWatch scheduled events using the AWS SDK for JavaScript. As stated at the beginning of this tutorial, be sure to terminate all of the resources you create while going through this tutorial to ensure that you’re not charged. You can do this by deleting the CloudFormation stack you created in the Create the AWS resources topic of this tutorial, as follows:
-
Open the CloudFormation console
. On the Stacks page, select the stack.
Choose Delete.
