Create a server in a virtual private cloud
You can host your server's endpoint inside a virtual private cloud (VPC) to use for transferring data to and from an Amazon S3 bucket or Amazon EFS file system without going over the public internet.
Note
After May 19, 2021, you won't be able to create a server using
EndpointType=VPC_ENDPOINT in your AWS account if your account hasn't
already done so before May 19, 2021. If you have already created servers with
EndpointType=VPC_ENDPOINT in your AWS account on or before February
21, 2021, you will not be affected. After this date, use
EndpointType=VPC. For more information, see
Discontinuing the use of VPC_ENDPOINT.
If you use Amazon Virtual Private Cloud (Amazon VPC) to host your AWS resources, you can establish a private connection between your VPC and a server. You can then use this server to transfer data over your client to and from your Amazon S3 bucket without using public IP addressing or requiring an internet gateway.
Using Amazon VPC, you can launch AWS resources in a custom virtual network. You can use a VPC to control your network settings, such as the IP address range, subnets, route tables, and network gateways. For more information about VPCs, see What Is Amazon VPC? in the Amazon VPC User Guide.
In the next sections, find instructions on how to create and connect your VPC to a server. As an overview, you do this as follows:
-
Set up a server using a VPC endpoint.
-
Connect to your server using a client that is inside your VPC through the VPC endpoint. Doing this enables you to transfer data that is stored in your Amazon S3 bucket over your client using AWS Transfer Family. You can perform this transfer even though the network is disconnected from the public internet.
-
In addition, if you choose to make your server's endpoint internet-facing, you can associate Elastic IP addresses with your endpoint. Doing this lets clients outside of your VPC connect to your server. You can use VPC security groups to control access to authenticated users whose requests originate only from allowed addresses.
Note
AWS Transfer Family supports dual-stack endpoints, allowing your server to communicate over both IPv4 and IPv6. To enable dual-stack support, select the Enable DNS dual-stack endpoint option when creating your VPC endpoint. Note that both your VPC and subnets must be configured to support IPv6 before you can use this feature. Dual-stack support is particularly useful when you have clients that need to connect using either protocol.
For information about dual-stack (IPv4 and IPv6) server endpoints, see IPv6 support for Transfer Family servers.
Topics
Create a server endpoint that can be accessed only within your VPC
In the following procedure, you create a server endpoint that is accessible only to resources within your VPC.
To create a server endpoint inside a VPC
-
Open the AWS Transfer Family console at https://console.aws.amazon.com/transfer/
. -
From the navigation pane, select Servers, then choose Create server.
-
In Choose protocols, select one or more protocols, and then choose Next. For more information about protocols, see Step 2: Create an SFTP-enabled server.
-
In Choose an identity provider, choose Service managed to store user identities and keys in AWS Transfer Family, and then choose Next.
This procedure uses the service-managed option. If you choose Custom, you provide an Amazon API Gateway endpoint and an AWS Identity and Access Management (IAM) role to access the endpoint. By doing so, you can integrate your directory service to authenticate and authorize your users. To learn more about working with custom identity providers, see Working with custom identity providers.
-
In Choose an endpoint, do the following:
-
For Endpoint type, choose the VPC hosted endpoint type to host your server's endpoint.
-
For Access, choose Internal to make your endpoint only accessible to clients using the endpoint's private IP addresses.
For details on the Internet Facing option, see Create an internet-facing endpoint for your server. A server that is created in a VPC for internal access only doesn't support custom hostnames.
-
For VPC, choose an existing VPC ID or choose Create a VPC to create a new VPC.
-
In the Availability Zones section, choose up to three Availability Zones and associated subnets.
-
In the Security Groups section, choose an existing security group ID or IDs or choose Create a security group to create a new security group. For more information about security groups, see Security groups for your VPC in the Amazon Virtual Private Cloud User Guide. To create a security group, see Creating a security group in the Amazon Virtual Private Cloud User Guide.
Note
Your VPC automatically comes with a default security group. If you don't specify a different security group or groups when you launch the server, we associate the default security group with your server.
-
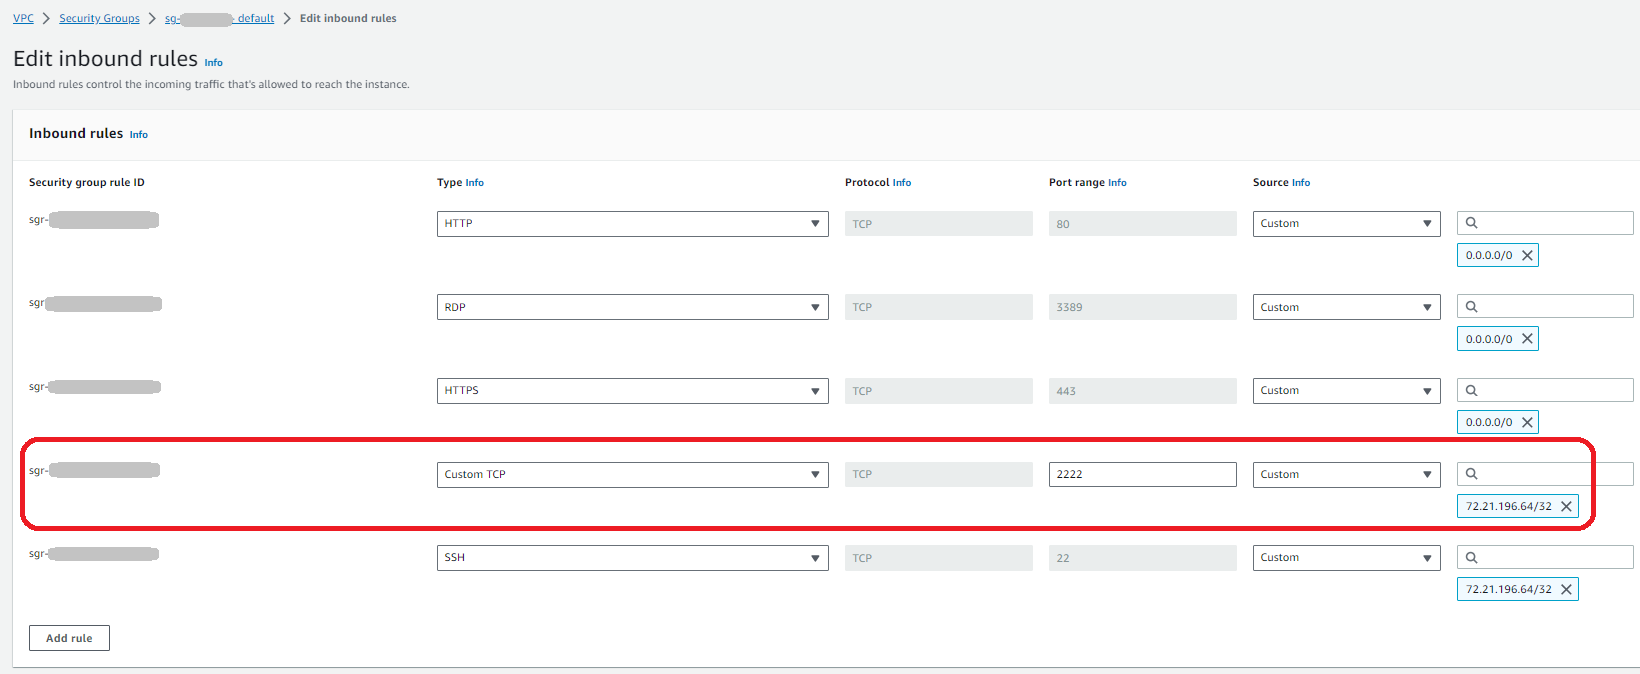
For the inbound rules for the security group, you can configure SSH traffic to use port 22, 2222, 22000, or any combination. Port 22 is configured by default. To use port 2222 or port 22000, you add an inbound rule to your security group. For the type, choose Custom TCP, then enter either
2222or22000for Port range, and for the source, enter the same CIDR range that you have for your SSH port 22 rule. -
For the inbound rules for the security group, configure FTP and FTPS traffic to use Port range
21for the control channel and8192-8200for the data channel.
Note
You can also use port 2223 for clients that require TCP "piggy-back" ACKs, or the ability for the final ack of the TCP 3-way handshake to also contain data.
Some client software may be incompatible with port 2223: for example, a client that requires the server to send the SFTP Identification String before the client does.
-
-
(Optional) For FIPS Enabled, select the FIPS Enabled endpoint check box to ensure the endpoint complies with Federal Information Processing Standards (FIPS).
Note
FIPS-enabled endpoints are only available in North American AWS Regions. For available Regions, see AWS Transfer Family endpoints and quotas in the AWS General Reference. For more information about FIPS, see Federal Information Processing Standard (FIPS) 140-2
. -
Choose Next.
-
-
In Configure additional details, do the following:
-
For CloudWatch logging, choose one of the following to enable Amazon CloudWatch logging of your user activity:
-
Create a new role to allow Transfer Family to automatically create the IAM role, as long as you have the right permissions to create a new role. The IAM role that is created is called
AWSTransferLoggingAccess. -
Choose an existing role to choose an existing IAM role from your account. Under Logging role, choose the role. This IAM role should include a trust policy with Service set to
transfer.amazonaws.com.For more information about CloudWatch logging, see Configure CloudWatch logging role.
Note
-
You can't view end-user activity in CloudWatch if you don't specify a logging role.
-
If you don't want to set up a CloudWatch logging role, select Choose an existing role, but don't select a logging role.
-
-
For Cryptographic algorithm options, choose a security policy that contains the cryptographic algorithms enabled for use by your server.
Note
By default, the
TransferSecurityPolicy-2024-01security policy is attached to your server unless you choose a different one.For more information about security policies, see Security policies for AWS Transfer Family servers.
-
(Optional: this section is only for migrating users from an existing SFTP-enabled server.) For Server Host Key, enter an RSA, ED25519, or ECDSA private key that will be used to identify your server when clients connect to it over SFTP.
-
(Optional) For Tags, for Key and Value, enter one or more tags as key-value pairs, and then choose Add tag.
-
Choose Next.
-
-
In Review and create, review your choices. If you:
-
Want to edit any of them, choose Edit next to the step.
Note
You will need to review each step after the step that you chose to edit.
-
Have no changes, choose Create server to create your server. You are taken to the Servers page, shown following, where your new server is listed.
-
It can take a couple of minutes before the status for your new server changes to Online. At that point, your server can perform file operations, but you'll need to create a user first. For details on creating users, see Managing users for server endpoints.
Create an internet-facing endpoint for your server
In the following procedure, you create a server endpoint. This endpoint is accessible over the internet only to clients whose source IP addresses are allowed in your VPC's default security group. Additionally, by using Elastic IP addresses to make your endpoint internet-facing, your clients can use the Elastic IP address to allow access to your endpoint in their firewalls.
Note
Only SFTP and FTPS can be used on an internet-facing VPC hosted endpoint.
To create an internet-facing endpoint
-
Open the AWS Transfer Family console at https://console.aws.amazon.com/transfer/
. -
From the navigation pane, select Servers, then choose Create server.
-
In Choose protocols, select one or more protocols, and then choose Next. For more information about protocols, see Step 2: Create an SFTP-enabled server.
-
In Choose an identity provider, choose Service managed to store user identities and keys in AWS Transfer Family, and then choose Next.
This procedure uses the service-managed option. If you choose Custom, you provide an Amazon API Gateway endpoint and an AWS Identity and Access Management (IAM) role to access the endpoint. By doing so, you can integrate your directory service to authenticate and authorize your users. To learn more about working with custom identity providers, see Working with custom identity providers.
-
In Choose an endpoint, do the following:
-
For Endpoint type, choose the VPC hosted endpoint type to host your server's endpoint.
-
For Access, choose Internet Facing to make your endpoint accessible to clients over the internet.
Note
When you choose Internet Facing, you can choose an existing Elastic IP address in each subnet or subnets. Or you can go to the VPC console (https://console.aws.amazon.com/vpc/
) to allocate one or more new Elastic IP addresses. These addresses can be owned either by AWS or by you. You can't associate Elastic IP addresses that are already in use with your endpoint. -
(Optional) For Custom hostname, choose one of the following:
Note
Customers in AWS GovCloud (US) need to connect via the Elastic IP address directly, or create a hostname record within Commercial Route 53 that points to their EIP. For more information about using Route 53 for GovCloud endpoints, see Setting up Amazon Route 53 with your AWS GovCloud (US) resources in the AWS GovCloud (US) User Guide.
-
Amazon Route 53 DNS alias – if the hostname that you want to use is registered with Route 53. You can then enter the hostname.
-
Other DNS – if the hostname that you want to use is registered with another DNS provider. You can then enter the hostname.
-
None – to use the server's endpoint and not use a custom hostname. The server hostname takes the form
server-id.server.transfer.region.amazonaws.comNote
For customers in AWS GovCloud (US), selecting None does not create a hostname in this format.
To learn more about working with custom hostnames, see Working with custom hostnames.
-
-
For VPC, choose an existing VPC ID or choose Create a VPC to create a new VPC.
-
In the Availability Zones section, choose up to three Availability Zones and associated subnets. For IPv4 Addresses, choose an Elastic IP address for each subnet. This is the IP address that your clients can use to allow access to your endpoint in their firewalls.
Tip: You must use a public subnet for your Availability Zones, or first setup an internet gateway if you want to use a private subnet.
-
In the Security Groups section, choose an existing security group ID or IDs or choose Create a security group to create a new security group. For more information about security groups, see Security groups for your VPC in the Amazon Virtual Private Cloud User Guide. To create a security group, see Creating a security group in the Amazon Virtual Private Cloud User Guide.
Note
Your VPC automatically comes with a default security group. If you don't specify a different security group or groups when you launch the server, we associate the default security group with your server.
-
For the inbound rules for the security group, you can configure SSH traffic to use port 22, 2222, 22000, or any combination. Port 22 is configured by default. To use port 2222 or port 22000, you add an inbound rule to your security group. For the type, choose Custom TCP, then enter either
2222or22000for Port range, and for the source, enter the same CIDR range that you have for your SSH port 22 rule. -
For the inbound rules for the security group, configure FTPS traffic to use Port range
21for the control channel and8192-8200for the data channel.
Note
You can also use port 2223 for clients that require TCP "piggy-back" ACKs, or the ability for the final ack of the TCP 3-way handshake to also contain data.
Some client software may be incompatible with port 2223: for example, a client that requires the server to send the SFTP Identification String before the client does.
-
-
(Optional) For FIPS Enabled, select the FIPS Enabled endpoint check box to ensure the endpoint complies with Federal Information Processing Standards (FIPS).
Note
FIPS-enabled endpoints are only available in North American AWS Regions. For available Regions, see AWS Transfer Family endpoints and quotas in the AWS General Reference. For more information about FIPS, see Federal Information Processing Standard (FIPS) 140-2
. -
Choose Next.
-
-
In Configure additional details, do the following:
-
For CloudWatch logging, choose one of the following to enable Amazon CloudWatch logging of your user activity:
-
Create a new role to allow Transfer Family to automatically create the IAM role, as long as you have the right permissions to create a new role. The IAM role that is created is called
AWSTransferLoggingAccess. -
Choose an existing role to choose an existing IAM role from your account. Under Logging role, choose the role. This IAM role should include a trust policy with Service set to
transfer.amazonaws.com.For more information about CloudWatch logging, see Configure CloudWatch logging role.
Note
-
You can't view end-user activity in CloudWatch if you don't specify a logging role.
-
If you don't want to set up a CloudWatch logging role, select Choose an existing role, but don't select a logging role.
-
-
For Cryptographic algorithm options, choose a security policy that contains the cryptographic algorithms enabled for use by your server.
Note
By default, the
TransferSecurityPolicy-2024-01security policy is attached to your server unless you choose a different one.For more information about security policies, see Security policies for AWS Transfer Family servers.
-
(Optional: this section is only for migrating users from an existing SFTP-enabled server.) For Server Host Key, enter an RSA, ED25519, or ECDSA private key that will be used to identify your server when clients connect to it over SFTP.
-
(Optional) For Tags, for Key and Value, enter one or more tags as key-value pairs, and then choose Add tag.
-
Choose Next.
-
(Optional) For Managed workflows, choose workflow IDs (and a corresponding role) that Transfer Family should assume when executing the workflow. You can choose one workflow to execute upon a complete upload, and another to execute upon a partial upload. To learn more about processing your files by using managed workflows, see AWS Transfer Family managed workflows.

-
-
In Review and create, review your choices. If you:
-
Want to edit any of them, choose Edit next to the step.
Note
You will need to review each step after the step that you chose to edit.
-
Have no changes, choose Create server to create your server. You are taken to the Servers page, shown following, where your new server is listed.
-
You can choose the server ID to see the detailed settings of the server that you just created. After the column Public IPv4 address has been populated, the Elastic IP addresses that you provided are successfully associated with your server's endpoint.
Note
When your server in a VPC is online, only the subnets can be modified and only through the UpdateServer API. You must stop the server to add or change the server endpoint's Elastic IP addresses.
Change the endpoint type for your server
If you have an existing server that is accessible over the internet (that is, has a public endpoint type), you can change its endpoint to a VPC endpoint.
Note
If you have an existing server in a VPC displayed as VPC_ENDPOINT, we
recommend that you modify it to the new VPC endpoint type. With this new endpoint
type, you no longer need to use a Network Load Balancer (NLB) to associate Elastic
IP addresses with your server's endpoint. Also, you can use VPC security groups
to restrict access to your server's endpoint. However, you can continue to use
the VPC_ENDPOINT endpoint type as needed.
The following procedure assumes that you have a server that uses either the current
public endpoint type or the older VPC_ENDPOINT type.
To change the endpoint type for your server
-
Open the AWS Transfer Family console at https://console.aws.amazon.com/transfer/
. -
In the navigation pane, choose Servers.
-
Select the check box of the server that you want to change the endpoint type for.
Important
You must stop the server before you can change its endpoint.
-
For Actions, choose Stop.
-
In the confirmation dialog box that appears, choose Stop to confirm that you want to stop the server.
Note
Before proceeding to the next step, in Endpoint details, wait for the Status of the server to change to Offline; this can take a couple of minutes. You might have to choose Refresh on the Servers page to see the status change.
You won't be able to make any edits until the server is Offline.
-
In Endpoint details, choose Edit.
-
In Edit endpoint configuration, do the following:
-
For Edit endpoint type, choose VPC hosted.
-
For Access, choose one of the following:
-
Internal to make your endpoint only accessible to clients using the endpoint's private IP addresses.
-
Internet Facing to make your endpoint accessible to clients over the public internet.
Note
When you choose Internet Facing, you can choose an existing Elastic IP address in each subnet or subnets. Or, you can go to the VPC console (https://console.aws.amazon.com/vpc/
) to allocate one or more new Elastic IP addresses. These addresses can be owned either by AWS or by you. You can't associate Elastic IP addresses that are already in use with your endpoint.
-
-
(Optional for internet facing access only) For Custom hostname, choose one of the following:
-
Amazon Route 53 DNS alias – if the hostname that you want to use is registered with Route 53. You can then enter the hostname.
-
Other DNS – if the hostname that you want to use is registered with another DNS provider. You can then enter the hostname.
-
None – to use the server's endpoint and not use a custom hostname. The server hostname takes the form
serverId.server.transfer.regionId.amazonaws.comTo learn more about working with custom hostnames, see Working with custom hostnames.
-
-
For VPC, choose an existing VPC ID, or choose Create a VPC to create a new VPC.
-
In the Availability Zones section, select up to three Availability Zones and associated subnets. If Internet Facing is chosen, also choose an Elastic IP address for each subnet.
Note
If you want the maximum of three Availability Zones, but there are not enough available, create them in the VPC console (https://console.aws.amazon.com/vpc/
). If you modify the subnets or Elastic IP addresses, the server takes a few minutes to update. You can't save your changes until the server update is complete.
-
Choose Save.
-
-
For Actions, choose Start and wait for the status of the server to change to Online; this can take a couple of minutes.
Note
If you changed a public endpoint type to a VPC endpoint type, notice that Endpoint type for your server has changed to VPC.
The default security group is attached to the endpoint. To change or add additional security groups, see Creating Security Groups.
Discontinuing the use of VPC_ENDPOINT
AWS Transfer Family has discontinued the ability to create servers with
EndpointType=VPC_ENDPOINT for new AWS accounts. As of May 19, 2021,
AWS accounts that don't own AWS Transfer Family servers with an endpoint type of
VPC_ENDPOINT will not be able to create new servers with
EndpointType=VPC_ENDPOINT. If you already own servers that use the
VPC_ENDPOINT endpoint type, we recommend that you start using
EndpointType=VPC as soon as possible. For details, see Update your AWS Transfer Family server endpoint type from VPC_ENDPOINT to VPC
We launched the new VPC endpoint type earlier in 2020. For more
information, see AWS Transfer Family for SFTP supports VPC Security Groups and Elastic IP
addresses
This endpoint type is functionally equivalent to the previous endpoint type
(VPC_ENDPOINT). You can attach Elastic IP addresses directly to the
endpoint to make it internet facing and use security groups for source IP filtering. For
more information, see the Use
IP allow listing to secure your AWS Transfer Family for SFTP servers
You can also host this endpoint in a shared VPC environment. For more information, see
AWS Transfer Family now supports shared services VPC environments
In addition to SFTP, you can use the VPC EndpointType to enable FTPS and
FTP. We don't plan to add these features and FTPS/FTP support to
EndpointType=VPC_ENDPOINT. We have also removed this endpoint type as
an option from the AWS Transfer Family console.
You can change the endpoint type for your server using the Transfer Family console, AWS CLI, API, SDKs, or CloudFormation. To change your server’s endpoint type, see Updating the AWS Transfer Family server endpoint type from VPC_ENDPOINT to VPC.
If you have any questions, contact AWS Support or your AWS account team.
Note
We do not plan to add these features and FTPS or FTP support to EndpointType=VPC_ENDPOINT. We are no longer offering it as an option on the AWS Transfer Family Console.
If you have additional questions, you can contact us through AWS Support or your account team.
Limiting VPC endpoint access for Transfer Family servers
When creating an AWS Transfer Family server with VPC endpoint type, your IAM users and principals need permissions to create and delete VPC endpoints. However, your organization's security policies may restrict these permissions. You can use IAM policies to allow VPC endpoint creation and deletion specifically for Transfer Family while maintaining restrictions for other services.
Important
The following IAM policy allows users to create and delete VPC endpoints only for Transfer Family servers while denying these operations for other services:
{
    "Effect": "Deny",
    "Action": [
        "ec2:CreateVpcEndpoint",
        "ec2:DeleteVpcEndpoints"
    ],
    "Resource": ["*"],
    "Condition": {
        "ForAnyValue:StringNotLike": {
            "ec2:VpceServiceName": [
                "com.amazonaws.INPUT-YOUR-REGION.transfer.server.*"
            ]
        },
        "StringNotLike": {
            "aws:PrincipalArn": [
                "arn:aws:iam::*:role/INPUT-YOUR-ROLE"
            ]
        }
    }
}
Replace INPUT-YOUR-REGION with your AWS Region (for
example, us-east-1) and
INPUT-YOUR-ROLE with the IAM role you want to grant
these permissions to.
Additional networking features
AWS Transfer Family provides several advanced networking features that enhance security and flexibility when using VPC configurations:
-
Shared VPC environment support - You can host your Transfer Family server endpoint in a shared VPC environment. For more information, see Using VPC hosted endpoints in shared VPCs with AWS Transfer Family
. -
Authentication and security - You can use an AWS Web Application Firewall to protect your Amazon API Gateway endpoint. For more information, see Securing AWS Transfer Family with AWS Web Application Firewall and Amazon API Gateway
.
