Using Nitro Enclaves with Amazon EKS
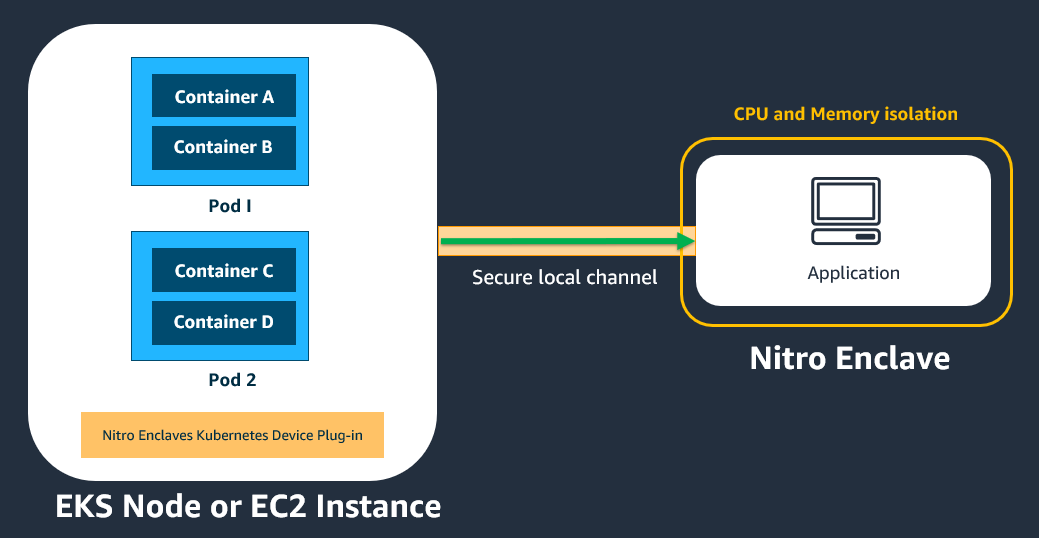
You can use Amazon Elastic Kubernetes Service to orchestrate, scale, and deploy Nitro Enclaves from a Kubernetes pod. Kubernetes is an open source platform for container orchestration. The following diagram provides a conceptual overview of how Nitro Enclaves integrates with Amazon EKS.
Important
All pods and containers in the same Amazon EKS node or Amazon EC2 instance that has the Nitro Enclaves Kubernetes device plugin installed will be able to communicate with the enclave that is attached to that parent Amazon EC2 instance.
For more information about Amazon EKS see the Amazon Elastic Kubernetes Service User Guide.
This tutorial shows how to create an Amazon EKS cluster with a managed node group and one enclave-enabled node. It shows how to install the Nitro Enclaves Kubernetes device plugin, how to prepare the Hello Enclaves sample application for deployment, and how to deploy the prepared Hello Enclaves Docker image to the cluster.
There are two key components to this process:
-
Launch templates. The process requires a launch template that is properly configured. The launch template must have enclaves enabled and an it must include specific user data that is provided in Step 1: Create a launch template. This launch template will be used to create the enclave-enabled nodes in the cluster.
-
The Nitro Enclaves Kubernetes device plugin. This device plugin gives your pods and containers the ability to create and terminate enclaves using the Nitro Enclaves Command Line Interface. The device plugin works with both Amazon EKS and self-managed Kubernetes nodes.
Tip
To simplify the build process, we also provide an open source tool called enclavectl that you can use to build and deploy your enclave
applications to an Amazon EKS cluster. Using enclavectl, you
can create an enclave-enabled Amazon EKS cluster and install the Nitro Enclaves device plugin as
a daemonset
Topics
Prerequisites
-
This tutorial assumes familiarity with Kubernetes concepts. For more information, see the Kubernetes documentation
. -
The following tools are required to complete this tutorial:
-
bash shell
-
AWS CLI version 2. For more information about installing the AWS CLI, see Getting started with the AWS CLI.
-
eksctl, a simple command line tool for creating and managing Kubernetes clusters on Amazon EKS. For more information, see Installing or updating eksctl.
-
Docker, an open platform used for packaging your enclave applications into images that can be deployed into containers on your worker nodes. For more information, see Get Docker
. -
jq, a command line JSON processor. For more information, see Download jq
. -
kubectl version 1.20 and later versions that include the Docker runtime. kubectl is the Kubernetes command line tool that enables you to deploy applications, inspect and manage cluster resources, and view logs. For more information, see Installing or updating kubectl in the Amazon EKS User Guide.
-
Step 1: Create a launch template
Create a launch template that will be used to launch the enclave-enabled worker nodes
(Amazon EC2 instances) in the cluster. You can create the launch template using either the
create-launch-template AWS CLI command or the Amazon EC2
console.
When you create the launch template, you must do the following:
-
Specify a supported instance type.
-
Enable Nitro Enclaves.
-
Specify the following user data, which automates the AWS Nitro Enclaves CLI installation, and preallocates the memory and the vCPUs for enclaves on the instance.
The
CPU_COUNTandMEMORY_MIBvariables in the user data specify the number of vCPUs and amount of memory (in MiB) respectively. For the purpose of this tutorial, the user data below specifies2vCPUs and768MiB of memory.Note
You can specify a custom number of vCPUs and amount of memory, depending on your workload and instance type. When you create an enclave on the worker node, the requested memory and vCPUs can't exceed the values that you specified here.
You can also include any other instructions in the user data that are required for your application.
Note
If you create the launch template using the AWS CLI, you must provide the user data as base64-encoded text.
-
Note the launch template ID (for example,
lt-01234567890abcdef; you'll need it in the following step.
For more information about creating a launch template, see Create a launch template in the Amazon EC2 User Guide.
Step 2: Create Kubernetes cluster and node
Create the cluster with node groups and worker nodes. In this tutorial, we use the eksctl command line tool to create an Amazon EKS cluster with one managed node group with one worker node using the launch template created in the previous step.
To create the cluster, node group, and worker node
-
Create a cluster configuration file named
cluster_config.yamland add the following configuration, which specifies the following:-
The name of the cluster (
metadata:name) -
The AWS Region in which to create the cluster (
region) -
The name of the node group (
managedNodeGroups:name) -
The ID and version of the launch template to use to create the worker nodes (
idandversion) -
The number of nodes in the node group (
desiredCapacity)
For the purpose of this tutorial, the configuration file creates a cluster named
ne-clusterinus-east-1, it creates1node in a node group namedne-groupusing version1of launch templatelt-01234567890abcdef.apiVersion: eksctl.io/v1alpha5 kind: ClusterConfig metadata: name: ne-cluster region:us-east-1version: "1.30" managedNodeGroups: - name: ne-group launchTemplate: id:lt-01234567890abcdefversion: "1" desiredCapacity:1For more information about cluster configuration files, see Using Config Files
in the eksctl documentation. -
-
Create the cluster, node group, and worker node using the cluster configuration file. Run the following eksctl command and specify the cluster configuration file created in the previous step.
$eksctl create cluster -fcluster_config.yamlAfter the cluster is created, you will see output similar to the following.
... [✓] EKS cluster "ne-cluster" inus-east-1region is ready
Note
When you create an Amazon EKS cluster using eksctl,
the tool automatically preconfigures kubectl so
that it can find and access the Amazon EKS cluster. If you create a self-managed cluster
using other tooling, you might need to manually configure kubectl so that it can communicate with your cluster. To check the
kubectl configuration, run kubectl
cluster-info. If you see a URL response, kubectl is correctly configured to access your cluster. For more
information, see Organizing Cluster Access Using kubeconfig Files
Step 3: Install the Nitro Enclaves Kubernetes device plugin
Deploy the Nitro Enclaves Kubernetes device plugin to the cluster and then enable it on
each worker node in the cluster using kubectl. The
plugin enables the pods on each worker node to access the Nitro Enclaves device
driver
To deploy and enable the Nitro Enclaves Kubernetes device plugin
-
Deploy the Nitro Enclaves Kubernetes device plugin to the cluster using the following command.
$kubectl apply -f https://raw.githubusercontent.com/aws/aws-nitro-enclaves-k8s-device-plugin/main/aws-nitro-enclaves-k8s-ds.yamlTo customize the Nitro Enclaves Kubernetes device plugin before deployment (for example, turning on the
ENCLAVE_CPU_ADVERTISEMENTfeature, download and edit the manifest before deployment.Download
curl -O https://raw.githubusercontent.com/aws/aws-nitro-enclaves-k8s-device-plugin/main/aws-nitro-enclaves-k8s-ds.yamlEdit
You can use any editor to manipulate the
aws-nitro-enclaves-k8s-ds.yamlfile or a command line tool, such asyq. See the following example.yq ea ' select(.kind == "DaemonSet") |= ( .spec.template.spec.containers[] |= ( select(.name == "aws-nitro-enclaves-k8s-dp").env[] |= ( select(.name == "ENCLAVE_CPU_ADVERTISEMENT").value = "true" ) ) ) // . ' -i aws-nitro-enclaves-k8s-ds.yamlDeployment
kubectl apply -f aws-nitro-enclaves-k8s-ds.yaml -
Get the name of the worker node on which to install the Nitro Enclaves Kubernetes device plugin using the following command.
$kubectl get nodesThe following is example output.
NAME STATUS ROLES AGE VERSION ip-123-123-123-123.us-east-1.compute.internal Ready <none> 21h v1.30.15-eks-fb459a0 -
Enable the Nitro Enclaves Kubernetes device plugin on the worker node. Use the following kubectl command and specify the node name from the previous step.
$kubectl label nodenode_nameaws-nitro-enclaves-k8s-dp=enabledFor example:
$kubectl label nodeip-123-123-123-123.us-east-1.compute.internalaws-nitro-enclaves-k8s-dp=enabled
Step 4: Prepare the image
Nitro Enclaves uses Docker images as a convenient file format for packaging your applications. You must build the Docker image that includes your enclave application and any other commands that are needed to run the application. This Docker image will be deployed to the worker node in the following step.
AWS provides a command line tool, enclavectl that
automates the steps that are needed to build an enclave image file and to package your
enclave image file into a Docker image. Additionally, the tool includes features that
automate Amazon EKS cluster and node group creation, and application deployment. For an
end-to-end tutorial on how to use the enclavectl tool
to automate cluster creation, application packaging, and application deployment, see the
aws-nitro-enclaves-with-k8s readme file
Note
You can also perform these steps manually using Docker and the Nitro CLI. For more information, see Building an enclave image file.
In this tutorial, we use the enclavectl tool to package the Hello Enclaves sample application into a Docker image.
To prepare the image
-
The enclavectl utility can be found in the
aws-nitro-enclaves-with-k8sGitHub repo. Clone the GitHub repo and navigate into the directory.$git clone git@github.com:aws/aws-nitro-enclaves-with-k8s.git && cd aws-nitro-enclaves-with-k8s -
Source the
env.shscript to add the enclavectl tool to you PATH variable.$source env.sh -
Configure the enclavectl for the tutorial. The
settings.jsonfile includes some default parameters that are used only if you create a cluster using enclavectl. Since the cluster was created manually in the previous steps, the parameters in thesettings.jsonare not used; but you must run this command to configure the tool before using it.$enclavectl configure --file settings.json -
Build the Hello Enclaves enclave image file and package it into a Docker image. The required files are located in the
/container/hellodirectory. Use theenclavectl buildcommand and specify the name of the directory.$enclavectl build --image helloTip
You can also use the enclavectl tool to package your own enclave applications into a Docker image. To do this, you must create a new directory with the name of your application in the
/containerdirectory. For example,/aws-nitro-enclaves-with-k8s/container/. Then, you must create your Dockerfile and anmy-appenclave_manifest.jsonfile in this directory. Then, when you run theenclavectl buildcommand, for--imagespecify the name of the directory that you created. For example,enclavectl build --image my-app.For more information about how to use the enclavectl tool to package you applications, see How to create your own application
-
The Docker image is created with a name in the following format:
hello-unique_uuid. To view the full name of the image, run the following command.$docker image ls | grep hello
Step 5: Deploy the application to the cluster
Finally, you need to deploy the application to your cluster.
To deploy the application to the cluster
-
Create a deployment specification. Create a new file named
deployment_spec.yamland add the following content.apiVersion: apps/v1 kind: Deployment metadata: name:unique_deployment_namespec: replicas: 1 selector: matchLabels: app:application_nametemplate: metadata: labels: app:application_namespec: containers: - name:unique container_nameimage:docker_image_name:image_tagcommand: ["docker_image_entry_point"] resources: limits: aws.ec2.nitro/nitro_enclaves: "1" hugepages-2Mi:768Micpu:250mrequests: aws.ec2.nitro/nitro_enclaves: "1" hugepages-2Mi:768MivolumeMounts: - mountPath: /dev/hugepages name: hugepage readOnly: false volumes: - name: hugepage-2mi emptyDir: medium: HugePages-2Mi - name: hugepage-1gi emptyDir: medium: HugePages-1Gi tolerations: - effect: NoSchedule operator: Exists - effect: NoExecute operator: ExistsThe deployment specification must include the following Nitro Enclaves specific sections:
-
limits:
  aws.ec2.nitro/nitro_enclaves: "1"
  hugepages-2Mi: 768Mi
The
limitssection defines the resource limits for the container. A container can't use more resources than what is defined in the limits. For more information, see Requests and limits. aws.ec2.nitro/nitro_enclavesis the resource name of the enclaves device driverdefined in the device plugin. When the device plugin is registered, it advertises this name to kubelet . The resource name can be requested as part of a specification any time. In the template above, we specify 1so that only one application can use the enclaves device driver at the same time. You can modify this value depending on your requirements.hugepagesspecifies the huge page size limit for your application. Nitro Enclaves uses large contiguous memory regions and therefore requires huge pages support. In the template above, the huge page size limit for the application is set to768 MiBof memory. Keep in mind that thenitro-enclaves-allocatorservice, which was installed to the node through the user data specified in the launch template, already allocated a huge page size based the value specified forMEMORY_MIBMEMORY_MIBin the user data is1024, thenitro-enclaves allocatorallocated one page of 1 GiB huge page type for the whole node. In this case, the field in the deployment spec be defined ashugepages-1Gi: 1Gi.For more information, see Managing huge pages
. -
requests:
  aws.ec2.nitro/nitro_enclaves: "1"
  hugepages-2Mi: 768Mi
The
requestssection is used to define the node on which to place the pod For more information, see Requests and limits. In the template above, we request a pod that has one enclave device (
aws.ec2.nitro/nitro_enclaves: "1"), and a huge page size of 768 MiB (hugepages-2Mi: 768Mi).
The following is an example deployment specification for the Hello Enclaves application created in the previous steps.
apiVersion: apps/v1 kind: Deployment metadata: name:hello_deploymentspec: replicas: 1 selector: matchLabels: app:hellotemplate: metadata: labels: app:hellospec: containers: - name:hello_containerimage:123456789012.dkr.ecr.eu-central-1.amazonaws.com/hello-b0f89e0a-7d83-4928-853c-9a3f941fa769:latestcommand: ["/home/run.sh"] resources: limits: aws.ec2.nitro/nitro_enclaves: "1" hugepages-2Mi:768Micpu:250mrequests: aws.ec2.nitro/nitro_enclaves: "1" hugepages-2Mi:768MivolumeMounts: - mountPath: /dev/hugepages name: hugepage readOnly: false volumes: - name: hugepage emptyDir: medium: HugePages-2Mi tolerations: - effect: NoSchedule operator: Exists - effect: NoExecute operator: Exists -
-
If the
ENCLAVE_CPU_ADVERTISEMENTfeature flag has been set, then the workloads can request a specific amount of CPUs for their enclaves. The Kubernetes scheduler can place the workloads on the EKS worker nodes according to the available CPUs. For more information, seeaws-nitro-enclaves-k8s-device-plugindocumentation. Kubernetes workloads can request CPUs for their enclaves (for example, 2) by adding
aws.ec2.nitro/nitro_enclaves_cpus: "2"to the limits and sections under resources.resources: limits: aws.ec2.nitro/nitro_enclaves_cpus: "2" requests: aws.ec2.nitro/nitro_enclaves_cpus: "2"These values need to be combined with the limits and requests from the previous step. The following example shows a fully populated
resourcessection for a Kubernetes pod requesting access to a single enclave that requires 2Gi of memory and access to 2 CPUs.resources: limits: aws.ec2.nitro/nitro_enclaves: "1" aws.ec2.nitro/nitro_enclaves_cpus: "2" hugepages-1Gi: 2Gi cpu: 250m requests: aws.ec2.nitro/nitro_enclaves: "1" aws.ec2.nitro/nitro_enclaves_cpus: "2" hugepages-1Gi: 2Gi -
Apply the deployment specification to the cluster and deploy the application. Use the
kubectl applycommand and specify the deployment specification file.$kubectl apply -fdeployment_spec.yamlTip
The enclavectl tool automates and simplifies the steps required to deploy an application to a cluster. You can use the
enclavectl run --imagecommand to automatically generate a deployment specification for your application and to automatically deploy it to your cluster. For example,image_nameenclavectl run --image hello. If you prefer automatically generate a deployment specification for your application, but deploy it manually, add the--prepare-onlyflag. For example,enclavectl run --image hello --prepare-only. Doing this will generate the deployment specification but it will not deploy the application to the cluster. Once the deployment specification has been generated, you can deploy the application using thekubectl applycommand.
