Using Amazon Aurora machine learning with Aurora MySQL
By using Amazon Aurora machine learning with your Aurora MySQL DB cluster, you can use Amazon Bedrock, Amazon Comprehend, or Amazon SageMaker AI, depending on your needs. They each support different machine learning use cases.
Contents
Requirements for using Aurora machine learning with Aurora MySQL
Supported features and limitations of Aurora machine learning with Aurora MySQL
Setting up your Aurora MySQL DB cluster to use Aurora machine learning
Performance considerations for using Aurora machine learning with Aurora MySQL
Requirements for using Aurora machine learning with Aurora MySQL
AWS machine learning services are managed services that are set up and run in their own production environments. Aurora machine learning supports integration with Amazon Bedrock, Amazon Comprehend, and SageMaker AI. Before trying to set up your Aurora MySQL DB cluster to use Aurora machine learning, be sure you understand the following requirements and prerequisites.
-
The machine learning services must be running in the same AWS Region as your Aurora MySQL DB cluster. You can't use machine learning services from an Aurora MySQL DB cluster in a different Region.
-
If your Aurora MySQL DB cluster is in a different virtual public cloud (VPC) from your Amazon Bedrock, Amazon Comprehend, or SageMaker AI service, the VPC's Security group needs to allow outbound connections to the target Aurora machine learning service. For more information, see Control traffic to your AWS resources using security groups in the Amazon VPC User Guide.
-
You can upgrade an Aurora cluster that's running a lower version of Aurora MySQL to a supported higher version if you want to use Aurora machine learning with that cluster. For more information, see Database engine updates for Amazon Aurora MySQL.
-
Your Aurora MySQL DB cluster must use a custom DB cluster parameter group. At the end of the setup process for each Aurora machine learning service that you want to use, you add the Amazon Resource Name (ARN) of the associated IAM role that was created for the service. We recommend that you create a custom DB cluster parameter group for your Aurora MySQL in advance and configure your Aurora MySQL DB cluster to use it so that it's ready for you to modify at the end of the setup process.
-
For SageMaker AI:
-
The machine learning components that you want to use for inferences must be set up and ready to use. During the configuration process for your Aurora MySQL DB cluster, make sure to have the ARN of the SageMaker AI endpoint available. The data scientists on your team are likely best able to handle working with SageMaker AI to prepare the models and handle the other such tasks. To get started with Amazon SageMaker AI, see Get Started with Amazon SageMaker AI. For more information about inferences and endpoints, see Real-time inference.
-
To use SageMaker AI with your own training data, you must set up an Amazon S3 bucket as part of your Aurora MySQL configuration for Aurora machine learning. To do so, you follow the same general process as for setting up the SageMaker AI integration. For a summary of this optional setup process, see Setting up your Aurora MySQL DB cluster to use Amazon S3 for SageMaker AI (Optional).
-
-
For Aurora global databases, you set up the Aurora machine learning services that you want to use in all AWS Regions that make up your Aurora global database. For example, if you want to use Aurora machine learning with SageMaker AI for your Aurora global database, you do the following for every Aurora MySQL DB cluster in every AWS Region:
-
Set up the Amazon SageMaker AI services with the same SageMaker AI training models and endpoints. These must also use the same names.
-
Create the IAM roles as detailed in Setting up your Aurora MySQL DB cluster to use Aurora machine learning.
-
Add the ARN of the IAM role to the custom DB cluster parameter group for each Aurora MySQL DB cluster in every AWS Region.
These tasks require that Aurora machine learning is available for your version of Aurora MySQL in all AWS Regions that make up your Aurora global database.
-
Region and version availability
Feature availability and support varies across specific versions of each Aurora database engine, and across AWS Regions.
-
For information on version and Region availability for Amazon Comprehend and Amazon SageMaker AI with Aurora MySQL, see Aurora machine learning with Aurora MySQL.
-
Amazon Bedrock is supported only on Aurora MySQL version 3.06 and higher.
For information on Region availability for Amazon Bedrock, see Model support by AWS Region in the Amazon Bedrock User Guide.
Supported features and limitations of Aurora machine learning with Aurora MySQL
When using Aurora MySQL with Aurora machine learning, the following limitations apply:
-
The Aurora machine learning extension doesn't support vector interfaces.
-
Aurora machine learning integrations aren't supported when used in a trigger.
Aurora machine learning functions aren't compatible with binary logging (binlog) replication.
-
The setting
--binlog-format=STATEMENTthrows an exception for calls to Aurora machine learning functions. -
Aurora machine learning functions are nondeterministic, and nondeterministic stored functions aren't compatible with the binlog format.
For more information, see Binary Logging Formats
in the MySQL documentation. -
-
Stored functions that call tables with generated-always columns aren't supported. This applies to any Aurora MySQL stored function. To learn more about this column type, see CREATE TABLE and Generated Columns
in the MySQL documentation. -
Amazon Bedrock functions don't support
RETURNS JSON. You can useCONVERTorCASTto convert fromTEXTtoJSONif needed. -
Amazon Bedrock doesn't support batch requests.
-
Aurora MySQL supports any SageMaker AI endpoint that reads and writes the comma-separated value (CSV) format, through a
ContentTypeoftext/csv. This format is accepted by the following built-in SageMaker AI algorithms:-
Linear Learner
-
Random Cut Forest
-
XGBoost
To learn more about these algorithms, see Choose an Algorithm in the Amazon SageMaker AI Developer Guide.
-
Setting up your Aurora MySQL DB cluster to use Aurora machine learning
In the following topics, you can find separate setup procedures for each of these Aurora machine learning services.
Topics
Setting up your Aurora MySQL DB cluster to use Amazon Bedrock
Aurora machine learning relies on AWS Identity and Access Management (IAM) roles and policies to allow your Aurora MySQL DB cluster to access and use the Amazon Bedrock services. The following procedures create an IAM permission policy and role so that your DB cluster can integrate with Amazon Bedrock.
To create the IAM policy
Sign in to the AWS Management Console and open the IAM console at https://console.aws.amazon.com/iam/
. -
Choose Policies in the navigation pane.
-
Choose Create a policy.
-
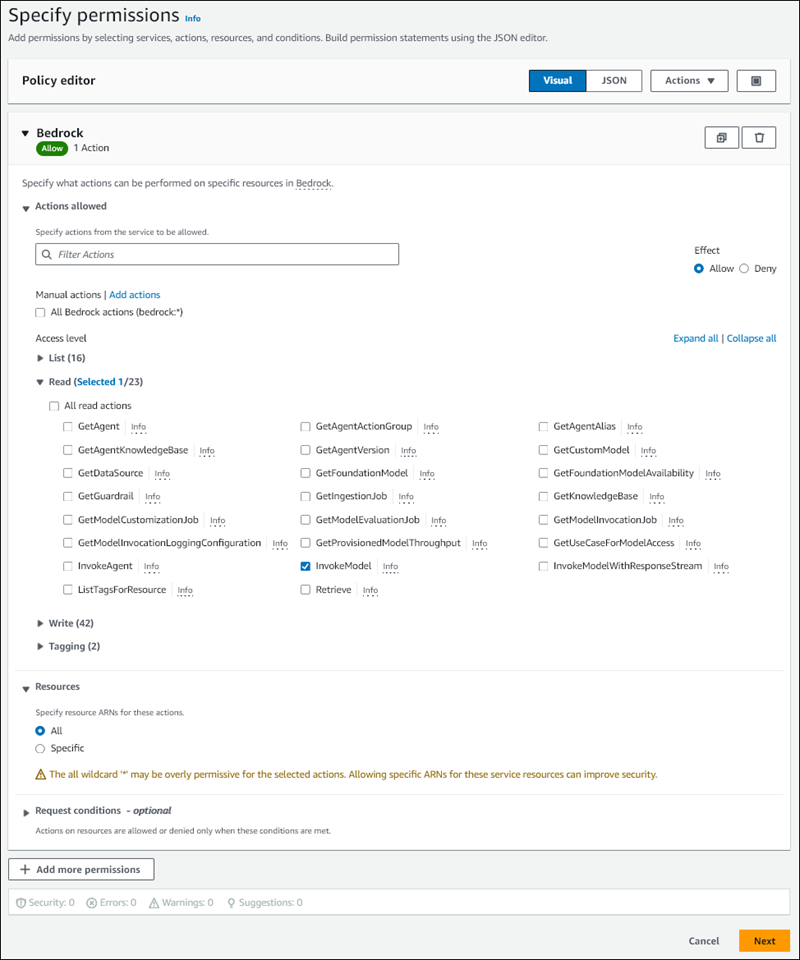
On the Specify permissions page, for Select a service, choose Bedrock.
The Amazon Bedrock permissions display.
-
Expand Read, then select InvokeModel.
-
For Resources, select All.
The Specify permissions page should resemble the following figure.
-
Choose Next.
-
On the Review and create page, enter a name for your policy, for example
BedrockInvokeModel. -
Review your policy, then choose Create policy.
Next you create the IAM role that uses the Amazon Bedrock permission policy.
To create the IAM role
Sign in to the AWS Management Console and open the IAM console at https://console.aws.amazon.com/iam/
. -
Choose Roles in the navigation pane.
-
Choose Create role.
-
On the Select trusted entity page, for Use case, choose RDS.
-
Select RDS - Add Role to Database, then choose Next.
-
On the Add permissions page, for Permissions policies, select the IAM policy that you created, then choose Next.
-
On the Name, review, and create page, enter a name for your role, for example
ams-bedrock-invoke-model-role.The role should resemble the following figure.

-
Review your role, then choose Create role.
Next you associate the Amazon Bedrock IAM role with your DB cluster.
To associate the IAM role with your DB cluster
Sign in to the AWS Management Console and open the Amazon RDS console at https://console.aws.amazon.com/rds/
. -
Choose Databases from the navigation pane.
-
Choose the Aurora MySQL DB cluster that you want to connect to Amazon Bedrock services.
-
Choose the Connectivity & security tab.
-
For Manage IAM roles section, choose Select IAM to add to this cluster.
-
Choose the IAM that you created, and then choose Add role.
The IAM role is associated with your DB cluster, first with the status Pending, then Active. When the process completes, you can find the role in the Current IAM roles for this cluster list.

You must add the ARN of this IAM role to the aws_default_bedrock_role parameter of the custom DB cluster
parameter group associated with your Aurora MySQL DB cluster. If your Aurora MySQL DB cluster doesn't use a custom DB
cluster parameter group, you need to create one to use with your Aurora MySQL DB cluster to complete the integration. For more
information, see DB cluster parameter groups for Amazon Aurora DB clusters.
To configure the DB cluster parameter
-
In the Amazon RDS Console, open the Configuration tab of your Aurora MySQL DB cluster.
-
Locate the DB cluster parameter group configured for your cluster. Choose the link to open your custom DB cluster parameter group, then choose Edit.
-
Find the
aws_default_bedrock_roleparameter in your custom DB cluster parameter group. -
In the Value field, enter the ARN of the IAM role.
-
Choose Save changes to save the setting.
-
Reboot the primary instance of your Aurora MySQL DB cluster so that this parameter setting takes effect.
The IAM integration for Amazon Bedrock is complete. Continue setting up your Aurora MySQL DB cluster to work with Amazon Bedrock by Granting database users access to Aurora machine learning.
Setting up your Aurora MySQL DB cluster to use Amazon Comprehend
Aurora machine learning relies on AWS Identity and Access Management roles and policies to allow your Aurora MySQL DB cluster to access and use the Amazon Comprehend services. The following procedure automatically creates an IAM role and policy for your cluster so that it can use Amazon Comprehend.
To set up your Aurora MySQL DB cluster to use Amazon Comprehend
Sign in to the AWS Management Console and open the Amazon RDS console at https://console.aws.amazon.com/rds/
. -
Choose Databases from the navigation pane.
-
Choose the Aurora MySQL DB cluster that you want to connect to Amazon Comprehend services.
-
Choose the Connectivity & security tab.
-
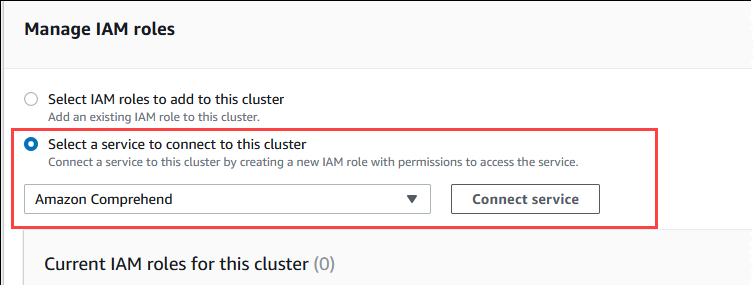
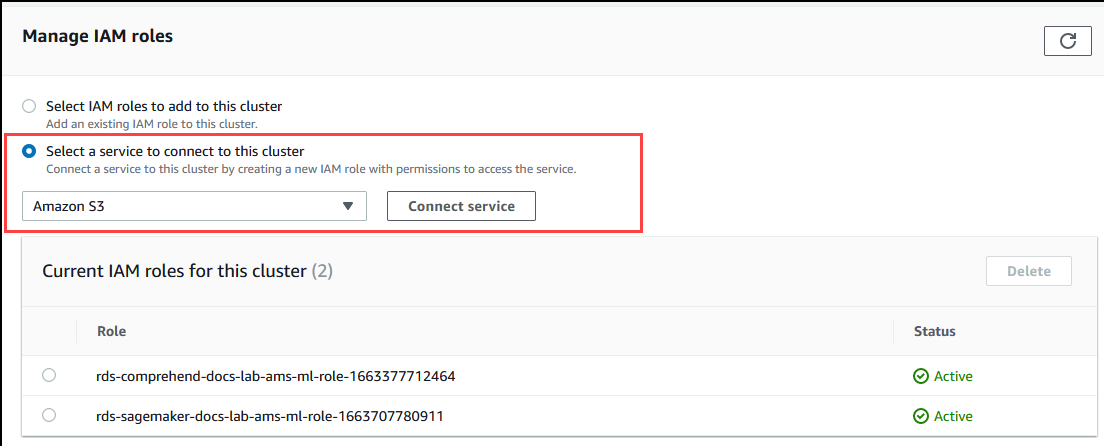
For Manage IAM roles section, choose Select a service to connect to this cluster.
-
Choose Amazon Comprehend from the menu, and then choose Connect service.
The Connect cluster to Amazon Comprehend dialog doesn't require any additional information. However, you might see a message notifying you that the integration between Aurora and Amazon Comprehend is currently in preview. Be sure to read the message before you continue. You can choose Cancel if you prefer not to proceed.
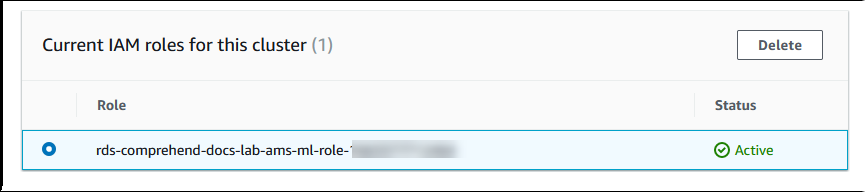
Choose Connect service to complete the integration process.
Aurora creates the IAM role. It also creates the policy that allows the Aurora MySQL DB cluster to use Amazon Comprehend services and attaches the policy to the role. When the process completes, you can find the role in the Current IAM roles for this cluster list as shown in the following image.
You need to add the ARN of this IAM role to the
aws_default_comprehend_roleparameter of the custom DB cluster parameter group associated with your Aurora MySQL DB cluster. If your Aurora MySQL DB cluster doesn't use a custom DB cluster parameter group, you need to create one to use with your Aurora MySQL DB cluster to complete the integration. For more information, see DB cluster parameter groups for Amazon Aurora DB clusters.After creating your custom DB cluster parameter group and associating it with your Aurora MySQL DB cluster, you can continue following these steps.
If your cluster uses a custom DB cluster parameter group, do as follows.
In the Amazon RDS Console, open the Configuration tab of your Aurora MySQL DB cluster.
-
Locate the DB cluster parameter group configured for your cluster. Choose the link to open your custom DB cluster parameter group, then choose Edit.
Find the
aws_default_comprehend_roleparameter in your custom DB cluster parameter group.In the Value field, enter the ARN of the IAM role.
Choose Save changes to save the setting. In the following image, you can find an example.

Reboot the primary instance of your Aurora MySQL DB cluster so that this parameter setting takes effect.
The IAM integration for Amazon Comprehend is complete. Continue setting up your Aurora MySQL DB cluster to work with Amazon Comprehend by granting access to the appropriate database users.
Setting up your Aurora MySQL DB cluster to use SageMaker AI
The following procedure automatically creates the IAM role and policy for your Aurora MySQL DB cluster
so that it can use SageMaker AI. Before trying to follow this procedure, be sure that you have the SageMaker AI endpoint
available so that you can enter it when needed. Typically, data scientists on your team would do the work to
produce an endpoint that you can use from your Aurora MySQL DB cluster. You can find such endpoints in the
SageMaker AI console

To set up your Aurora MySQL DB cluster to use SageMaker AI
Sign in to the AWS Management Console and open the Amazon RDS console at https://console.aws.amazon.com/rds/
. -
Choose Databases from the Amazon RDS navigation menu and then choose the Aurora MySQL DB cluster that you want to connect to SageMaker AI services.
-
Choose the Connectivity & security tab.
-
Scroll to the Manage IAM roles section, and then choose Select a service to connect to this cluster. Choose SageMaker AI from the selector.

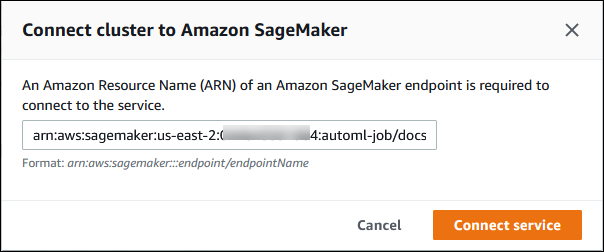
Choose Connect service.
In the Connect cluster to SageMaker AI dialog, enter the ARN of the SageMaker AI endpoint.
-
Aurora creates the IAM role. It also creates the policy that allows the Aurora MySQL DB cluster to use SageMaker AI services and attaches the policy to the role. When the process completes, you can find the role in the Current IAM roles for this cluster list.
Open the IAM console at https://console.aws.amazon.com/iam/
. Choose Roles from the Access management section of the AWS Identity and Access Management navigation menu.
Find the role from among those listed. Its name uses the following pattern.
rds-sagemaker-your-cluster-name-role-auto-generated-digitsOpen the role's Summary page and locate the ARN. Note the ARN or copy it using the copy widget.
Open the Amazon RDS console at https://console.aws.amazon.com/rds/
. Choose your Aurora MySQL DB cluster, and then choose its Configuration tab.
Locate the DB cluster parameter group, and choose the link to open your custom DB cluster parameter group. Find the
aws_default_sagemaker_roleparameter and enter the ARN of the IAM role in the Value field and Save the setting.Reboot the primary instance of your Aurora MySQL DB cluster so that this parameter setting takes effect.
The IAM setup is now complete. Continue setting up your Aurora MySQL DB cluster to work with SageMaker AI by granting access to the appropriate database users.
If you want to use your SageMaker AI models for training rather than using pre-built SageMaker AI components, you also need to add the Amazon S3 bucket to your Aurora MySQL DB cluster, as outlined in the Setting up your Aurora MySQL DB cluster to use Amazon S3 for SageMaker AI (Optional) that follows.
Setting up your Aurora MySQL DB cluster to use Amazon S3 for SageMaker AI (Optional)
To use SageMaker AI with your own models rather than using the pre-built components provided by SageMaker AI, you need to set up an Amazon S3 bucket for the Aurora MySQL DB cluster to use. For more information about creating an Amazon S3 bucket, see Creating a bucket in the Amazon Simple Storage Service User Guide.
To set up your Aurora MySQL DB cluster to use an Amazon S3 bucket for SageMaker AI
Sign in to the AWS Management Console and open the Amazon RDS console at https://console.aws.amazon.com/rds/
. -
Choose Databases from the Amazon RDS navigation menu and then choose the Aurora MySQL DB cluster that you want to connect to SageMaker AI services.
-
Choose the Connectivity & security tab.
-
Scroll to the Manage IAM roles section, and then choose Select a service to connect to this cluster. Choose Amazon S3 from the selector.
Choose Connect service.
In the Connect cluster to Amazon S3 dialog, enter the ARN of the Amazon S3 bucket, as shown in the following image.
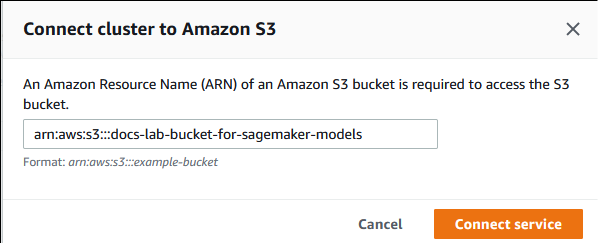
Choose Connect service to complete this process.
For more information about using Amazon S3 buckets with SageMaker AI, see Specify an Amazon S3 Bucket to Upload Training Datasets and Store Output Data in the Amazon SageMaker AI Developer Guide. To learn more about working with SageMaker AI, see Get Started with Amazon SageMaker AI Notebook Instancesin the in the Amazon SageMaker AI Developer Guide.
Granting database users access to Aurora machine learning
Database users must be granted permission to invoke Aurora machine learning functions. How you grant permission depends on the version of MySQL that you use for your Aurora MySQL DB cluster, as outlined in the following. How you do so depends on the version of MySQL that your Aurora MySQL DB cluster uses.
For Aurora MySQL version 3 (MySQL 8.0 compatible), database users must be granted the appropriate database role. For more informations, see Using Roles
in the MySQL 8.0 Reference Manual. For Aurora MySQL version 2 (MySQL 5.7 compatible), database users are granted privileges. For more information, see Access Control and Account Management
in the MySQL 5.7 Reference Manual.
The following table shows the roles and privileges that database users need to work with machine learning functions.
| Aurora MySQL version 3 (role) | Aurora MySQL version 2 (privilege) |
|---|---|
|
AWS_BEDROCK_ACCESS |
– |
|
AWS_COMPREHEND_ACCESS |
INVOKE COMPREHEND |
|
AWS_SAGEMAKER_ACCESS |
INVOKE SAGEMAKER |
Granting access to Amazon Bedrock functions
To give database users access to Amazon Bedrock functions, use the following SQL statement:
GRANT AWS_BEDROCK_ACCESS TOuser@domain-or-ip-address;
Database users also need to be granted EXECUTE permissions for the functions that you create for working
with Amazon Bedrock:
GRANT EXECUTE ON FUNCTIONdatabase_name.function_nameTOuser@domain-or-ip-address;
Finally, database users must have their roles set to
AWS_BEDROCK_ACCESS:
SET ROLE AWS_BEDROCK_ACCESS;
The Amazon Bedrock functions are now available for use.
Granting access to Amazon Comprehend functions
To give database users access to Amazon Comprehend functions, use the appropriate statement for your Aurora MySQL version.
Aurora MySQL version 3 (MySQL 8.0 compatible)
GRANT AWS_COMPREHEND_ACCESS TOuser@domain-or-ip-address;Aurora MySQL version 2 (MySQL 5.7 compatible)
GRANT INVOKE COMPREHEND ON *.* TOuser@domain-or-ip-address;
The Amazon Comprehend functions are now available for use. For usage examples, see Using Amazon Comprehend with your Aurora MySQL DB cluster.
Granting access to SageMaker AI functions
To give database users access to SageMaker AI functions, use the appropriate statement for your Aurora MySQL version.
Aurora MySQL version 3 (MySQL 8.0 compatible)
GRANT AWS_SAGEMAKER_ACCESS TOuser@domain-or-ip-address;Aurora MySQL version 2 (MySQL 5.7 compatible)
GRANT INVOKE SAGEMAKER ON *.* TOuser@domain-or-ip-address;
Database users also need to be granted EXECUTE permissions for the functions that you create for working with SageMaker AI.
Suppose that you created two functions, db1.anomoly_score and db2.company_forecasts, to invoke
the services of your SageMaker AI endpoint. You grant execute privileges as shown in the following example.
GRANT EXECUTE ON FUNCTION db1.anomaly_score TOuser1@domain-or-ip-address1; GRANT EXECUTE ON FUNCTION db2.company_forecasts TOuser2@domain-or-ip-address2;
The SageMaker AI functions are now available for use. For usage examples, see Using SageMaker AI with your Aurora MySQL DB cluster.
Using Amazon Bedrock with your Aurora MySQL DB cluster
To use Amazon Bedrock, you create a user-defined function (UDF) in your Aurora MySQL database that invokes a model. For more information, see Supported models in Amazon Bedrock in the Amazon Bedrock User Guide.
A UDF uses the following syntax:
CREATE FUNCTIONfunction_name(argumenttype) [DEFINER = user] RETURNSmysql_data_type[SQL SECURITY {DEFINER | INVOKER}] ALIAS AWS_BEDROCK_INVOKE_MODEL MODEL ID 'model_id' [CONTENT_TYPE 'content_type'] [ACCEPT 'content_type'] [TIMEOUT_MStimeout_in_milliseconds];
-
Amazon Bedrock functions don't support
RETURNS JSON. You can useCONVERTorCASTto convert fromTEXTtoJSONif needed. -
If you don't specify
CONTENT_TYPEorACCEPT, the default isapplication/json. -
If you don't specify
TIMEOUT_MS, the value foraurora_ml_inference_timeoutis used.
For example, the following UDF invokes the Amazon Titan Text Express model:
CREATE FUNCTION invoke_titan (request_body TEXT)
    RETURNS TEXT
    ALIAS AWS_BEDROCK_INVOKE_MODEL
    MODEL ID 'amazon.titan-text-express-v1'
    CONTENT_TYPE 'application/json'
    ACCEPT 'application/json';
To allow a DB user to use this function, use the following SQL command:
GRANT EXECUTE ON FUNCTIONdatabase_name.invoke_titan TOuser@domain-or-ip-address;
Then the user can call invoke_titan like any other function, as shown in the following example. Make sure to
format the request body according to the Amazon Titan text models.
CREATE TABLE prompts (request varchar(1024));
INSERT INTO prompts VALUES (
'{
    "inputText": "Generate synthetic data for daily product sales in various categories - include row number, product name, category, date of sale and price. Produce output in JSON format. Count records and ensure there are no more than 5.",
    "textGenerationConfig": {
        "maxTokenCount": 1024,
        "stopSequences": [],
        "temperature":0,
        "topP":1
    }
}');

SELECT invoke_titan(request) FROM prompts;

{"inputTextTokenCount":44,"results":[{"tokenCount":296,"outputText":"
```tabular-data-json
{
    "rows": [
        {
            "Row Number": "1",
            "Product Name": "T-Shirt",
            "Category": "Clothing",
            "Date of Sale": "2024-01-01",
            "Price": "$20"
        },
        {
            "Row Number": "2",
            "Product Name": "Jeans",
            "Category": "Clothing",
            "Date of Sale": "2024-01-02",
            "Price": "$30"
        },
        {
            "Row Number": "3",
            "Product Name": "Hat",
            "Category": "Accessories",
            "Date of Sale": "2024-01-03",
            "Price": "$15"
        },
        {
            "Row Number": "4",
            "Product Name": "Watch",
            "Category": "Accessories",
            "Date of Sale": "2024-01-04",
            "Price": "$40"
        },
        {
            "Row Number": "5",
            "Product Name": "Phone Case",
            "Category": "Accessories",
            "Date of Sale": "2024-01-05",
            "Price": "$25"
        }
    ]
}
```","completionReason":"FINISH"}]}
For other models that you use, make sure to format the request body appropriately for them. For more information, see Inference parameters for foundation models in the Amazon Bedrock User Guide.
Using Amazon Comprehend with your Aurora MySQL DB cluster
For Aurora MySQL, Aurora machine learning provides the following two built-in functions for working with Amazon Comprehend and your text data. You provide
the text to analyze (input_data) and specify the language (language_code).
- aws_comprehend_detect_sentiment
-
This function identifies the text as having a positive, negative, neutral, or mixed emotional posture. This function's reference documentation is as follows.
aws_comprehend_detect_sentiment(
  input_text,
  language_code
  [,max_batch_size]
)
To learn more, see Sentiment in the Amazon Comprehend Developer Guide.
- aws_comprehend_detect_sentiment_confidence
-
This function measures the confidence level of the sentiment detected for a given text. It returns a value (type,
double) that indicates the confidence of the sentiment assigned by the aws_comprehend_detect_sentiment function to the text. Confidence is a statistical metric between 0 and 1. The higher the confidence level, the more weight you can give the result. A summary of the function's documentation is as follows.aws_comprehend_detect_sentiment_confidence( input_text, language_code [,max_batch_size] )
In both functions (aws_comprehend_detect_sentiment_confidence, aws_comprehend_detect_sentiment) the max_batch_size uses
a default value of 25 if none is specified. Batch size should always
be greater than 0. You can use max_batch_size to tune the performance of the Amazon Comprehend function calls. A large batch
size trades off faster performance for greater memory usage on the Aurora MySQL DB cluster. For more information, see
Performance considerations for using Aurora machine learning with Aurora MySQL.
For more information about parameters and return types for the sentiment detection functions in Amazon Comprehend, see DetectSentiment
Example: A simple query using Amazon Comprehend functions
Here's an example of a simple query that invokes these two functions to see how happy your customers are with your support team.
Suppose you have a database table (support) that stores customer feedback after each request for help. This example
query applies both built-in functions to the text in the feedback column of the table and outputs
the results. The confidence values returned by the function are doubles between 0.0 and 1.0. For more readable output, this
query rounds the results to 6 decimal points. For easier comparisons, this query also sorts the results in descending order,
from the result having the highest degree of confidence, first.
SELECT feedback AS 'Customer feedback', aws_comprehend_detect_sentiment(feedback, 'en') AS Sentiment, ROUND(aws_comprehend_detect_sentiment_confidence(feedback, 'en'), 6) AS Confidence FROM support ORDER BY Confidence DESC;+----------------------------------------------------------+-----------+------------+ | Customer feedback | Sentiment | Confidence | +----------------------------------------------------------+-----------+------------+ | Thank you for the excellent customer support! | POSITIVE | 0.999771 | | The latest version of this product stinks! | NEGATIVE | 0.999184 | | Your support team is just awesome! I am blown away. | POSITIVE | 0.997774 | | Your product is too complex, but your support is great. | MIXED | 0.957958 | | Your support tech helped me in fifteen minutes. | POSITIVE | 0.949491 | | My problem was never resolved! | NEGATIVE | 0.920644 | | When will the new version of this product be released? | NEUTRAL | 0.902706 | | I cannot stand that chatbot. | NEGATIVE | 0.895219 | | Your support tech talked down to me. | NEGATIVE | 0.868598 | | It took me way too long to get a real person. | NEGATIVE | 0.481805 | +----------------------------------------------------------+-----------+------------+ 10 rows in set (0.1898 sec)
Example: Determining the average sentiment for text above a specific confidence level
A typical Amazon Comprehend query looks for rows where the sentiment is a certain value, with a confidence level greater than a certain number. For example, the following query shows how you can determine the average sentiment of documents in your database. The query considers only documents where the confidence of the assessment is at least 80%.
SELECT AVG(CASE aws_comprehend_detect_sentiment(productTable.document, 'en')
  WHEN 'POSITIVE' THEN 1.0
  WHEN 'NEGATIVE' THEN -1.0
  ELSE 0.0 END) AS avg_sentiment, COUNT(*) AS total
FROM productTable
WHERE productTable.productCode = 1302 AND
    aws_comprehend_detect_sentiment_confidence(productTable.document, 'en') >= 0.80;
Using SageMaker AI with your Aurora MySQL DB cluster
To use SageMaker AI functionality from your Aurora MySQL DB cluster, you need to create stored functions that embed your calls to the SageMaker AI
endpoint and its inference features. You do so by using MySQL's CREATE FUNCTION in generally the same way that
you do for other processing tasks on your Aurora MySQL DB cluster.
To use models deployed in SageMaker AI for inference, you create user-defined functions using MySQL data definition language (DDL) statements for stored functions. Each stored function represents the SageMaker AI endpoint hosting the model. When you define such a function, you specify the input parameters to the model, the specific SageMaker AI endpoint to invoke, and the return type. The function returns the inference computed by the SageMaker AI endpoint after applying the model to the input parameters.
All Aurora machine learning stored functions return numeric types or VARCHAR. You can use any numeric type except BIT.
Other types, such as JSON, BLOB, TEXT, and DATE aren't allowed.
The following example shows the CREATE FUNCTION syntax for working with SageMaker AI.
CREATE FUNCTION function_name (
     arg1 type1,
     arg2 type2, ...)
     [DEFINER = user]
  RETURNS mysql_type
  [SQL SECURITY { DEFINER | INVOKER } ]
  ALIAS AWS_SAGEMAKER_INVOKE_ENDPOINT
  ENDPOINT NAME 'endpoint_name'
  [MAX_BATCH_SIZE max_batch_size];
This is an extension of the regular CREATE FUNCTION DDL statement. In the
CREATE FUNCTION statement that defines the SageMaker AI function, you don't
specify a function body. Instead, you specify the keyword ALIAS where the
function body usually goes. Currently, Aurora machine learning only supports
aws_sagemaker_invoke_endpoint for this extended syntax. You must specify the
endpoint_name parameter. An SageMaker AI endpoint can have different characteristics for each model.
Note
For more information about CREATE FUNCTION, see
CREATE PROCEDURE and
CREATE FUNCTION Statements
The max_batch_size parameter is optional. By default, maximum batch size is 10,000.
You can use this parameter in your function to restrict the maximum number of inputs
processed in a batched request to SageMaker AI. The max_batch_size
parameter can help to avoid an error caused by inputs that are too large, or to make SageMaker AI
return a response more quickly. This parameter affects the size of an internal
buffer used for SageMaker AI request processing. Specifying too large a value for
max_batch_size might cause substantial memory overhead on your DB instance.
We recommend that you leave the MANIFEST setting at its default value of
OFF. Although you can use the MANIFEST ON option, some SageMaker AI
features can't directly use the CSV exported with this option. The manifest format is not
compatible with the expected manifest format from SageMaker AI.
You create a separate stored function for each of your SageMaker AI models. This mapping of functions to models is required because an endpoint is associated with a specific model, and each model accepts different parameters. Using SQL types for the model inputs and the model output type helps to avoid type conversion errors passing data back and forth between the AWS services. You can control who can apply the model. You can also control the runtime characteristics by specifying a parameter representing the maximum batch size.
Currently, all Aurora machine learning functions have the NOT DETERMINISTIC property. If you
don't specify that property explicitly, Aurora sets NOT DETERMINISTIC
automatically. This requirement is because the SageMaker AI model can be changed without any
notification to the database. If that happens, calls to an Aurora machine learning function might return
different results for the same input within a single transaction.
You can't use the characteristics CONTAINS SQL, NO SQL,
READS SQL DATA, or MODIFIES SQL DATA in your CREATE
FUNCTION statement.
Following is an example usage of invoking an SageMaker AI endpoint to detect anomalies. There is
an SageMaker AI endpoint random-cut-forest-model. The corresponding model is already
trained by the random-cut-forest algorithm. For each input, the model returns an
anomaly score. This example shows the data points whose score is greater than 3 standard
deviations (approximately the 99.9th percentile) from the mean score.
CREATE FUNCTION anomaly_score(value real) returns real
  alias aws_sagemaker_invoke_endpoint endpoint name 'random-cut-forest-model-demo';

set @score_cutoff = (select avg(anomaly_score(value)) + 3 * std(anomaly_score(value)) from nyc_taxi);

select *, anomaly_detection(value) score from nyc_taxi
  where anomaly_detection(value) > @score_cutoff;
Character set requirement for SageMaker AI functions that return strings
We recommend specifying a character set of utf8mb4 as the return type for your SageMaker AI
functions that return string values. If that isn't practical, use a large enough string length for the
return type to hold a value represented in the utf8mb4 character set. The following example
shows how to declare the utf8mb4 character set for your function.
CREATE FUNCTION my_ml_func(...) RETURNS VARCHAR(5) CHARSET utf8mb4 ALIAS ...Currently, each SageMaker AI function that returns a string uses the character set
utf8mb4 for the return value. The return value uses this character set even
if your SageMaker AI function declares a different character set for its return type implicitly or
explicitly. If your SageMaker AI function declares a different character set for the return value, the
returned data might be silently truncated if you store it in a table column that isn't
long enough. For example, a query with a DISTINCT clause creates a temporary
table. Thus, the SageMaker AI function result might be truncated due to the way strings are handled
internally during a query.
Exporting data to Amazon S3 for SageMaker AI model training (Advanced)
We recommend that you get started with Aurora machine learning and SageMaker AI by using some of the provided algorithms, and that the data scientists on your team provide you with the SageMaker AI endpoints that you can use with your SQL code. In the following, you can find minimal information about using your own Amazon S3 bucket with your your own SageMaker AI models and your Aurora MySQL DB cluster.
Machine learning consists of two major steps: training, and inference.
To train SageMaker AI models, you export data to an Amazon S3 bucket. The Amazon S3 bucket is used by a Jupyter SageMaker AI notebook
instance to train your model before it is deployed. You can use the SELECT INTO OUTFILE S3
statement to query data from an Aurora MySQL DB cluster and save it directly into text files stored in an Amazon S3
bucket. Then the notebook instance consumes the data from the Amazon S3 bucket for training.
Aurora machine learning extends the existing SELECT INTO OUTFILE syntax in Aurora MySQL to export data to CSV format.
The generated CSV file can be directly consumed by models that need this format for training purposes.
SELECT * INTO OUTFILE S3 's3_uri' [FORMAT {CSV|TEXT} [HEADER]] FROM table_name;The extension supports the standard CSV format.
-
Format
TEXTis the same as the existing MySQL export format. This is the default format. -
Format
CSVis a newly introduced format that follows the specification in RFC-4180. -
If you specify the optional keyword
HEADER, the output file contains one header line. The labels in the header line correspond to the column names from theSELECTstatement. -
You can still use the keywords
CSVandHEADERas identifiers.
The extended syntax and grammar of SELECT INTO is now as follows:
INTO OUTFILE S3 's3_uri'
[CHARACTER SET charset_name]
[FORMAT {CSV|TEXT} [HEADER]]
[{FIELDS | COLUMNS}
  [TERMINATED BY 'string']
  [[OPTIONALLY] ENCLOSED BY 'char']
  [ESCAPED BY 'char']
]
[LINES
  [STARTING BY 'string']
  [TERMINATED BY 'string']
]
Performance considerations for using Aurora machine learning with Aurora MySQL
The Amazon Bedrock, Amazon Comprehend, and SageMaker AI services do most of the work when invoked by an Aurora machine learning function. That means that you can scale those resources as needed, independently. For your Aurora MySQL DB cluster, you can make your function calls as efficient as possible. Following, you can find some performance considerations to note when working with Aurora machine learning.
Model and prompt
Performance when using Amazon Bedrock is highly dependent on the model and prompt that you use. Choose a model and prompt that are optimal for your use case.
Query cache
The Aurora MySQL query cache doesn't work for Aurora machine learning functions. Aurora MySQL doesn't store query results in the query cache for any SQL statements that call Aurora machine learning functions.
Batch optimization for Aurora machine learning function calls
The main Aurora machine learning performance aspect that you can influence from your Aurora cluster is the batch mode setting for calls to the Aurora machine learning stored functions. Machine learning functions typically require substantial overhead, making it impractical to call an external service separately for each row. Aurora machine learning can minimize this overhead by combining the calls to the external Aurora machine learning service for many rows into a single batch. Aurora machine learning receives the responses for all the input rows, and delivers the responses, one row at a time, to the query as it runs. This optimization improves the throughput and latency of your Aurora queries without changing the results.
When you create an Aurora stored function that's connected to an SageMaker AI endpoint, you define the batch size parameter. This parameter influences how many rows are transferred for every underlying call to SageMaker AI. For queries that process large numbers of rows, the overhead to make a separate SageMaker AI call for each row can be substantial. The larger the data set processed by the stored procedure, the larger you can make the batch size.
If the batch mode optimization can be applied to an SageMaker AI function, you can tell by checking the query plan produced by the
EXPLAIN PLAN statement. In this case, the extra column in the execution plan includes
Batched machine learning. The following example shows a call to an SageMaker AI function that uses batch
mode.
mysql> CREATE FUNCTION anomaly_score(val real) returns real alias aws_sagemaker_invoke_endpoint endpoint name 'my-rcf-model-20191126';
Query OK, 0 rows affected (0.01 sec)

mysql> explain select timestamp, value, anomaly_score(value) from nyc_taxi;
+----+-------------+----------+------------+------+---------------+------+---------+------+------+----------+--------------------------+
| id | select_type | table    | partitions | type | possible_keys | key  | key_len | ref  | rows | filtered | Extra                    |
+----+-------------+----------+------------+------+---------------+------+---------+------+------+----------+--------------------------+
|  1 | SIMPLE      | nyc_taxi | NULL       | ALL  | NULL          | NULL | NULL    | NULL |   48 |   100.00 | Batched machine learning |
+----+-------------+----------+------------+------+---------------+------+---------+------+------+----------+--------------------------+
1 row in set, 1 warning (0.01 sec)
When you call one of the built-in Amazon Comprehend functions, you can control the batch size by specifying the optional
max_batch_size parameter. his parameter restricts the maximum number of input_text values
processed in each batch. By sending multiple items at once, it reduces the number of round trips between Aurora and Amazon Comprehend.
Limiting the batch size is useful in situations such as a query with a LIMIT clause. By using a small value for
max_batch_size, you can avoid invoking Amazon Comprehend more times than you have input texts.
The batch optimization for evaluating Aurora machine learning functions applies in the following cases:
-
Function calls within the select list or the
WHEREclause ofSELECTstatements -
Function calls in the
VALUESlist ofINSERTandREPLACEstatements -
SageMaker AI functions in
SETvalues inUPDATEstatements:INSERT INTO MY_TABLE (col1, col2, col3) VALUES (ML_FUNC(1), ML_FUNC(2), ML_FUNC(3)), (ML_FUNC(4), ML_FUNC(5), ML_FUNC(6)); UPDATE MY_TABLE SET col1 = ML_FUNC(col2), SET col3 = ML_FUNC(col4) WHERE ...;
Monitoring Aurora machine learning
You can monitor Aurora machine learning batch operations by querying several global variables, as shown in the following example.
show status like 'Aurora_ml%';
You can reset the status variables by using a FLUSH STATUS statement. Thus, all of the figures represent totals,
averages, and so on, since the last time the variable was reset.
Aurora_ml_logical_request_cnt-
The number of logical requests that the DB instance has evaluated to be sent to the Aurora machine learning services since the last status reset. Depending on whether batching has been used, this value can be higher than
Aurora_ml_actual_request_cnt. Aurora_ml_logical_response_cnt-
The aggregate response count that Aurora MySQL receives from the Aurora machine learning services across all queries run by users of the DB instance.
Aurora_ml_actual_request_cnt-
The aggregate request count that Aurora MySQL makes to the Aurora machine learning services across all queries run by users of the DB instance.
Aurora_ml_actual_response_cnt-
The aggregate response count that Aurora MySQL receives from the Aurora machine learning services across all queries run by users of the DB instance.
Aurora_ml_cache_hit_cnt-
The aggregate internal cache hit count that Aurora MySQL receives from the Aurora machine learning services across all queries run by users of the DB instance.
Aurora_ml_retry_request_cnt-
The number of retried requests that the DB instance has sent to the Aurora machine learning services since the last status reset.
Aurora_ml_single_request_cnt-
The aggregate count of Aurora machine learning functions that are evaluated by non-batch mode across all queries run by users of the DB instance.
For information about monitoring the performance of the SageMaker AI operations called from Aurora machine learning functions, see Monitor Amazon SageMaker AI.
