Create an Amazon FinSpace environment
Important
Amazon FinSpace Dataset Browser will be discontinued on March 26,
2025. Starting November 29, 2023, FinSpace will no longer accept the creation of new Dataset Browser
environments. Customers using Amazon FinSpace with Managed Kdb Insights
An Amazon FinSpace environment is created from an AWS account. To create a FinSpace environment, the user performing the actions must have IAM permissions for AdministratorAccess or the FinSpace managed policy attached to their role.
To create a FinSpace environment
-
Sign in to your AWS account and open FinSpace from the AWS Management Console. It is located under Analytics, and you can find it by searching for FinSpace. Your AWS account number is displayed for verification purposes.
-
Choose Create Environment.

-
Enter a name for your FinSpace environment under Environment name.
-
(Optional) Add Environment description.
-
Select a symmetric encryption KMS key to encrypt data in your FinSpace environment. If a KMS key is not available in the region where you want to create your FinSpace environment, create a new key.
For more information, see Creating keys in the AWS Key Management Service Developer Guide
-
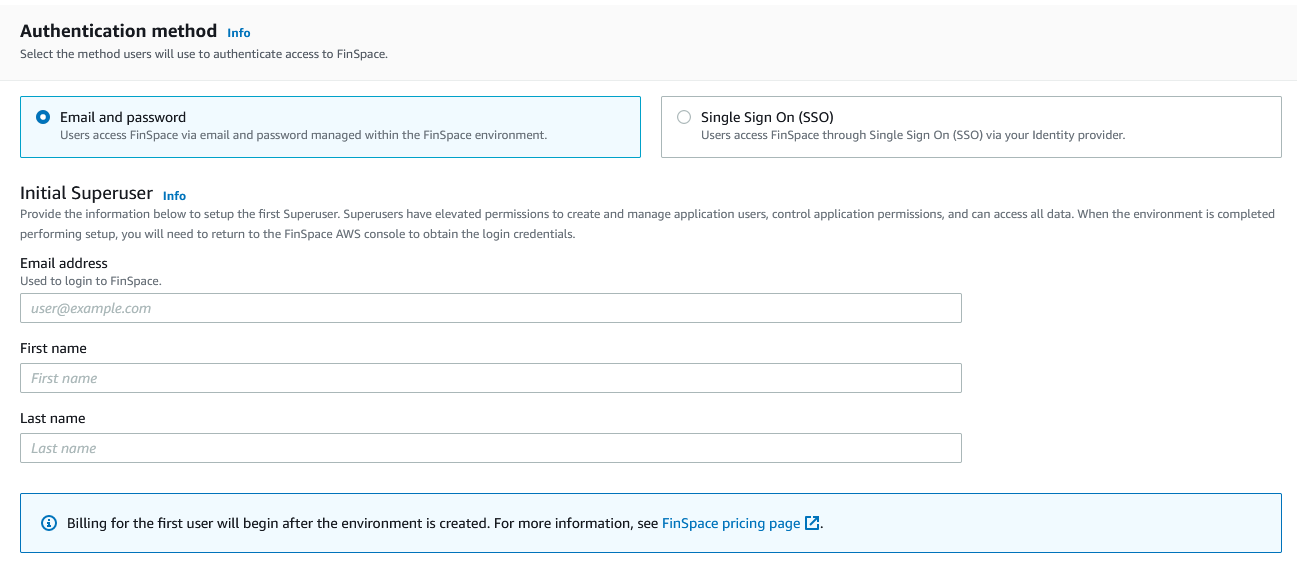
Select an authentication method for the environment from the following options:
Warning
Selected authentication method cannot be changed once an environment is created.
-
Email and password: You must specify an initial superuser. A superuser has elevated permissions to create and manage application users, control application permissions and access all data. When the environment is completed performing setup, you will need to return to the FinSpace AWS console to obtain the sign in credentials from the environment details page. Enter the following information for the superuser:
-
Enter the Email address.
-
Enter First name.
-
Enter Last Name.
-
-
Single Sign On:
-
Enter the name of your SAML 2.0 Identity Provider (IdP) which will be used for authentication.
-
You can choose to either upload SAML metadata document or enter the SAML metadata document URL issued by your IdP. Learn more about SAML 2.0 based SSO support in FinSpace.
-
Provide the attribute definition from your SAML 2.0 compliant identity provider (IdP) for the email field. Refer to the documentation of your IdP to determine the correct format for the attribute. An example for email attribute is
http://schemas.xmlsoap.org/ws/2005/05/identity/claims/emailaddress.
-
-
-
Choose Create Environment. The environment creation process has now begun and it will take 50-60 minutes to finish in the background. You can return to other activities while the environment is being created.

After the environment is created, a domain URL will be generated which is the sign-in url for your FinSpace web application.
Note
Review Inter-network traffic privacy in Amazon FinSpace Dataset browser to ensure that your FinSpace web application is accessible to users.
Setup additional superusers
After your Amazon FinSpace environment is created, you can create additional superusers and configure permission groups from within the FinSpace web application. A superuser has all permissions to take all actions in FinSpace. The first superuser is created when the environment is created in the AWS console page. After the superuser is created, the superuser uses the credentials to login to the FinSpace web application for the first time.
To create a superuser
-
Sign in to your AWS account in which the FinSpace environment was created and open FinSpace from the AWS management console. It is located under Analytics, and you can find it by searching for FinSpace. Your AWS account number is displayed for verification purposes.
-
Select the FinSpace environment for which a superuser will be created.
-
In the section, superusers, choose Add superuser.
-
Enter the Email address.
-
Enter First name.
-
Enter Last name.
-
Choose Next.
-
Review the superuser details.
-
Choose Create and view credentials. Note that if you have created an environment with SSO, you will not receive a temporary password as you will be authenticated with your IdP.
The credentials of superusers, who have yet to sign in, are listed in a banner at the top of the environment details page.
Share the credentials with the person designated as the superuser. The credentials are necessary to sign in to your FinSpace web application. The Domain is the sign-in url for your FinSpace web application.
AWS tags
You can optionally assign tags to an Amazon FinSpace environment. A tag is a label that you assign to an AWS resource. Each tag consists of a key and an optional value, both of which you define. If you're using AWS Identity and Access Management, you can control which users in your AWS account have permission to create, edit, or delete tags.
To add a new tag in your FinSpace environment
-
Sign in to your AWS account and open FinSpace from the AWS Management Console. It is located under Analytics, and you can find it by searching for FinSpace. Your AWS account number is displayed for verification purposes.
-
Select the FinSpace environment to manage and add tags.
-
Under the Tags section, choose Manage Tags.
-
To add a new tag, choose Add new tag. Add tag details.
-
Choose Save changes.
To delete an existing tag in your FinSpace environment
-
Sign in to your AWS account and open FinSpace from the AWS Management Console. It is located under Analytics, and you can find it by searching for FinSpace. Your AWS account number is displayed for verification purposes.
-
Select the FinSpace environment to manage and add tags.
-
Under the Tags section, choose Manage Tags.
-
Choose Remove for the tag you want to remove.
-
Choose Save changes.
