Automatically build and deploy a Java application to Amazon EKS using a CI/CD pipeline
MAHESH RAGHUNANDANAN, Jomcy Pappachen, and James Radtke, Amazon Web Services
Summary
This pattern describes how to create a continuous integration and continuous delivery (CI/CD) pipeline that automatically builds and deploys a Java application with recommended DevSecOps practices to an Amazon Elastic Kubernetes Service (Amazon EKS) cluster on the AWS Cloud. This pattern uses a greeting application developed with a Spring Boot Java framework and that uses Apache Maven.
You can use this pattern’s approach to build the code for a Java application, package the application artifacts as a Docker image, security scan the image, and upload the image as a workload container on Amazon EKS. This pattern's approach is useful if you want to migrate from a tightly coupled monolithic architecture to a microservices architecture. The approach also helps you to monitor and manage the entire lifecycle of a Java application, which ensures a higher level of automation and helps avoid errors or bugs.
Prerequisites and limitations
Prerequisites
An active AWS account.
AWS Command Line Interface (AWS CLI) version 2, installed and configured. For more information about this, see Installing or updating to the latest version of the AWS CLI in the AWS CLI documentation.
AWS CLI version 2 must be configured with the same AWS Identity and Access Management (IAM) role that creates the Amazon EKS cluster, because only that role is authorized to add other IAM roles to the
aws-authConfigMap. For information and steps to configure AWS CLI, see Configuring settings in the AWS CLI documentation.IAM roles and permissions with full access to AWS CloudFormation. For more information about this, see Controlling access with IAM in the CloudFormation documentation.
An existing Amazon EKS cluster, with details of the IAM role name and the Amazon Resource Name (ARN) of the IAM role for worker nodes in the EKS cluster.
Kubernetes Cluster Autoscaler, installed and configured in your Amazon EKS cluster. For more information, see Scale cluster compute with Karpenter and Cluster Autoscaler in the Amazon EKS documentation.
Access to code in the GitHub repository.
Important
AWS Security Hub is enabled as part of the CloudFormation templates that are included in the code for this pattern. By default, after Security Hub is enabled, it comes with a 30–day free trial. After the trial, there is a cost associated with this AWS service. For more information about pricing, see AWS Security Hub pricing
Product versions
Helm version 3.4.2 or later
Apache Maven version 3.6.3 or later
BridgeCrew Checkov version 2.2 or later
Aqua Security Trivy version 0.37 or later
Architecture
Technology stack
AWS CodeBuild
AWS CodeCommit
Notice: AWS CodeCommit is no longer available to new customers. Existing customers of AWS CodeCommit can continue to use the service as normal. Learn more
. However, this solution will work with any version control system (VCS) Git provider such as GitHub or GitLab with minimal changes. Amazon CodeGuru
AWS CodePipeline
Amazon Elastic Container Registry (Amazon ECR)
Amazon EKS
Amazon EventBridge
AWS Security Hub
Amazon Simple Notification Service (Amazon SNS)
Target architecture
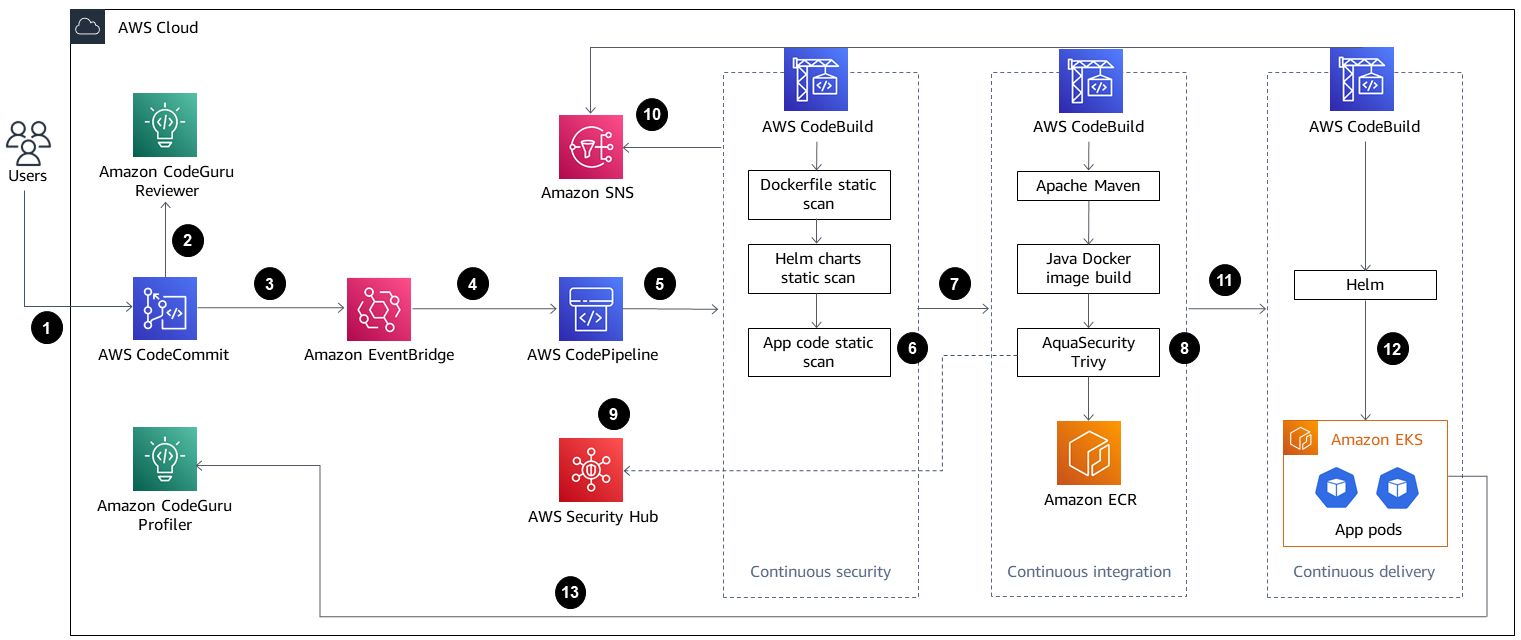
The diagram shows the following workflow:
The developer updates the Java application code in the base branch of the CodeCommit repository, which creates a pull request (PR).
As soon as the PR is submitted, Amazon CodeGuru Reviewer automatically reviews the code, analyzes it based on best practices for Java, and gives recommendations to the developer.
After the PR is merged to the base branch, an Amazon EventBridge event is created.
The EventBridge event initiates the CodePipeline pipeline, which starts.
CodePipeline runs the CodeSecurity Scan stage (continuous security).
AWS CodeBuild starts the security scan process in which the Dockerfile and Kubernetes deployment Helm files are scanned by using Checkov, and application source code is scanned based on incremental code changes. The application source code scan is performed by the CodeGuru Reviewer Command Line Interface (CLI) wrapper
. If the security scan stage is successful, the Build stage (continuous integration) is initiated.
In the Build stage, CodeBuild builds the artifact, packages the artifact to a Docker image, scans the image for security vulnerabilities by using Aqua Security Trivy, and stores the image in Amazon ECR.
The vulnerabilities detected from step 8 are uploaded to Security Hub for further analysis by developers or engineers. Security Hub provides an overview and recommendations for remediating the vulnerabilities.
Email notifications of sequential phases within the CodePipeline pipeline are sent through Amazon SNS.
After the continuous integration phases are complete, CodePipeline enters the Deploy stage (continuous delivery).
The Docker image is deployed to Amazon EKS as a container workload (pod) by using Helm charts.
The application pod is configured with Amazon CodeGuru Profiler agent, which sends the profiling data of the application (CPU, heap usage, and latency) to CodeGuru Profiler, which helps developers understand the behavior of the application.
Tools
AWS services
CloudFormation helps you set up AWS resources, provision them quickly and consistently, and manage them throughout their lifecycle across AWS accounts and Regions.
AWS CodeBuild is a fully managed build service that helps you compile source code, run unit tests, and produce artifacts that are ready to deploy.
AWS CodeCommit is a version control service that helps you privately store and manage Git repositories, without needing to manage your own source control system.
Notice: AWS CodeCommit is no longer available to new customers. Existing customers of AWS CodeCommit can continue to use the service as normal. Learn more
Amazon CodeGuru Profiler collects runtime performance data from your live applications, and provides recommendations that can help you fine-tune your application performance.
Amazon CodeGuru Reviewer uses program analysis and machine learning to detect potential defects that are difficult for developers to find and offers suggestions for improving your Java and Python code.
AWS CodePipeline helps you quickly model and configure the different stages of a software release and automate the steps required to release software changes continuously.
Amazon Elastic Container Registry (Amazon ECR) is a managed container image registry service that’s secure, scalable, and reliable.
Amazon Elastic Kubernetes Service (Amazon EKS) helps you run Kubernetes on AWS without needing to install or maintain your own Kubernetes control plane or nodes.
Amazon EventBridge is a serverless event bus service that helps you connect your applications with real-time data from a variety of sources, including AWS Lambda functions, HTTP invocation endpoints using API destinations, or event buses in other AWS accounts.
AWS Identity and Access Management (IAM) helps you securely manage access to your AWS resources by controlling who is authenticated and authorized to use them.
AWS Security Hub provides a comprehensive view of your security state on AWS. It also helps you check your AWS environment against security industry standards and best practices.
Amazon Simple Notification Service (Amazon SNS) helps you coordinate and manage the exchange of messages between publishers and clients, including web servers and email addresses.
Amazon Simple Storage Service (Amazon S3) is a cloud-based object storage service that helps you store, protect, and retrieve any amount of data.
Other services
Helm
is an open-source package manager for Kubernetes. Apache Maven
is a software project management and comprehension tool. BridgeCrew Checkov
is a static code analysis tool for scanning infrastructure as code (IaC) files for misconfigurations that might lead to security or compliance problems. Aqua Security Trivy
is a comprehensive scanner for vulnerabilities in container images, file systems, and Git repositories, in addition to configuration issues.
Code
The code for this pattern is available in the GitHub aws-codepipeline-devsecops-amazoneks
Best practices
This pattern follows IAM security best practices to apply the principle of least privilege for IAM entities across all phases of the solution. If you want to extend the solution with additional AWS services or third-party tools, we recommend that you review the section on applying least-privilege permissions in the IAM documentation.
If you have multiple Java applications, we recommend that you create separate CI/CD pipelines for each application.
If you have a monolith application, we recommend that you break the application into microservices where possible. Microservices are more flexible, they make it easier to deploy applications as containers, and they provide better visibility into the overall build and deployment of the application.
Epics
| Task | Description | Skills required |
|---|---|---|
Clone the GitHub repository. | To clone the repository, run the following command.
| App developer, DevOps engineer |
Create an S3 bucket and upload the code. |
| AWS DevOps, Cloud administrator, DevOps engineer |
Create an CloudFormation stack. |
| AWS DevOps, DevOps engineer |
Validate the CloudFormation stack deployment. |
| AWS DevOps, DevOps engineer |
Delete the S3 bucket. | Empty and delete the S3 bucket that you created earlier. For more information, see Deleting a bucket in the Amazon S3 documentation. | AWS DevOps, DevOps engineer |
| Task | Description | Skills required |
|---|---|---|
Configure the Helm charts of your Java application. |
| DevOps engineer |
Validate Helm charts for syntax errors. |
| DevOps engineer |
| Task | Description | Skills required |
|---|---|---|
Create the CI/CD pipeline. |
| AWS DevOps |
| Task | Description | Skills required |
|---|---|---|
Turn on Aqua Security integration. | This step is required for uploading the Docker image vulnerability findings reported by Trivy to Security Hub. Because CloudFormation doesn’t support Security Hub integrations, this process must be done manually.
| AWS administrator, DevOps engineer |
| Task | Description | Skills required |
|---|---|---|
Allow CodeBuild to run Helm or kubectl commands in the Amazon EKS cluster. | For CodeBuild to be authenticated to use Helm or ImportantThe following procedure must be completed before the deployment approval stage in CodePipeline.
The | DevOps |
| Task | Description | Skills required |
|---|---|---|
Verify that the CI/CD pipeline automatically initiates. |
For more information about starting the pipeline by using CodePipeline, see Start a pipeline in CodePipeline, Start a pipeline manually, and Start a pipeline on a schedule in the CodePipeline documentation. | DevOps |
Approve the deployment. |
| DevOps |
Validate application profiling. | After the deployment is complete and the application pod is deployed in Amazon EKS, the Amazon CodeGuru Profiler agent that is configured in the application will try to send profiling data of the application (CPU, heap summary, latency, and bottlenecks) to CodeGuru Profiler. For the initial deployment of an application, CodeGuru Profiler takes about 15 minutes to visualize the profiling data. | AWS DevOps |
Related resources
Additional information
AWS CodeCommit is no longer available to new customers. Existing customers of AWS CodeCommit can continue to use the service as normal. Learn more
. This solution will also work with any version control system (VCS) Git provider such as GitHub or GitLab with minimal changes. CodeGuru Profiler should not be confused with the AWS X-Ray service in terms of functionality. We recommend that you use CodeGuru Profiler to identify the most expensive lines of codes that might cause bottlenecks or security issues, and fix them before they become a potential risk. The X-Ray service is for application performance monitoring.
In this pattern, event rules are associated with the default event bus. If needed, you can extend the pattern to use a custom event bus.
This pattern uses CodeGuru Reviewer as a static application security testing (SAST) tool for application code. You can also use this pipeline for other tools, such as SonarQube or Checkmarx. You can add the scan setup instructions for any of these tools to
buildspec/buildspec_secscan.yamlto replace the CodeGuru scan instructions.
