Register multiple AWS accounts with a single email address by using Amazon SES
Joe Wozniak and Shubhangi Vishwakarma, Amazon Web Services
Summary
This pattern describes how you can decouple real email addresses from the email address that’s associated with an AWS account. AWS accounts require a unique email address to be provided at the time of account creation. In some organizations, the team that manages AWS accounts must take on the burden of managing many unique email addresses with their messaging team. This can be difficult for large organizations that manage many AWS accounts. Additionally, if your email system doesn’t allow plus addressing or sub-addressing as defined in Sieve Email Filtering: Subaddress Extension (RFC 5233)admin+123456789123@example.com—this pattern can help overcome this limitation.
This pattern provides a unique email address vending solution that enables AWS account owners to associate one email address with multiple AWS accounts. The real email addresses of AWS account owners are then associated with these generated email addresses in a table. The solution handles all incoming email for the unique email accounts, looks up the owner of each account, and then forwards any received messages to the owner.
Prerequisites and limitations
Prerequisites
Administrative access to an AWS account.
Access to a development environment.
(Optional) Familiarity with AWS Cloud Development Kit (AWS CDK) workflows and the Python programming language will help you troubleshoot any issues or make modifications.
Limitations
Overall vended email address length of 64 characters. For details, see CreateAccount in the AWS Organizations API reference.
Product versions
Node.js version 22.x or later
Python 3.13 or later
Python packages pip and virtualenv
AWS CDK CLI version 2.1019.2 or later
Docker 20.10.x or later
Architecture
Target technology stack
AWS CloudFormation stack
AWS Lambda functions
Amazon Simple Email Service (Amazon SES) rule and rule set
AWS Identity and Access Management (IAM) roles and policies
Amazon Simple Storage Service (Amazon S3) bucket and bucket policy
AWS Key Management Service (AWS KMS) key and key policy
Amazon Simple Notification Service (Amazon SNS) topic and topic policy
Amazon DynamoDB table
Target architecture
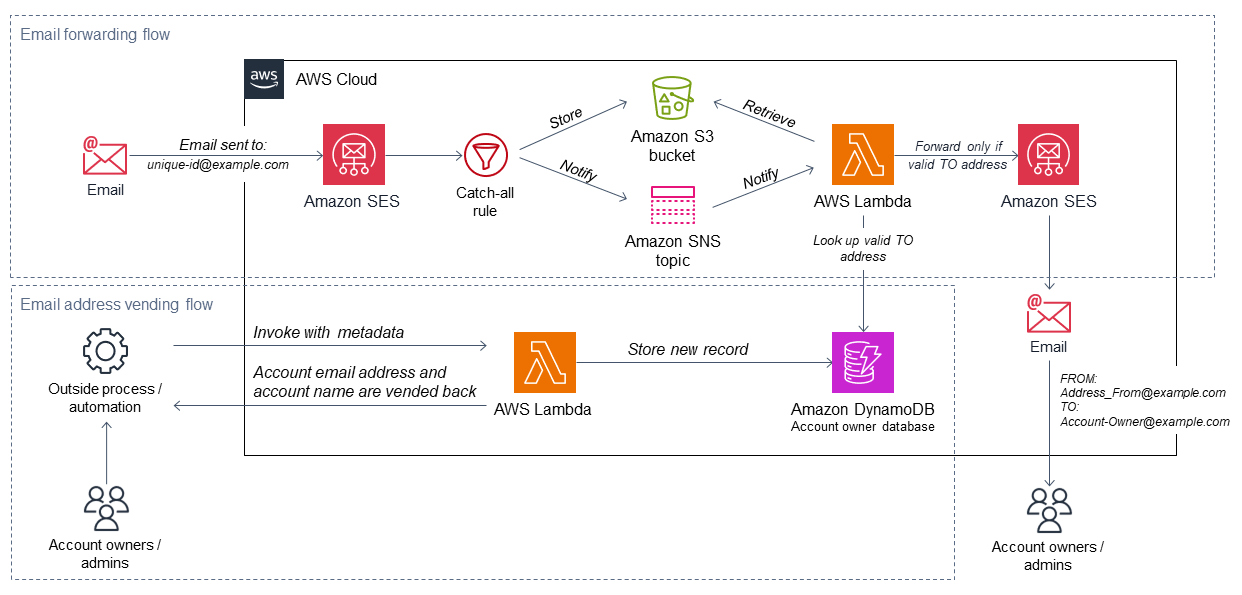
This diagram shows two flows:
Email address vending flow: In the diagram, the email address vending flow (lower section) begins typically with an account vending solution or outside automation, or is invoked manually. In the request, a Lambda function is called with a payload that contains the needed metadata. The function uses this information to generate a unique account name and email address, stores it in a DynamoDB database, and returns the values to the caller. These values can then be used to create a new AWS account (typically by using AWS Organizations).
Email forwarding flow: This flow is illustrated in the upper section of the previous diagram. When an AWS account is created by using the account email generated from the email address vending flow, AWS sends various emails, such as account registration confirmation and periodic notifications, to that email address. By following the steps in this pattern, you configure your AWS account with Amazon SES to receive emails for the entire domain. This solution configures forwarding rules that allow Lambda to process all incoming emails, check to see if the
TOaddress is in the DynamoDB table, and forward the message to the account owner's email address instead. Using this process gives account owners the ability to associate multiple accounts with one email address.
Automation and scale
This pattern uses the AWS CDK to fully automate the deployment. The solution uses AWS managed services that will (or can be configured to) scale automatically to meet your needs. The Lambda functions might require additional configuration to meet your scaling needs. For more information, see Understanding Lambda function scaling in the Lambda documentation.
Tools
AWS services
AWS CloudFormation helps you set up AWS resources, provision them quickly and consistently, and manage them throughout their lifecycle across AWS accounts and Regions.
AWS Command Line Interface (AWS CLI) is an open-source tool that helps you interact with AWS services through commands in your command-line shell.
Amazon DynamoDB is a fully managed NoSQL database service that provides fast, predictable, and scalable performance.
AWS Identity and Access Management (IAM) helps you securely manage access to your AWS resources by controlling who is authenticated and authorized to use them.
AWS Key Management Service (AWS KMS) helps you create and control cryptographic keys to help protect your data.
AWS Lambda is a compute service that helps you run code without needing to provision or manage servers. It runs your code only when needed and scales automatically, so you pay only for the compute time that you use.
Amazon Simple Email Service (Amazon SES) helps you send and receive emails by using your own email addresses and domains.
Amazon Simple Notification Service (Amazon SNS) helps you coordinate and manage the exchange of messages between publishers and clients, including web servers and email addresses.
Amazon Simple Storage Service (Amazon S3) is a cloud-based object storage service that helps you store, protect, and retrieve any amount of data.
Tools needed for deployment
Development environment with the AWS CLI and IAM access to your AWS account. For details, see the links in the Related resources section.
On your development system, install the following:
Git command line tool, available from the Git downloads website
. The AWS CLI to configure access credentials for the AWS CDK. For more information, see the AWS CLI documentation.
Python version 3.13 or later, available from the Python downloads website
. UV for Python package management. For installation instructions, see the UV installation guide
. Node.js version 22.x or later. For installation instructions, see the Node.js documentation
. AWS CDK CLI version 2.1019.2 or later. For installation instructions, see the AWS CDK documentation.
Docker version 20.10.x or later. For installation instructions, see the Docker documentation
.
Code
The code for this pattern is available in the GitHub AWS account factory email
Epics
| Task | Description | Skills required |
|---|---|---|
Identify or create an AWS account. | Identify an existing or new AWS account to which you have full administrative access, to deploy the email solution. | AWS administrator, Cloud administrator |
Set up a deployment environment. | Configure an easy to use deployment environment and set up dependencies by following these steps:
| AWS DevOps, App developer |
| Task | Description | Skills required |
|---|---|---|
Identify and allocate a domain. | The email forwarding functionality requires a dedicated domain. Identify and allocate a domain or subdomain that you can verify with Amazon SES. This domain should be available to receive incoming email within the AWS account where the email forwarding solution is deployed. Domain requirements:
| Cloud administrator, Network administrator, DNS administrator |
Verify the domain. | Verify that the identified domain can be used to accept incoming email. Complete the instructions in Verifying your domain for Amazon SES email receiving in the Amazon SES documentation. This will require coordination with the person or team who is responsible for the domain's DNS records. | App developer, AWS DevOps |
Set up MX records. | Set up your domain with MX records that point to the Amazon SES endpoints in your AWS account and Region. For more information, see Publishing an MX record for Amazon SES email receiving in the Amazon SES documentation. | Cloud administrator, Network administrator, DNS administrator |
| Task | Description | Skills required |
|---|---|---|
Modify the default values in | Edit some of the default values in the
| App developer, AWS DevOps |
Deploy the email vending and forwarding solution. |
| App developer, AWS DevOps |
Verify that the solution has been deployed. | Verify that the solution deployed successfully before you begin testing:
| App developer, AWS DevOps |
| Task | Description | Skills required |
|---|---|---|
Verify that the API is working. | In this step, you submit test data to the solution's API and confirm that the solution produces the expected output and that backend operations have been performed as expected. Manually run the Vend Email Lambda function by using test input. (For an example, see the sample_vend_request.json file | App developer, AWS DevOps |
Verify that email is being forwarded. | In this step, you send a test email through the system and verify that the email is forwarded to the expected recipient.
| App developer, AWS DevOps |
Troubleshooting
| Issue | Solution |
|---|---|
The system doesn’t forward email as expected. | Verify that your setup is correct:
After you verify your domain setup, follow these steps:
|
When you try to deploy the AWS CDK stack, you receive an error similar to: "Template format error: Unrecognized resource types" | In most instances, this error message means that the Region you’re targeting doesn’t have all the available AWS services. If you’re using an Amazon EC2 instance to deploy the solution, you might be targeting a Region that is different from the Region where the instance is running. NoteBy default, the AWS CDK deploys to the Region and account that you configured in the AWS CLI. Possible solutions:
|
When you deploy the solution, you receive the error message: "Deployment failed: Error: AwsMailFwdStack: SSM parameter /cdk-bootstrap/hnb659fds/version not found. Has the environment been bootstrapped? Please run 'cdk bootstrap'" | If you have never deployed any AWS CDK resources to the AWS account and Region you’re targeting, you will have to first run the To solve this problem, set the |
Related resources
For help installing the AWS CLI, see Installing or updating to the latest version of the AWS CLI.
For help setting up the AWS CLI with IAM access credentials, see Configuring settings for the AWS CLI.
For help with the AWS CDK, see Getting started with the AWS CDK.
Additional information
Costs
When you deploy this solution, the AWS account holder might incur costs that are associated with the use of the following services. It is important for you to understand how these services are billed so you are aware of any potential charges. For pricing information, see the following pages:
