Set up queued callback by creating flows, queues, and routing profiles in Amazon Connect
You can allow your customers to maintain their position in queue without requiring them to stay on the call during high wait times, and get a callback from an available agent when it's their turn.
Contents
How callbacks keep their place in queue
Callbacks can be configured to remain in the same queue as the original inbound call or to be placed in a separate dedicated queue that you create. This separate queue enables you to get a clearer delineation between active inbound calls and callbacks in real time reports.
You can ensure that the callback maintains its position in queue even when you place it in a dedicated queue by configuring it at the same priority as the original inbound queue in the routing profile. This ensures that Amazon Connect continues to look at the original start time of the inbound call to maintain order, regardless of whether the customer opted for a callback or to stay on the call for the next available agent.
Amazon Connect evaluates the routing profiles first so if the two queues have the same priority, the oldest call is pushed first across all queues with the same priorities. For example, if your original call arrived at 10:00 and left a callback request at 10:05, Amazon Connect looks for the call start time of 10:00, not 10:05.
Steps to set up queued callbacks
Use the steps provided in the following overview to set up queued callback.
-
Set up a queue specifically for callbacks. In your real-time metrics reports, you can look at that queue and see how many customers are waiting for callbacks.
-
Set up caller ID. When setting your callback queue, specify the caller ID name and phone number that appears to customers when you call back.
-
Add the callback queue to a routing profile. Set this up so that contacts waiting for a call are routed to agents.
-
Create a flow for queued callbacks. Set this up to offer the option for a callback to the customer.
-
(Optional) Create a callback creation flow. When a callback is created, this flow is run. The contact is enqueued only when there is a Transfer to queue set on this flow. You can use the callback creation flow to Check contact attributes to see if the callback is a duplicate or if the customer issue is resolved before queuing the contact for an agent. This flow also allows you to set a customer queue flow by adding a Set customer queue flow block.
-
(Optional) Create a customer queue flow for callback. This flow is run if you choose a Set customer queue flow block for the Set creation flow option. You can use a Set customer queue flow block to add logic to transfer a contact from one queue to another. Or, you can manually remove a callback from the queue by using the StopContact API.
-
(Optional) Create an outbound whisper flow. When a queued call is placed, the customer hears this message after they pick up and before they connect to the agent. For example, "Hello, this is your scheduled callback..."
-
(Optional) Create an agent whisper flow. This is what the agent hears right after they accept the contact, before they are joined to the customer. For example, "You're about to be connected to Customer John, who requested a refund for..."
-
(Not applicable to Amazon Connect by individual feature customers) Choose a dial mode between agent first and customer first.
The routing process
-
When a customer leaves their number it's put in a queue and then routed to the next available agent.
-
After an agent accepts the callback in the CCP, Amazon Connect calls the customer.
If no agents are available to work on callbacks, the callbacks can stay in queue for up to 7 days after they are created before Amazon Connect automatically removes them.
Tip
To manually remove a callback from the queue, use the StopContact API.
-
If there is no answer when the Amazon Connect calls the customer, it retries based on the number of times you've specified.
-
If the call goes to voicemail, it's considered connected.
-
If the customer calls again while in the callback queue, it's treated as a new call and will be handled as usual. To avoid duplicate callback requests in a callback queue, see this blog: Preventing duplicate callback requests in Amazon Connect
.
How queued callbacks affect queue limits
-
Queued callbacks count towards the queue size limit, but they are routed to the error branch. For example, if you have a queue that handles callbacks and incoming calls, and that queue reaches the size limit:
-
The next callback is routed to the error branch.
-
The next incoming call gets a reorder tone (also known as a fast busy tone), which indicates no transmission path to the called number is available.
-
-
Consider setting up your queued callbacks to be lower priority than your queue for incoming calls. This way, your agents only work on queued callbacks when the incoming call volume is low.
Create a flow for queued callbacks
To see what a flow looks like with queued callback, in new Amazon Connect instances see Sample queue configurations flow in Amazon Connect. In previous instances, see Sample queued callback flow in Amazon Connect.
The following procedure shows how to:
-
Request a callback number from a customer.
-
Store the callback number in an attribute.
-
Reference the attribute in a Set callback number block to set the number to dial the customer.
-
Transfer the customer to the callback queue.
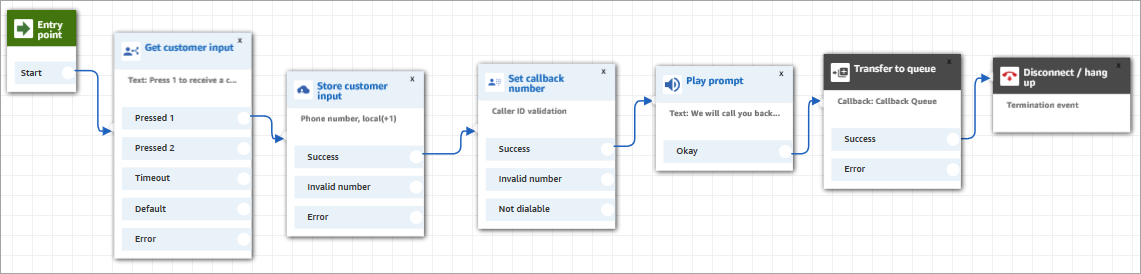
At the basic level, here's what this queued callback flow looks like, without any of the alternative branches or error handling configured. The following image shows a flow with the following blocks: Get customer input, Store customer input, Set callback number, Play prompt, Transfer to queue, and Disconnect/hang up.
Following are the steps to create this flow.
To create a flow for queued callbacks
-
In Amazon Connect, choose Routing, Contact flows.
-
Select an existing flow, or choose Create flow to create a new one.
Tip
You can create this flow using different flow types: Customer queue flow, Transfer to agent, Transfer to queue.
-
Add a Get customer input block.
-
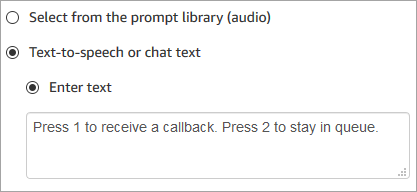
Configure the block to prompt the customer for a callback. The following image shows a message in the Text-to-speech box: Press 1 to receive a callback. Press 2 to stay in queue.
-
At the bottom of the block, choose Add another condition, and add options 1 and 2, as shown in the following image.

-
Add a Store customer input block.
-
Configure the block to prompt customers for their callback number, such as "Please enter your phone number." The following image shows the Properties page of the Store customer input block.

-
In the Customer input section, select Phone number, and then choose one of the following:
-
Local format: Your customers are calling from phone numbers that are in the same country as the AWS Region where you created your Amazon Connect instance.
-
International format/Enforce E.164: Your customers are calling from phone numbers in countries or regions other than the one where you created your instance.
-
-
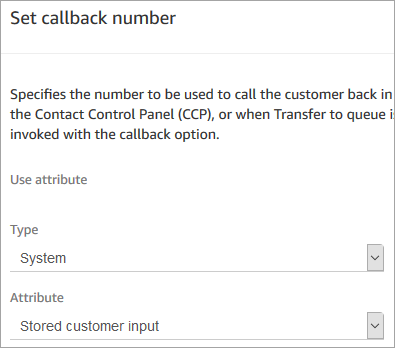
Add a Set callback number block to your flow.
-
Configure the block to set Type to System, as shown in the following image. For Attribute, choose Store customer input. This attribute stores the customer's phone number.
-
Add a Transfer to queue block.
-
In the Transfer to queue block, configure the Transfer to callback queue tab as shown in the following image. Set Initial delay to 99. Set Max number of retries to 2. Set Minimum time between attempts to 10 minutes.

The following properties are available:
-
Initial delay: Specify how much time has to pass between a callback contact being initiated in the flow, and the customer is put in queue for the next available agent. In the previous example, the time is 99 seconds.
-
Maximum number of retries: If this is set to 2, then Amazon Connect tries to call back the customer a maximum of three times: the initial callback, and two retries.
A retry only happens if it rings but there's no answer. If the callback goes to voicemail, it's considered connected and Amazon Connect does not retry again.
Tip
We strongly recommend that you double-check the number entered in Maximum number of retries. If you accidentally enter a high number, such as 20, it's going to result in unnecessary work for the agent and too many calls for the customer.
-
Minimum time between attempts: If the customer doesn't answer the phone, this is how long to wait until trying again. In the previous example, we wait 10 minutes between attempts.
-
-
In the Optional parameters section, choose Set working queue if you want to transfer the contact to a queue that you set up specifically for callbacks. This option is shown in the following image.

Creating a queue just for callbacks lets you view in your real-time metrics reports how many customers are waiting for callbacks.
If you don't set a working queue, Amazon Connect uses the queue that was set previously in the flow.
-
The callback contact is a new contact separate from the inbound voice contact. You can optionally control the experience of this callback contact when it is created by configuring the Set creation flow option in the Transfer to queue block, as shown in the following image.

-
(In addition for Amazon Connect customers) You can also choose the dial mode between agent first and customer first.

-
(Optional) Create a callback creation flow. Use the Set creation flow dropdown menu to select the flow to be run when a callback contact is created.
The callback creation flow that you select must meet the following requirements:
-
The flow type must be the default flow type, Contact flow (inbound). For information about flow types, see Choose a flow type.
-
You need to configure a Transfer to queue block to queue the contact in the queue of your choice.
Following are additional options for how you can configure your callback creation flow:
-
You can evaluate contact attributes (including customer profiles) by using a Check contact attributes block to see if the callback should be terminated because it is a duplicate or the customer issue has already been resolved.
-
You can add a Set customer queue flow block and use it to specify the flow to run when a customer is transferred to a queue. This flow is called a customer queue flow.
-
In the customer queue flow, you can evaluate the contact's wait time in queue by using a combination of the Get queue metrics block and GetCurrentMetricData to send an advance SMS to customers, notifying them to expect a callback in the near future from the specific contact center number.
-
-
-
-
To save and test this flow, configure the other branches and add error handling. To see an example of how this is done, see Sample queue configurations flow in Amazon Connect. For previous instances, see Sample queued callback flow in Amazon Connect.
-
For information about how callbacks appear in real-time metrics reports and contact records, see Queued callbacks in real-time metrics in Amazon Connect.
Customer first callback contact lifecycle
The contact lifecycle for customer first callbacks will be spread across three different contacts as outlined in the following diagram:

-
C1 (Inbound contact) is an inbound voice contact and no changes are expected in its definition.
-
C2 (queued customer first callback contact) is the queued leg of the customer first callback with a new initiation method of CALLBACK_CUSTOMER_FIRST_QUEUED. C2 will execute the creation flow (if specified) prior to queuing in the working queue after the initial delay (if specified). C2 will not support configurations for retries and consequently time between attempts within this flow block (only available for agent first callbacks). Pls see details for C3 on how to configure retries for customer first callbacks.
-
C3 (dialed customer first callback contact) is the dialed leg of the customer first callback with a new initiation method of CALLBACK_CUSTOMER_FIRST_DIALED. C3 will execute the required outbound callback flow specified in the transfer to callback flow block (only required for customer first dials, not agent first). For customer first callbacks, retries and time between attempts will be configured in the outbound flow specified for C3 based on the output of the "Check call progress" flow block (to determine whether a contact has been answered by a voicemail or human voice). Once the customer confirms presence, the flow for C3 should have a "Transfer to queue" flow block configured to place the contact in its queue to find the next available agent. Users can also customize the routing priority of this contact within the flow using the set routing criteria or change routing priority / age flow blocks.
Note
The final working queue for the callback can be set at any point in its lifecycle between C1 / C2 / C3 and the following stages will inherit it. It has to be set at least once before C2 is created (using set working queue in C1 inbound flow or specifying the queue in Transfer to queue block while configuring C2) but can be modified using the set creation flow for C2 or in the outbound flow specified for C3.
Analytics for customer first callbacks
Amazon Connect will update / create the following metrics, for customer first callbacks:
- SUM_CONNECTING_TIME_AGENT
-
Definition – The time taken for an agent to pick up a callback contact.
Filter – Initiation method of
CALLBACK_CUSTOMER_FIRST_DIALED - CONTACTS_CREATED
-
-
Definition – Count of customer first callbacks contacts created
Filter – Initiation method of
CALLBACK_CUSTOMER_FIRST_QUEUED -
Definition – Count of customer first callbacks dialed
Filter – Initiation method of
CALLBACK_CUSTOMER_FIRST_DIALED
-
- CONTACTS_HANDLED
-
Definition – Count of customer first callback contacts handled by an agent
Filter – Initiation method of
CALLBACK_CUSTOMER_FIRST_DIALED - AVG_QUEUE_ANSWER_TIME_CUSTOMER_FIRST_CALLBACK
-
Definition – Average of total queue time for callback contact from the time C2 was queued to the time C3 was answered.
Note: Only published on C3. Includes the total queued time for C2 and C3.
- AVG_QUEUE_ANSWER_TIME
-
Definition – Average speed of answer for callback contacts after the customer is dialed and put in queue.
Filter – Initiation method of
CALLBACK_CUSTOMER_FIRST_DIALED - CONTACTS_ABANDONED
-
Definition – count of callback contacts where the customer dropped off before the call was connected to an agent. Only relevant for C3 since C2 will never have a customer on the line.
Filter – Initiation method
CALLBACK_CUSTOMER_FIRST_DIALED - AVG_ABANDON_TIME
-
Definition – Average queue time at which customers abandoned a contact
Filter – Initiation method of
CALLBACK_CUSTOMER_FIRST_DIALED - AVG_WAIT_TIME_AFTER_CUSTOMER_CONNECTION
-
Definition – Average of the time between the first customer response and an agent answer (only relevant for C3).
Filter – Initiation method of
CALLBACK_CUSTOMER_FIRST_DIALED
Contact Model for customer first callbacks
C2 queued customer first callback contact
InitialContactId : C1 (Inbound contact)
ContactId : C2 (this contact)
PreviousContactId : C1 (Inbound contact)
NextContactId : C3 (Dialed customer first callback contact)
Channel : VOICE,
InitiationMethod : CALLBACK_CUSTOMER_FIRST_QUEUED,

ConnectedToSystemTimeStamp : time // Timestamp when callback creation flow got started

CustomerEndpoint : customer phone number endpoint

DisconnectTimestamp : time // Timestamp indicating contact is disconnected and customer will be dialed

DisconnectReason : // Disconnect reason code

InitiationTimeStamp : time // Timestamp indicating customer first callback has been created in connect systems

QueueInfo : {
    Arn : arn // Queue arn representing customer first callback queue
    EnqueueTimeStamp : time // Timestamp indicating customer first callback has been put in queue and waiting out to dial.
    DequeueTimeStamp : time // Timestamp indicating customer first callback has been taken out from queue to dial out end customer.
    Duration : time // total time it took connect systems to dial out end customer.
}
C3 dialed customer first callback contact
InitialContactId : C1 (Inbound contact)
ContactId : C3 (this contact)
PreviousContactId : C2 (Queued customer first callback contact)
Channel : VOICE,
InitiationMethod : CALLBACK_CUSTOMER_FIRST_DIALED,

ConnectedToSystemTimeStamp : time // Timestamp when the outbound call associated with callback was connected with customer.

CustomerEndpoint : customer phone number endpoint

SystemEndpoint : Outbound caller id assigned to the outbound queue

Agent : {
    // All agent information associated with the outbound call.
    // Like Agent Arn, ConnectToAgentTimestamp, ACW duration etc.
}

AgentConnectionAttempts : number

DisconnectTimestamp : time // Timestamp indicating outbound call for the callback is disconnected

DisconnectReason : // Disconnect reason code

SegmentAttributes : {
    'connect:TrafficType' : 'CUSTOMER_FIRST_CALLBACK'
},

AnsweringMachineDetectionStatus : HUMAN_ANSWERED|VOICEMAIL_BEEP|VOICEMAIL_NO_BEEP|AMD_UNANSWERED|AMD_UNRESOLVED|AMD_NOT_APPLICABLE|SIT_TONE_BUSY|SIT_TONE_INVALID_NUMBER|SIT_TONE_DETECTED|FAX_MACHINE_DETECTED|AMD_ERROR|AMD_UNRESOLVED_SILENCE(WIP)

CustomerVoiceActivity : {
    GreetingStartTimestamp : timestamp
    GreetingEndTimestamp : timestamp
}

InitiationTimeStamp : time // Timestamp indicating start of outbound call to customer

QueueInfo : {
    Arn : arn // Queue arn representing customer first callback queue
    EnqueueTimeStamp : time // Timestamp indicating customer first callback has been put in queue to join with agent.
    DequeueTimeStamp : time // Timestamp indicating customer first callback has been taken out from queue to join with agent.
    Duration : time // total time it took connect systems to join dialed end customer with agent.
    CallbackTotalQueueDuration : time // total time the customer first callback spent in queue (Includes the total queued time for C2 and C3.)
}
Sample flows for customer first callbacks
Inbound call flow for customer first callbacks
The following images show how to configure a transfer to queue flow block by setting up a callback creation flow and an outbound dial flow.


Callback creation flow configuration
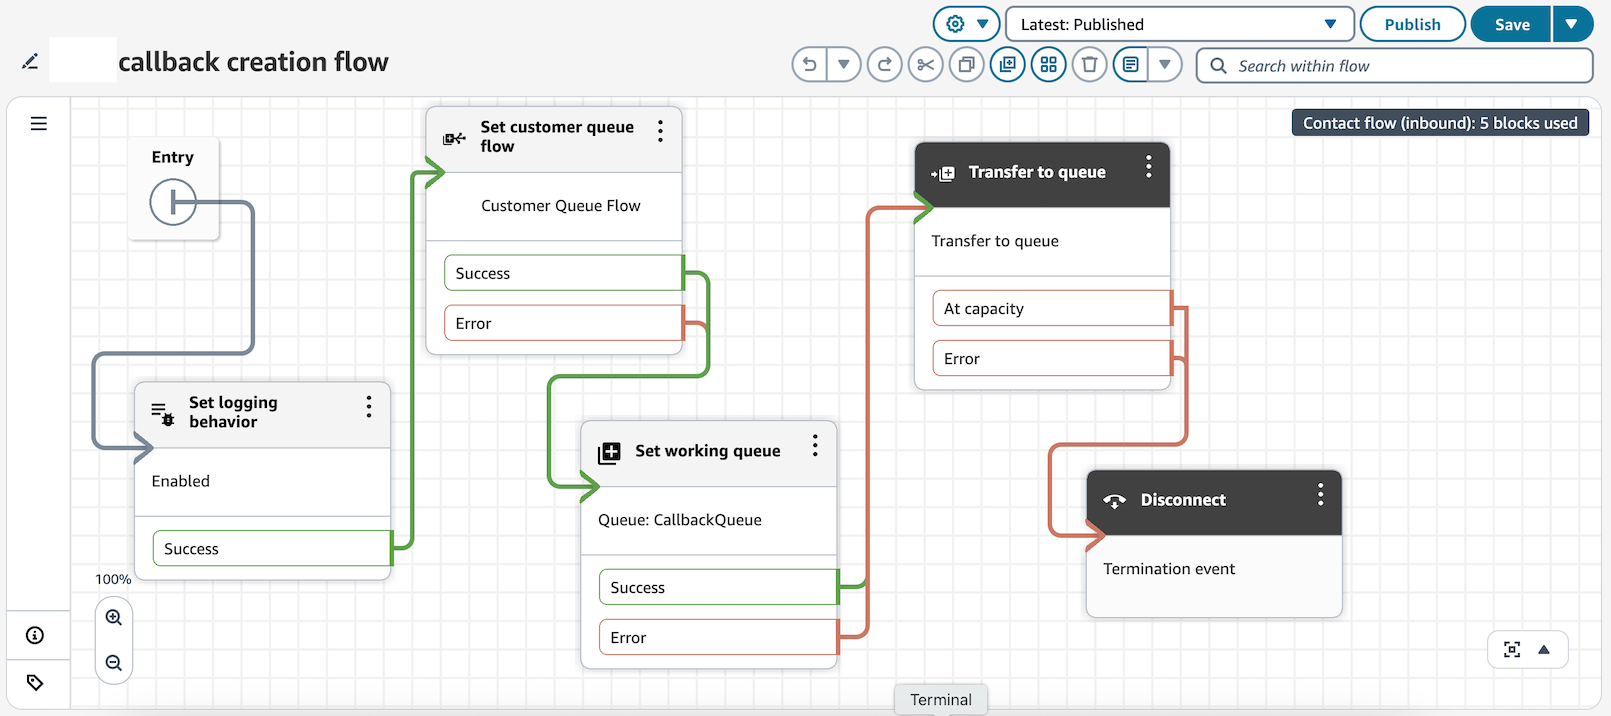
Callback creation flow configures customer queue flow to execute while callback contact is in queue waiting for agent availability to dial out to customers.
Customer queue flow for callbacks

A Customer Queue Flow can monitor contact queue position and trigger actions when position is less than 2 (like sending SMS/email). In this example, we set a contact attribute instead.
If position is greater than or equal to 2, the flow waits 5 minutes before rechecking. You can adjust the wait duration, but we recommend a minimum 1-minute interval between checks.
To check the position in queue, you will first have to configure the Get metrics flow block:

Get Metrics block will have to be followed by a check contact attributes flow block to evaluate the position in queue metric.

Outbound dial flow for callbacks

In the Outbound dial flow, we evaluate presence of customer via check call progress flow block. If voicemail is detected, a callback contact is recreated. If we detect customer on other end of the call. call is transferred to queue for agent to be joined to end-customer.
Callbacks from a chat, task, or email contact
You can also configure the Transfer to Callback option in the Transfer to queue block to support callbacks when a customer contacts you from a chat, task, or email contact. For example, if a customer reaches out after hours when no agent is available, they can request a voice callback by sending a chat message or completing a webform request (which uses tasks).
The following video shows how to use Contact Lens to allow customers who contact you through Amazon Connect chat to request a callback. This creates a more personalized customer experience. It shows how to configure this capability that allows customers to request callbacks from any channel, not just voice calls.
Learn more about queued callbacks
See the following topics to learn more about queued callbacks:
