Share security groups with AWS Organizations
The Shared Security Group feature enables you to share a security group with other AWS Organizations accounts within the same AWS Region and make the security group available to be used by those accounts.
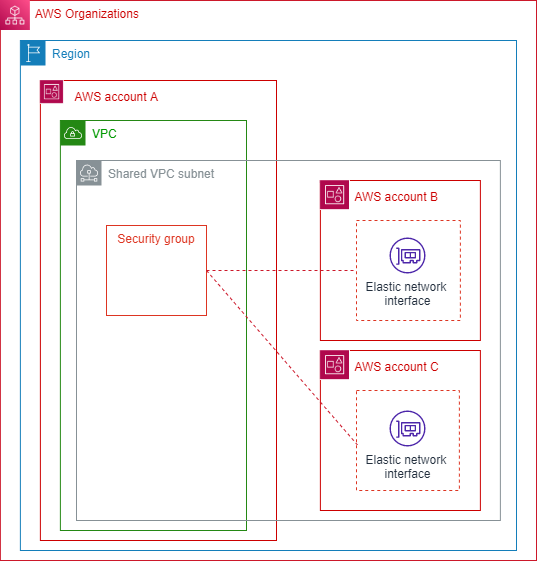
The following diagram demonstrates how you can use the Shared Security Group feature to simplify security group management across accounts in your AWS Organizations:

This diagram shows three accounts that are part of the same Organization. Account A shares a VPC subnet with Accounts B and C. Account A shares the security group with Accounts B and C using the Shared Security Group feature. Accounts B and C then use that security group when they launch instances in the shared subnet. This enables Account A to manage the security group; any updates to the security group apply to the resources that Accounts B and C have running in the shared VPC subnet.
Requirements of the Shared Security Group feature
-
This feature is only available for accounts in the same Organization in AWS Organizations. Resource sharing must be enabled in AWS Organizations.
-
The account that shares the security group must own both the VPC and the security group.
-
You cannot share default security groups.
-
You cannot share security groups that are in a default VPC.
-
Participant accounts can create security groups in a shared VPC but they cannot share those security groups.
-
A minimum set of permissions is required for an IAM principal to share a security group with AWS RAM. Use the
AmazonEC2FullAccessandAWSResourceAccessManagerFullAccessmanaged IAM policies to ensure your IAM principals have the required permissions to share and use shared security groups. If you use a custom IAM policy, thec2:PutResourcePolicyandec2:DeleteResourcePolicyactions are required. These are permission-only IAM actions. If an IAM principal doesn’t have these permissions granted, an error will occur when attempting to share the security group using the AWS RAM.
Services that support this feature
-
Amazon API Gateway
-
Amazon EC2
-
Amazon ECS
-
Amazon EFS
-
Amazon EKS
-
Amazon EMR
-
Amazon FSx
-
Amazon ElastiCache
-
AWS Elastic Beanstalk
-
AWS Glue
Amazon MQ
Amazon SageMaker AI
Elastic Load Balancing
Application Load Balancer
Network Load Balancer
How this feature affects existing quotas
Security group quotas apply. For the 'Security groups per network interface' quota, however, if a participant uses both owned and shared groups on an Elastic network interface (ENI), the minimum of owner and participant's quota applies.
Example to demonstrate how the quota is affected by this feature:
-
Owner account quota: 4 security groups per interface
-
Participant account quota: 5 security groups per interface.
-
Owner shares groups SG-O1, SG-O2, SG-O3, SG-O4, SG-O5 with participant. Participant already has groups of their own in the VPC: SG-P1, SG-P2, SG-P3, SG-P4, SG-P5.
-
If participant creates an ENI and uses only their owned groups, they can associate all 5 security groups (SG-P1, SG-P2, SG-P3, SG-P4, SG-P5) because that's their quota.
-
If the participant creates an ENI and uses any shared groups on it, they can only associate up to 4 groups. In this case, the quota for such an ENI is the minimum of owner and participant's quotas. Possible valid configurations will look like this:
-
SG-O1, SG-P1, SG-P2, SG-P3
-
SG-O1, SG-O2, SG-O3, SG-O4
-
Share a security group
This section explains how to use the AWS Management Console and the AWS CLI to share a security group with other accounts in your Organization.
The security group is now shared. You can select the security group when launching an EC2 instance in a shared subnet within the same VPC.
Stop sharing a security group
This section explains how to use the AWS Management Console and the AWS CLI to stop sharing a security group with other accounts in your Organization.
The security group is no longer being shared. After the owner stops sharing a security group, the following rules apply:
Existing participant Elastic Network Interfaces (ENIs) continue to get any security group rule updates that are made to unshared security groups. Unsharing only prevents the participant from creating new associations with the unshared group.
Participants can no longer associate the unshared security group with any ENIs they own.
Participants can describe and delete the ENIs that are still associated with unshared security groups.
If participants still have ENIs associated with the unshared security group, the owner cannot delete the unshared security group. The owner can only delete the security group after participants disassociate (remove) the security group from all their ENIs.
-
Participants cannot launch new EC2 instances using an ENI associated with an unshared security group.