Getting started with virtual private servers on Lightsail
In Lightsail, an instance is a virtual private server (also called a virtual machine). You create and manage Lightsail instances in the AWS Cloud. When you create an instance, you choose an image that has an operating system (OS) on it. You can also choose an instance image that has an application or development stack on it, including the base OS.
The instance that you create in this tutorial will incur usage fees from the time that you
create the instance until you delete it. Deletion is the final step of this tutorial. For
more information about pricing, see Lightsail pricing
Topics
Step 1: Complete the prerequisites
If you're a new AWS customer, complete the setup prerequisites before you start using Amazon Lightsail. For more information, see Set up AWS account and administrative users for Lightsail.
Step 2: Create an instance
You can create an instance by using the Lightsail console
-
Sign in to the Lightsail console
. -
On the home page, choose Create instance.
-
Select a location for your instance (an AWS Region and Availability Zone). Choose an AWS Region that is closest to your physical location for reduced latency.
Choose Change AWS Region and Availability Zone to create your instance in another location.
-
You can pick an application (Apps + OS) or an operating system (OS Only).
To learn more about Lightsail instance images, see Review the Lightsail instance blueprint offerings.
-
Choose your instance plan.
Choose whether your instance uses dual-stack (IPv4 and IPv6), or IPv6-only networking. Some Lightsail blueprints don't support IPv6-only networking at this time. To see which blueprints support IPv6-only networking see Review the Lightsail instance blueprint offerings.
You can try the $5 USD Lightsail plan free for one month (up to 750 hours). We will credit one free month to your account. Learn more on our Lightsail pricing page
. -
Enter a name for your instance.
Resource names:
-
Must be unique within each AWS Region in your Lightsail account.
-
Must contain 2 to 255 characters.
-
Must start and end with an alphanumeric character or number.
-
Can include alphanumeric characters, numbers, periods, dashes, and underscores.
-
-
Choose Create instance.
Within minutes, your Lightsail instance is ready and you can connect to it.
Step 3: Connect to your instance
-
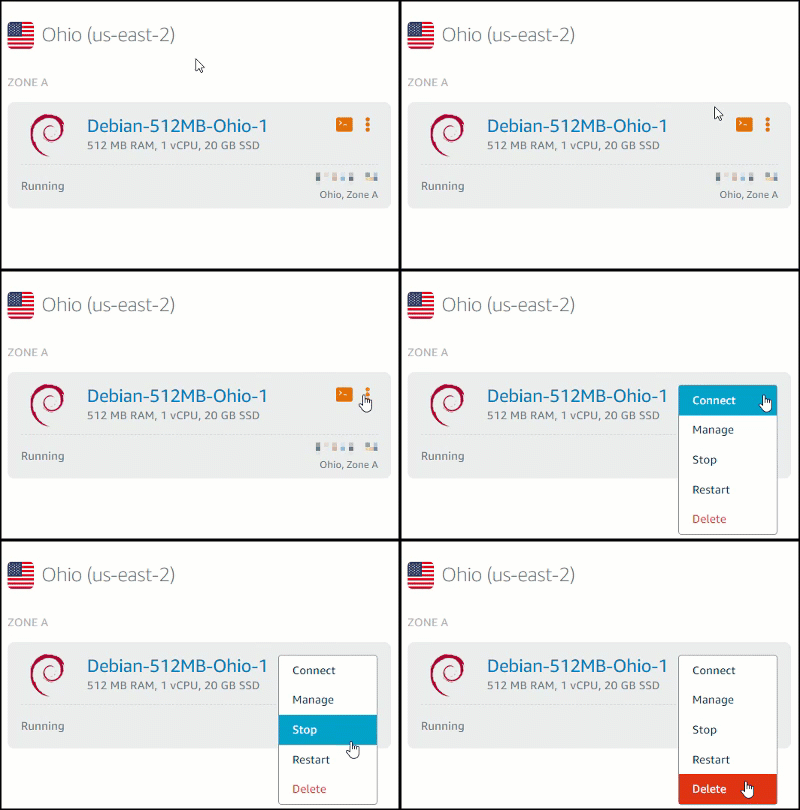
From the Lightsail home page, choose the actions menu icon (⋮), then choose Connect.

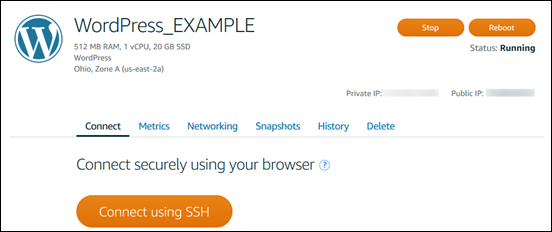
Alternatively, you can connect from your instance's management page. Select your instance's name, choose the Connect tab, then choose Connect using SSH.

-
You can now type commands into the terminal and manage your Lightsail instance without setting up an SSH client.

To learn how to connect to add additional storage to your virtual computer, continue to the next step of this tutorial.
Step 4: Add storage to your instance
Lightsail provides block-level storage volumes (disks) that you can attach to an instance. Even though your instance comes with a system disk, you can attach additional storage disks as your needs change. You can also detach a disk from an instance and attach it to another instance.
After you create an additional disk, you will need to connect to your Lightsail instance to format and mount the disk.
For more information about creating, attaching, and managing a disk, see Create and attach Lightsail block storage disks to Linux instances.
To learn about backing up your virtual computer, continue to the next step of this tutorial.
Step 5: Create a snapshot
Snapshots are a point-in-time copy of your data. You can create snapshots of your instances and use them as baselines to create new instances or for data backup. A snapshot contains all of the data that's needed to restore your instance (from the moment when the snapshot was taken).
For more information about creating and managing snapshots, see Back up Linux/Unix Lightsail instances with snapshots.
To learn about cleaning up your virtual computer resources, continue to the next step of this tutorial.
Step 6: Clean up
After you're done with the instance that you created for this tutorial, you can delete it. This stops incurring charges for the instance if you don't need it.
Deleting an instance doesn't delete its associated snapshots or attached disks. If you created snapshots and disks for this tutorial, you should delete those as well.
To save your instance for later, but to avoid incurring charges, you can stop the
instance instead of deleting it. Then you can start it again later. For more information
about pricing, see Lightsail
pricing
Important
Deleting a Lightsail resource is a permanent action. The deleted data cannot be recovered. If you might need the data later, create a snapshot of your virtual computer before you delete it. For more information, see Back up Linux/Unix Lightsail instances with snapshots.
-
Sign in to the Lightsail console
. -
Choose Instances in the navigation pane.
-
For the instance you want to delete, choose the actions menu icon (⋮), then choose Delete.

-
Choose Yes, delete to confirm the deletion.
Next steps
Use the following topics to get started with Amazon Lightsail Linux and Windows based instances.