Create a Step Functions state machine using AWS SAM
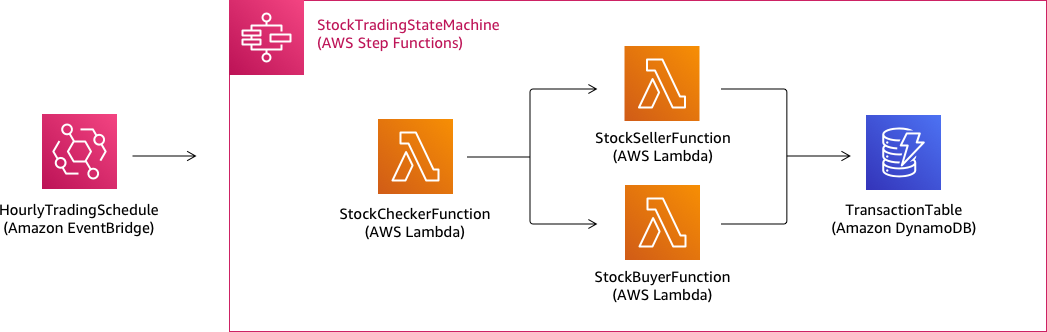
In this guide, you download, build, and deploy a sample AWS SAM application that contains an AWS Step Functions state machine. This application creates a mock stock trading workflow which runs on a pre-defined schedule (note that the schedule is disabled by default to avoid incurring charges).
The following diagram shows the components of this application:
The following is a preview of commands that you run to create your sample application. For more details about each of these commands, see the sections later in this page
# Step 1 - Download a sample application. For this tutorial you # will follow the prompts to select an AWS Quick Start Template # called 'Multi-step workflow'sam init# Step 2 - Build your applicationcdproject-directorysam build# Step 3 - Deploy your applicationsam deploy --guided
Prerequisites
This guide assumes that you've completed the steps in the Installing the AWS SAM CLI for your OS. It assumes that you've done the following:
-
Created an AWS account.
-
Configured IAM permissions.
-
Installed Homebrew. Note: Homebrew is only a prerequisite for Linux and macOS.
-
Installed the AWS SAM CLI. Note: Make sure you have version 0.52.0 or later. You can check which version you have by executing the command
sam
                        --version
.
Step 1: Download a Sample AWS SAM Application
Command to run:
sam init
Follow the on-screen prompts to select the following:
-
Template: AWS Quick Start Templates
-
Language: Python, Ruby, NodeJS, Go, Java, or .NET
-
Project name: (name of your choice - default is
sam-app) -
Quick start application: Multi-step workflow
What AWS SAM is doing:
This command creates a directory with the name you provided for the 'Project name'
prompt (default is sam-app). The specific contents of the directory will
depend on the language you choose.
Following are the directory contents when you choose one of the Python runtimes:
├── README.md
├── functions
│   ├── __init__.py
│   ├── stock_buyer
│   │   ├── __init__.py
│   │   ├── app.py
│   │   └── requirements.txt
│   ├── stock_checker
│   │   ├── __init__.py
│   │   ├── app.py
│   │   └── requirements.txt
│   └── stock_seller
│       ├── __init__.py
│       ├── app.py
│       └── requirements.txt
├── statemachine
│   └── stock_trader.asl.json
├── template.yaml
└── tests
    └── unit
        ├── __init__.py
        ├── test_buyer.py
        ├── test_checker.py
        └── test_seller.py
There are two especially interesting files that you can take a look at:
-
template.yaml: Contains the AWS SAM template that defines your application's AWS resources. -
statemachine/stockTrader.asl.json: Contains the application's state machine definition, which is written in Using Amazon States Language to define Step Functions workflows.
You can see the following entry in the template.yaml file, which points
to the state machine definition file:
    Properties:
      DefinitionUri: statemachine/stock_trader.asl.json
It can be helpful to keep the state machine definition as a separate file instead of embedding it in the AWS SAM template. For example, tracking changes to the state machine definition is easier if you don't include the definition in the template. You can use the Workflow Studio to create and maintain the state machine definition, and export the definition from the console directly to the Amazon States Language specification file without merging it into the template.
For more information about the sample application, see the README.md file
in the project directory.
Step 2: Build Your Application
Command to run:
First change into the project directory (that is, the directory where the
template.yaml file for the sample application is located; by default is
sam-app), then run this command:
sam build
Example output:
 Build Succeeded

 Built Artifacts  : .aws-sam/build
 Built Template   : .aws-sam/build/template.yaml

 Commands you can use next
 =========================
 [*] Invoke Function: sam local invoke
 [*] Deploy: sam deploy --guided
What AWS SAM is doing:
The AWS SAM CLI comes with abstractions for a number of Lambda runtimes to build your
dependencies, and copies all build artifacts into staging folders so that everything is
ready to be packaged and deployed. The sam build command builds any
dependencies that your application has, and copies the build artifacts to folders under
.aws-sam/build.
Step 3: Deploy Your Application to the AWS Cloud
Command to run:
sam deploy --guided
Follow the on-screen prompts. You can just respond with Enter to accept
the default options provided in the interactive experience.
What AWS SAM is doing:
This command deploys your application to the AWS cloud. It take the deployment
artifacts you build with the sam build command, packages and uploads them
to an Amazon S3 bucket created by AWS SAM CLI, and deploys the application using AWS CloudFormation. In the
output of the deploy command you can see the changes being made to your AWS CloudFormation
stack.
You can verify the example Step Functions state machine was successfully deployed by following these steps:
Sign in to the AWS Management Console and open the Step Functions console at https://console.aws.amazon.com/states/
. -
In the left navigation, choose State machines.
-
Find and choose your new state machine in the list. It will be named StockTradingStateMachine-
<unique-hash>. -
Choose the Definition tab.
You should now see a visual representation of your state machine. You can verify that
the visual representation matches the state machine definition found in the
statemachine/stockTrader.asl.json file of your project
directory.
Troubleshooting
SAM CLI error: "no such option: --guided"
When executing sam deploy, you see the following error:
Error: no such option: --guided
This means that you are using an older version of the AWS SAM CLI that does not
support the --guided parameter. To fix this, you can either update your
version of AWS SAM CLI to 0.33.0 or later, or omit the --guided parameter
from the sam deploy command.
SAM CLI error: "Failed to create managed resources: Unable to locate credentials"
When executing sam deploy, you see the following error:
Error: Failed to create managed resources: Unable to locate credentials
This means that you have not set up AWS credentials to enable the AWS SAM CLI to make AWS service calls. To fix this, you must set up AWS credentials. For more information, see Setting Up AWS Credentials in the AWS Serverless Application Model Developer Guide.
Clean Up
If you no longer need the AWS resources you created by running this tutorial, you can remove them by deleting the AWS CloudFormation stack that you deployed.
To delete the AWS CloudFormation stack created with this tutorial using the AWS Management Console, follow these steps:
Sign in to the AWS Management Console and open the AWS CloudFormation console at https://console.aws.amazon.com/cloudformation
. -
In the left navigation pane, choose Stacks.
-
In the list of stacks, choose sam-app (or the name of stack you created).
-
Choose Delete.
When done, the status of the of the stack will change to DELETE_COMPLETE.
Alternatively, you can delete the AWS CloudFormation stack by executing the following AWS CLI command:
aws cloudformation delete-stack --stack-namesam-app--regionregion
Verify Deleted Stack
For both methods of deleting the AWS CloudFormation stack, you can verify it was deleted by
going to the https://console.aws.amazon.com/cloudformation
