Amazon Monitron is no longer open to new customers. Existing customers can
continue to use the service as normal. For capabilities similar to Amazon
Monitron, see our blog post
Monitoring costs
Amazon Monitron assigns AWS–generated tags to each sensor: a project tag and a site tag. If you use AWS Cost Explorer, you can use these assigned tag values to get cost reports filtered to specific Amazon Monitron projects and sites.
Topics
Conceptual overview
When you set up Amazon Monitron, you create a project in which you configure and install your Amazon Monitron resources. Every project, in turn, can be linked to mutliple sites, or organized collections of assets, gateways, and sensors linked together based on either a common location or function.
Each site can contain multiple Amazon Monitron sensors, attached to multiple assets or machines, transmitting the asset data collected through multiple gateways.
While all your sites, assets, gateways, and sensors exist conveniently within one project, your Amazon Monitron setup might be more distributed in practice. For example, your company may own one project to monitor sites located in different geographical locations, or grouped together by different business use cases and needs. Or you may own multiple projects, each with its own specific configuration. Partners who integrate Amazon Monitron, may also wish to assign a project to each of their own customers
While getting an overall understanding of your Amazon Monitron costs is useful, what your business may need is a more granular understanding of the usage and costs attached to each project, location, or business use case. This may also be necessary for internal cost allocation purpose between different divisions.
In these situations, using Amazon Monitron assigned AWS–generated tags in AWS Cost Explorer can help you understand and plan your business resources better.
Billing tag keys and tag values
Amazon Monitron uses AWS–generated tags to internally assign project and site level tag values. You can use these tags to find your projects and sites on the AWS Cost Explorer console. The tag keys are of the following format:
-
Project –
aws:monitron:project -
Site –
aws:monitron:location_level4
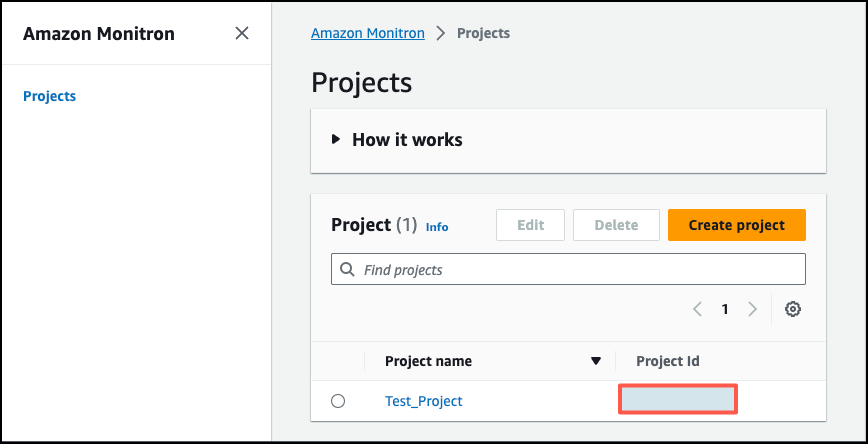
Retrieving project tag values
You can retrieve your assigned project value using your Amazon Monitron web app. The tag value for your project is the project ID.
To retrieve the specific tag value assigned to your Amazon Monitron project:
-
Open the Amazon Monitron console at https://console.aws.amazon.com/monitron
. -
Choose Create Project.
-
In the navigation pane, choose Projects.
The list of projects is displayed under Projects.
-
Choose the project that you want to get details on.
-
Copy the tag value from your Project Id.
You can use this project id to filter costs in AWS Cost Explorer console.
Retrieving site tag values
You can retrieve your assigned site tag value using your Amazon Monitron web app. The tag value for your site is the Id.
To retrieve the specific tag value assigned to your Amazon Monitron site:
-
Open the Amazon Monitron console at https://console.aws.amazon.com/monitron
. -
Choose Create project.
-
If you're creating a project for the first time, follow the steps outlined in Creating a project.
If you're choosing an existing project, from the left navigation menu, select Projects, and then select the project you want to create custom asset classes for.
-
From the project details page, choose Open in Amazon Monitron web app.

-
From the left navigation pane, choose Sites.
The list of sites is displayed.

-
Choose the site that you want to get details on.
-
Copy the tag value from your Id.
You can use this id to filter costs in AWS Cost Explorer console.
Activating billing tags
To begin using project and site level cost tracker tags, you must do the following:
-
Prerequisite – You must activate AWS Cost Explorer on the AWS Management Console. This requires minimal setup. We recommend you follow the steps outlined in the AWS Cost Management guide.
-
Activate the Amazon Monitron AWS–generated tags in your AWS billing account.
From your AWS Billing and Cost Management left navigation pane:
-
From Cost Organization, select Cost allocation tags. You will find the AWS generated cost allocation tags in this section.
-
Select the tags you want to use and choose Activate.

Note
It takes up to 96 hours for the tags to be activated. The billing data starts being tagged only after the tags are active.
-
Viewing cost reports
After your Amazon Monitron AWS generated tags have been activated and are active, you can view usage and cost reports filtered by these tags using AWS Cost Explorer on the AWS Cost Management console.
You can filter usage and cost history by choosing a tag key value pair. For example,
if you want to view usage reports a particular project, you would first choose a tag
value aws:monitron:project and then select the project id value from the
options available.
To generate cost and usage reports
-
Open the AWS Cost Management console at https://console.aws.amazon.com/costmanagement
. -
From the left navigation pane, select Cost Explorer.
-
From the New cost and usage report page, from the right navigation menu, in Filters, choose Amazon Monitron as the Service.
-
From the right navigation menu, for Tags choose the assigned tag key for your project or site from the dropdown options.
-
Then, choose the Amazon Monitron assigned tag value for your project or site.

Note
You can save the report with the filters selected to the report library to easily review it later. You can also adjust and customize your report further, including the date range and granularity of your report.
