Tutorial: Using AWS Lambda with Amazon Simple Notification Service - AWS Lambda

Tutorial: Using AWS Lambda with Amazon Simple Notification Service

In this tutorial, you use a Lambda function in one AWS account to subscribe to an Amazon Simple Notification Service (Amazon SNS) topic in a separate AWS account. When you publish messages to your Amazon SNS topic, your Lambda function reads the contents of the message and outputs it to Amazon CloudWatch Logs. To complete this tutorial, you use the AWS Command Line Interface (AWS CLI).


      Diagram showing the services used in this tutorial: an Amazon SNS topic connected to a Lambda function connected to a CloudWatch Logs log group.

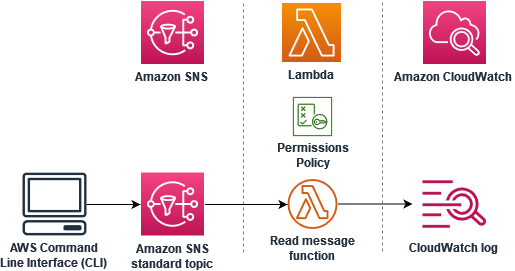
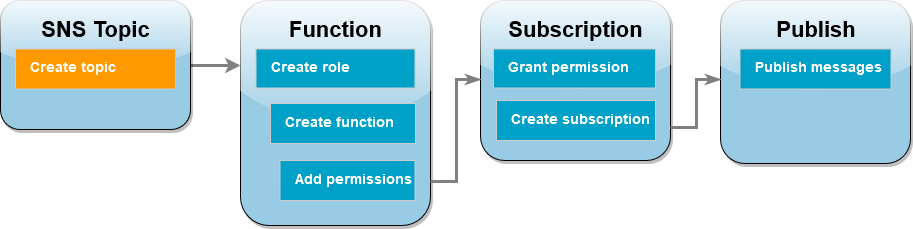
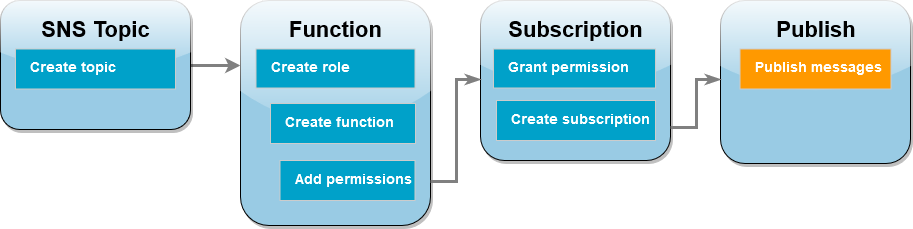
To complete this tutorial, you perform the following steps:

  • In account A, create an Amazon SNS topic.

  • In account B, create a Lambda function that will read messages from the topic.

  • In account B, create a subscription to the topic.

  • Publish messages to the Amazon SNS topic in account A and confirm that the Lambda function in account B outputs them to CloudWatch Logs.

By completing these steps, you will learn how to configure an Amazon SNS topic to invoke a Lambda function. You will also learn how to create an AWS Identity and Access Management (IAM) policy that gives permission for a resource in another AWS account to invoke Lambda.

In the tutorial, you use two separate AWS accounts. The AWS CLI commands illustrate this by using two named profiles called accountA and accountB, each configured for use with a different AWS account. To learn how to configure the AWS CLI to use different profiles, see Configuration and credential file settings in the AWS Command Line Interface User Guide for Version 2. Be sure to configure the same default AWS Region for both profiles.

If the AWS CLI profiles you create for the two AWS accounts use different names, or if you use the default profile and one named profile, modify the AWS CLI commands in the following steps as needed.

Prerequisites

If you do not have an AWS account, complete the following steps to create one.

To sign up for an AWS account
  1. Open https://portal.aws.amazon.com/billing/signup.

  2. Follow the online instructions.

    Part of the sign-up procedure involves receiving a phone call and entering a verification code on the phone keypad.

    When you sign up for an AWS account, an AWS account root user is created. The root user has access to all AWS services and resources in the account. As a security best practice, assign administrative access to an administrative user, and use only the root user to perform tasks that require root user access.

AWS sends you a confirmation email after the sign-up process is complete. At any time, you can view your current account activity and manage your account by going to https://aws.amazon.com/ and choosing My Account.

After you sign up for an AWS account, secure your AWS account root user, enable AWS IAM Identity Center, and create an administrative user so that you don't use the root user for everyday tasks.

Secure your AWS account root user
  1. Sign in to the AWS Management Console as the account owner by choosing Root user and entering your AWS account email address. On the next page, enter your password.

    For help signing in by using root user, see Signing in as the root user in the AWS Sign-In User Guide.

  2. Turn on multi-factor authentication (MFA) for your root user.

    For instructions, see Enable a virtual MFA device for your AWS account root user (console) in the IAM User Guide.

Create an administrative user
  1. Enable IAM Identity Center.

    For instructions, see Enabling AWS IAM Identity Center in the AWS IAM Identity Center User Guide.

  2. In IAM Identity Center, grant administrative access to an administrative user.

    For a tutorial about using the IAM Identity Center directory as your identity source, see Configure user access with the default IAM Identity Center directory in the AWS IAM Identity Center User Guide.

Sign in as the administrative user
  • To sign in with your IAM Identity Center user, use the sign-in URL that was sent to your email address when you created the IAM Identity Center user.

    For help signing in using an IAM Identity Center user, see Signing in to the AWS access portal in the AWS Sign-In User Guide.

If you have not yet installed the AWS Command Line Interface, follow the steps at Installing or updating the latest version of the AWS CLI to install it.

The tutorial requires a command line terminal or shell to run commands. In Linux and macOS, use your preferred shell and package manager.

Note

In Windows, some Bash CLI commands that you commonly use with Lambda (such as zip) are not supported by the operating system's built-in terminals. To get a Windows-integrated version of Ubuntu and Bash, install the Windows Subsystem for Linux.

Create an Amazon SNS topic (account A)


        Tutorial workflow diagram showing you are in the Amazon SNS topic step creating the topic
To create the topic
  • In account A, create an Amazon SNS standard topic using the following AWS CLI command.

    aws sns create-topic --name sns-topic-for-lambda --profile accountA

    You should see output similar to the following.

    { "TopicArn": "arn:aws:sns:us-west-2:123456789012:sns-topic-for-lambda" }

    Make a note of the Amazon Resource Name (ARN) of your topic. You’ll need it later in the tutorial when you add permissions to your Lambda function to subscribe to the topic.

Create a function execution role (account B)


        Tutorial workflow diagram showing you are in the function step creating the execution role

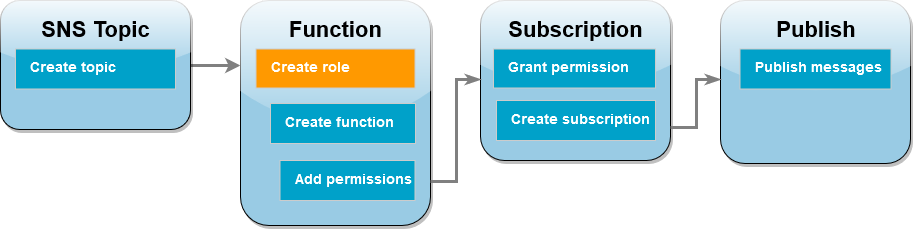
An execution role is an IAM role that grants a Lambda function permission to access AWS services and resources. Before you create your function in account B, you create a role that gives the function basic permissions to write logs to CloudWatch Logs. We’ll add the permissions to read from your Amazon SNS topic in a later step.

To create an execution role
  1. In account B open the roles page in the IAM console.

  2. Choose Create role.

  3. For Trusted entity type, choose AWS service.

  4. For Use case, choose Lambda.

  5. Choose Next.

  6. Add a basic permissions policy to the role by doing the following:

    1. In the Permissions policies search box, enter AWSLambdaBasicExecutionRole.

    2. Choose Next.

  7. Finalize the role creation by doing the following:

    1. Under Role details, enter lambda-sns-role for Role name.

    2. Choose Create role.

Create a Lambda function (account B)


        Tutorial workflow diagram showing you are in the function step creating the function

Create a Lambda function that processes your Amazon SNS messages. The function code logs the message contents of each record to Amazon CloudWatch Logs.

This tutorial uses the Node.js 18.x runtime, but we've also provided example code in other runtime languages. You can select the tab in the following box to see code for the runtime you're interested in. The JavaScript code you'll use in this step is in the first example shown in the JavaScript tab.

.NET
AWS SDK for .NET
Note

There's more on GitHub. Find the complete example and learn how to set up and run in the Serverless examples repository.

Consuming an SNS event with Lambda using .NET.

using Amazon.Lambda.Core; using Amazon.Lambda.SNSEvents; // Assembly attribute to enable the Lambda function's JSON input to be converted into a .NET class. [assembly: LambdaSerializer(typeof(Amazon.Lambda.Serialization.SystemTextJson.DefaultLambdaJsonSerializer))] namespace SnsIntegration; public class Function { public async Task FunctionHandler(SNSEvent evnt, ILambdaContext context) { foreach (var record in evnt.Records) { await ProcessRecordAsync(record, context); } context.Logger.LogInformation("done"); } private async Task ProcessRecordAsync(SNSEvent.SNSRecord record, ILambdaContext context) { try { context.Logger.LogInformation($"Processed record {record.Sns.Message}"); // TODO: Do interesting work based on the new message await Task.CompletedTask; } catch (Exception e) { //You can use Dead Letter Queue to handle failures. By configuring a Lambda DLQ. context.Logger.LogError($"An error occurred"); throw; } } }
Go
SDK for Go V2
Note

There's more on GitHub. Find the complete example and learn how to set up and run in the Serverless examples repository.

Consuming an SNS event with Lambda using Go.

package main import ( "context" "fmt" "github.com/aws/aws-lambda-go/events" "github.com/aws/aws-lambda-go/lambda" ) func handler(ctx context.Context, snsEvent events.SNSEvent) { for _, record := range snsEvent.Records { processMessage(record) } fmt.Println("done") } func processMessage(record events.SNSEventRecord) { message := record.SNS.Message fmt.Printf("Processed message: %s\n", message) // TODO: Process your record here } func main() { lambda.Start(handler) }
Java
SDK for Java 2.x
Note

There's more on GitHub. Find the complete example and learn how to set up and run in the Serverless examples repository.

Consuming an SNS event with Lambda using Java.

package example; import com.amazonaws.services.lambda.runtime.Context; import com.amazonaws.services.lambda.runtime.LambdaLogger; import com.amazonaws.services.lambda.runtime.RequestHandler; import com.amazonaws.services.lambda.runtime.events.SNSEvent; import com.amazonaws.services.lambda.runtime.events.SNSEvent.SNSRecord; import java.util.Iterator; import java.util.List; public class SNSEventHandler implements RequestHandler<SNSEvent, Boolean> { LambdaLogger logger; @Override public Boolean handleRequest(SNSEvent event, Context context) { logger = context.getLogger(); List<SNSRecord> records = event.getRecords(); if (!records.isEmpty()) { Iterator<SNSRecord> recordsIter = records.iterator(); while (recordsIter.hasNext()) { processRecord(recordsIter.next()); } } return Boolean.TRUE; } public void processRecord(SNSRecord record) { try { String message = record.getSNS().getMessage(); logger.log("message: " + message); } catch (Exception e) { throw new RuntimeException(e); } } }
JavaScript
SDK for JavaScript (v2)
Note

There's more on GitHub. Find the complete example and learn how to set up and run in the Serverless examples repository.

Consuming an SNS event with Lambda using JavaScript.

exports.handler = async (event, context) => { for (const record of event.Records) { await processMessageAsync(record); } console.info("done"); }; async function processMessageAsync(record) { try { const message = JSON.stringify(record.Sns.Message); console.log(`Processed message ${message}`); await Promise.resolve(1); //Placeholder for actual async work } catch (err) { console.error("An error occurred"); throw err; } }

Consuming an SNS event with Lambda using TypeScript.

import { SNSEvent, Context, SNSHandler, SNSEventRecord } from "aws-lambda"; export const functionHandler: SNSHandler = async ( event: SNSEvent, context: Context ): Promise<void> => { for (const record of event.Records) { await processMessageAsync(record); } console.info("done"); }; async function processMessageAsync(record: SNSEventRecord): Promise<any> { try { const message: string = JSON.stringify(record.Sns.Message); console.log(`Processed message ${message}`); await Promise.resolve(1); //Placeholder for actual async work } catch (err) { console.error("An error occurred"); throw err; } }
PHP
SDK for PHP
Note

There's more on GitHub. Find the complete example and learn how to set up and run in the Serverless examples repository.

Consuming an SNS event with Lambda using PHP.

<?php /* Since native PHP support for AWS Lambda is not available, we are utilizing Bref's PHP functions runtime for AWS Lambda. For more information on Bref's PHP runtime for Lambda, refer to: https://bref.sh/docs/runtimes/function Another approach would be to create a custom runtime. A practical example can be found here: https://aws.amazon.com/blogs/apn/aws-lambda-custom-runtime-for-php-a-practical-example/ */ // Additional composer packages may be required when using Bref or any other PHP functions runtime. // require __DIR__ . '/vendor/autoload.php'; return function ($event, $context) { foreach ($event["Records"] as $record) { processMessage($record); } echo "Done!" . PHP_EOL; }; function processMessage($record) { try { $message = $record['Sns']['Message']; echo "Processed Message: {$message}" . PHP_EOL; } catch (Exception $e) { echo "Error occured: {$e->getMessage()}" . PHP_EOL; throw $e; } }
Python
SDK for Python (Boto3)
Note

There's more on GitHub. Find the complete example and learn how to set up and run in the Serverless examples repository.

Consuming an SNS event with Lambda using Python.

def lambda_handler(event, context): for record in event['Records']: process_message(record) print("done") def process_message(record): try: message = record['Sns']['Message'] print(f"Processed message {message}") # TODO; Process your record here except Exception as e: print("An error occurred") raise e
Ruby
SDK for Ruby
Note

There's more on GitHub. Find the complete example and learn how to set up and run in the Serverless examples repository.

Consuming an SNS event with Lambda using Ruby.

def lambda_handler(event:, context:) event['Records'].map { |record| process_message(record) } end def process_message(record) message = record['Sns']['Message'] puts("Processing message: #{message}") rescue StandardError => e puts("Error processing message: #{e}") raise end
Rust
SDK for Rust
Note

There's more on GitHub. Find the complete example and learn how to set up and run in the Serverless examples repository.

Consuming an SNS event with Lambda using Rust.

use aws_lambda_events::event::sns::SnsEvent; use aws_lambda_events::sns::SnsRecord; use lambda_runtime::{run, service_fn, Error, LambdaEvent}; use tracing::info; // Built with the following dependencies: // aws_lambda_events = { version = "0.10.0", default-features = false, features = ["sns"] } // lambda_runtime = "0.8.1" // tokio = { version = "1", features = ["macros"] } // tracing = { version = "0.1", features = ["log"] } // tracing-subscriber = { version = "0.3", default-features = false, features = ["fmt"] } async fn function_handler(event: LambdaEvent<SnsEvent>) -> Result<(), Error> { for event in event.payload.records { process_record(&event)?; } Ok(()) } fn process_record(record: &SnsRecord) -> Result<(), Error> { info!("Processing SNS Message: {}", record.sns.message); // Implement your record handling code here. Ok(()) } #[tokio::main] async fn main() -> Result<(), Error> { tracing_subscriber::fmt() .with_max_level(tracing::Level::INFO) .with_target(false) .without_time() .init(); run(service_fn(function_handler)).await }
To create the function
  1. Create a directory for the project, and then switch to that directory.

    mkdir sns-tutorial cd sns-tutorial
  2. Copy the sample JavaScript code into a new file named index.js.

  3. Create a deployment package using the following zip command.

    zip function.zip index.js
  4. Run the following AWS CLI command to create your Lambda function in account B.

    aws lambda create-function --function-name Function-With-SNS \ --zip-file fileb://function.zip --handler index.handler --runtime nodejs18.x \ --role arn:aws:iam::<AccountB_ID>:role/lambda-sns-role \ --timeout 60 --profile accountB

    You should see output similar to the following.

    { "FunctionName": "Function-With-SNS", "FunctionArn": "arn:aws:lambda:us-west-2:123456789012:function:Function-With-SNS", "Runtime": "nodejs18.x", "Role": "arn:aws:iam::123456789012:role/lambda_basic_role", "Handler": "index.handler", ... "RuntimeVersionConfig": { "RuntimeVersionArn": "arn:aws:lambda:us-west-2::runtime:7d5f06b69c951da8a48b926ce280a9daf2e8bb1a74fc4a2672580c787d608206" } }
  5. Record the Amazon Resource Name (ARN) of your function. You’ll need it later in the tutorial when you add permissions to allow Amazon SNS to invoke your function.

Add permissions to function (account B)


        Tutorial workflow diagram showing you are in the function step adding permissions

For Amazon SNS to invoke your function, you need to grant it permission in a statement on a resource-based policy. You add this statement using the AWS CLI add-permission command.

To grant Amazon SNS permission to invoke your function
  • In account B, run the following AWS CLI command using the ARN for your Amazon SNS topic you recorded earlier.

    aws lambda add-permission --function-name Function-With-SNS \ --source-arn arn:aws:sns:us-east-1:<AccountA_ID>:sns-topic-for-lambda \ --statement-id function-with-sns --action "lambda:InvokeFunction" \ --principal sns.amazonaws.com --profile accountB

    You should see output similar to the following.

    { "Statement": "{\"Condition\":{\"ArnLike\":{\"AWS:SourceArn\": \"arn:aws:sns:us-east-1:<AccountA_ID>:sns-topic-for-lambda\"}}, \"Action\":[\"lambda:InvokeFunction\"], \"Resource\":\"arn:aws:lambda:us-east-1:<AccountB_ID>:function:Function-With-SNS\", \"Effect\":\"Allow\",\"Principal\":{\"Service\":\"sns.amazonaws.com\"}, \"Sid\":\"function-with-sns\"}" }
Note

If the account with the Amazon SNS topic is hosted in an opt-in AWS Region, you need to specify the region in the principal. For example, if you're working with an Amazon SNS topic in the Asia Pacific (Hong Kong) region, you need to specify sns.ap-east-1.amazonaws.com instead of sns.amazonaws.com for the principal.

Grant cross-account permission for Amazon SNS subscription (account A)


        Tutorial workflow diagram showing you are in the subscription step granting the permission

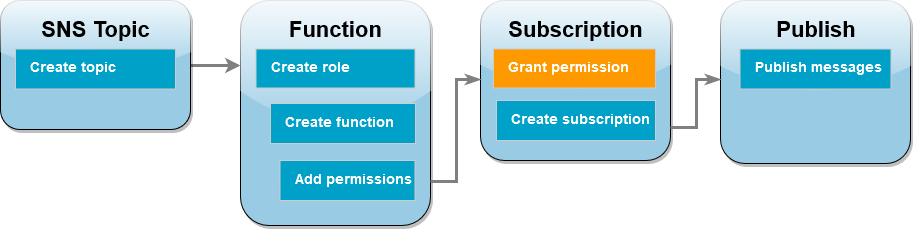
For your Lambda function in account B to subscribe to the Amazon SNS topic you created in account A, you need to grant permission for account B to subscribe to your topic. You grant this permission using the AWS CLI add-permission command.

To grant permission for account B to subscribe to the topic
  • In account A, run the following AWS CLI command. Use the ARN for the Amazon SNS topic you recorded earlier.

    aws sns add-permission --label lambda-access --aws-account-id <AccountB_ID> \ --topic-arn arn:aws:sns:us-east-1:<AccountA_ID>:sns-topic-for-lambda \ --action-name Subscribe ListSubscriptionsByTopic --profile accountA

Create a subscription (account B)


      Tutorial workflow diagram showing you are in the subscription step creating a subscription

In account B, you now subscribe your Lambda function to the Amazon SNS topic you created at the beginning of the tutorial in account A. When a message is sent to this topic (sns-topic-for-lambda), Amazon SNS invokes your Lambda function Function-With-SNS in account B.

To create a subscription
  • In account B, run the following AWS CLI command. Use your default region you created your topic in and the ARNs for your topic and Lambda function.

    aws sns subscribe --protocol lambda \ --region us-east-1 \ --topic-arn arn:aws:sns:us-east-1:<AccountA_ID>:sns-topic-for-lambda \ --notification-endpoint arn:aws:lambda:us-east-1:<AccountB_ID>:function:Function-With-SNS \ --profile accountB

    You should see output similar to the following.

    { "SubscriptionArn": "arn:aws:sns:us-east-1:<AccountA_ID>:sns-topic-for-lambda:5d906xxxx-7c8x-45dx-a9dx-0484e31c98xx" }

Publish messages to topic (account A and account B)


        Tutorial workflow diagram showing you are in the publish step publishing a messages

Now that your Lambda function in account B is subscribed to your Amazon SNS topic in account A, it’s time to test your setup by publishing messages to your topic. To confirm that Amazon SNS has invoked your Lambda function, you use CloudWatch Logs to view your function’s output.

To publish a message to your topic and view your function's output
  1. Enter Hello World into a text file and save it as message.txt.

  2. From the same directory you saved your text file in, run the following AWS CLI command in account A. Use the ARN for your own topic.

    aws sns publish --message file://message.txt --subject Test \ --topic-arn arn:aws:sns:us-east-1:<AccountA_ID>:sns-topic-for-lambda \ --profile accountA

    This will return a message ID with a unique identifier, indicating that Amazon SNS has accepted the message. Amazon SNS then attempts to deliver the message to the topic’s subscribers. To confirm that Amazon SNS has invoked your Lambda function, use CloudWatch Logs to view your function’s output:

  3. In account B, open the Log groups page of the Amazon CloudWatch console.

  4. Choose the log group for your function (/aws/lambda/Function-With-SNS).

  5. Choose the most recent log stream.

  6. If your function was correctly invoked, you’ll see output similar to the following showing the contents of the message you published to your topic.

    2023-07-31T21:42:51.250Z c1cba6b8-ade9-4380-aa32-d1a225da0e48 INFO Processed message Hello World 2023-07-31T21:42:51.250Z c1cba6b8-ade9-4380-aa32-d1a225da0e48 INFO done

Clean up your resources

You can now delete the resources that you created for this tutorial, unless you want to retain them. By deleting AWS resources that you're no longer using, you prevent unnecessary charges to your AWS account.

In Account A, clean up your Amazon SNS topic.

To delete the Amazon SNS topic
  1. Open the Topics page of the Amazon SNS console.

  2. Select the topic you created.

  3. Choose Delete.

  4. Enter delete me in the text input field.

  5. Choose Delete.

In Account B, clean up your execution role, Lambda function, and Amazon SNS subscription.

To delete the execution role
  1. Open the Roles page of the IAM console.

  2. Select the execution role that you created.

  3. Choose Delete.

  4. Enter the name of the role in the text input field and choose Delete.

To delete the Lambda function
  1. Open the Functions page of the Lambda console.

  2. Select the function that you created.

  3. Choose Actions, Delete.

  4. Type delete in the text input field and choose Delete.

To delete the Amazon SNS subscription
  1. Open the Subscriptions page of the Amazon SNS console.

  2. Select the subscription you created.

  3. Choose Delete, Delete.