Enabling user impersonation to monitor Spark user and job activity
EMR Notebooks allows you to configure user impersonation on a Spark cluster. This feature helps you track job activity initiated from within the notebook editor. In addition, EMR Notebooks has a built-in Jupyter Notebook widget to view Spark job details alongside query output in the notebook editor. The widget is available by default and requires no special configuration. However, to view the history servers, your client must be configured to view Amazon EMR web interfaces that are hosted on the primary node.
Note
EMR Notebooks are available as EMR Studio Workspaces in the console. The Create Workspace button in the console lets you create new notebooks. To access or create Workspaces, EMR Notebooks users need additional IAM role permissions. For more information, see Amazon EMR Notebooks are Amazon EMR Studio Workspaces in the console and Amazon EMR console.
Setting up Spark user impersonation
By default, Spark jobs that users submit using the notebook editor appear to
originate from an indistinct livy user identity. You can configure user
impersonation for the cluster so that these jobs are associated with the a user
identity that ran the code instead. HDFS user directories on the primary node are
created for each user identity that runs code in the notebook. For example, if user
NbUser1 runs code from the notebook editor, you can connect to the
primary node and see that hadoop fs -ls /user shows the directory
/user/user_NbUser1.
You enable this feature by setting properties in the core-site and
livy-conf configuration classifications. This feature is not
available by default when you have Amazon EMR create a cluster along with a notebook. For
more information about using configuration classifications to customize
applications, see Configuring
applications in the Amazon EMR Release Guide.
Use the following configuration classifications and values to enable user impersonation for EMR Notebooks:
[
    {
        "Classification": "core-site",
        "Properties": {
          "hadoop.proxyuser.livy.groups": "*",
          "hadoop.proxyuser.livy.hosts": "*"
        }
    },
    {
        "Classification": "livy-conf",
        "Properties": {
          "livy.impersonation.enabled": "true"
        }
    }
]
Using the Spark job monitoring widget
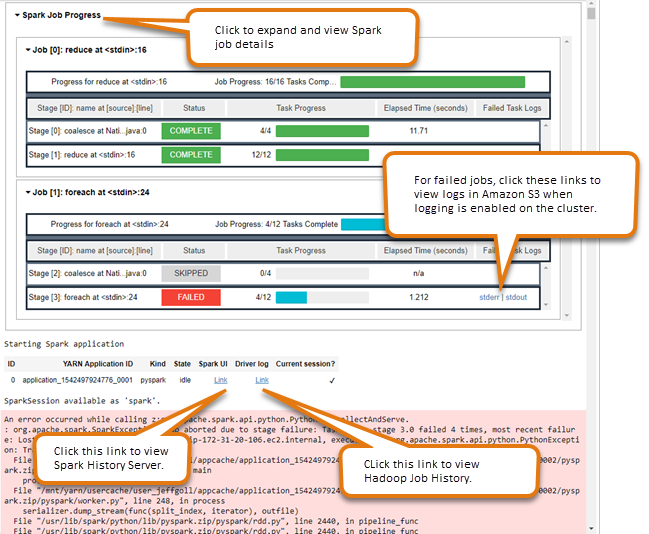
When you run code in the notebook editor that execute Spark jobs on the EMR cluster, the output includes a Jupyter Notebook widget for Spark job monitoring. The widget provides job details and useful links to the Spark history server page and the Hadoop job history page, along with convenient links to job logs in Amazon S3 for any failed jobs.
To view history server pages on the cluster primary node, you must set up an SSH client and proxy as appropriate. For more information, see View web interfaces hosted on Amazon EMR clusters. To view logs in Amazon S3, cluster logging must be enabled, which is the default for new clusters. For more information, see View log files archived to Amazon S3.
The following is an example of the Spark job monitoring.
