Create a Stack and Run an Application
Important
The AWS OpsWorks Stacks service reached end of life on May 26, 2024 and has been disabled for both new and existing customers.
We strongly recommend customers migrate their workloads to other solutions as soon as possible. If you have questions about migration, reach out to the AWS Support Team on AWS re:Post
This section shows how to use the Tomcat cookbook to implement a basic stack setup that runs a simple Java server pages (JSP) application named SimpleJSP. The stack consists of a Tomcat-based custom layer named TomCustom and a MySQL layer. SimpleJSP is deployed to TomCustom and displays some information from the MySQL database. If you are not already familiar with the basics of how to use OpsWorks Stacks, you should first read Getting Started with Chef 11 Linux Stacks.
The SimpleJSP Application
The SimpleJSP application demonstrates the basics of how to set up a database connection and retrieve data from the stack's MySQL database.
<html>
  <head>
    <title>DB Access</title>
  </head>
  <body>
    <%@ page language="java" import="java.sql.*,javax.naming.*,javax.sql.*" %>
    <%
      StringBuffer output = new StringBuffer();
      DataSource ds = null;
      Connection con = null;
      Statement stmt = null;
      ResultSet rs = null;
      try {
        Context initCtx = new InitialContext();
        ds = (DataSource) initCtx.lookup("java:comp/env/jdbc/mydb");
        con = ds.getConnection();
        output.append("Databases found:<br>");
        stmt = con.createStatement();
        rs = stmt.executeQuery("show databases");
        while (rs.next()) {
          output.append(rs.getString(1));
          output.append("<br>");
        }
      }
      catch (Exception e) {
        output.append("Exception: ");
        output.append(e.getMessage());
        output.append("<br>");
      }
      finally {
        try {
          if (rs != null) {
            rs.close();
          }
          if (stmt != null) {
            stmt.close();
          }
          if (con != null) {
            con.close();
          }
        }
        catch (Exception e) {
          output.append("Exception (during close of connection): ");
          output.append(e.getMessage());
          output.append("<br>");
        }
      }
    %>
    <%= output.toString() %>
  </body>
</html>
SimpleJSP uses a DataSource object to communicate with the MySQL
database. Tomcat uses the data in the web app context configuration
file to create and initialize a DataSource object and bind
it to a logical name. It then registers the logical name with a Java Naming and
Directory Interface (JNDI) naming service. To get an instance of the appropriate
DataSource object, you create an InitialContext object and
pass the resource's logical name to the object's lookup method, which
retrieves the appropriate object. The SimpleJSP example's logical name,
java:comp/env/jdbc/mydb, has the following components:
-
The root namespace,
java, which is separated from the rest of the name by a colon (:). -
Any additional namespaces, separated by forward slashes (/).
Tomcat automatically adds resources to the
comp/envnamespace. -
The resource name, which is defined in the web app context configuration file and separated from the namespaces by a forward slash.
The resource name for this example is
jdbc/mydb.
To establish a connection to the database, SimpleJSP does the following:
-
Calls the
DataSourceobject'sgetConnectionmethod, which returns aConnectionobject. -
Calls the
Connectionobject'screateStatementmethod to create aStatementobject, which you use to communicate with the database. -
Communicates with the database by calling the appropriate
Statementmethod.SimpleJSP calls
executeQueryto execute a SHOW DATABASES query, which lists the server's databases.
The executeQuery method returns a ResultSet object,
which contains the query results. SimpleJSP gets the database names from the
returned ResultSet object and concatenates them to create an output
string. Finally, the example closes the ResultSet,
Statement, and Connection objects. For more information
about JSP and JDBC, see JavaServer Pages
Technology
To use SimpleJSP with a stack, you must put it in a repository. You can use any of the supported repositories, but to use SimpleJSP with the example stack discussed in the following section, you must put it in a public S3 archive. For information on how to use the other standard repositories, see Cookbook Repositories.
To put SimpleJSP in an S3 archive repository
-
Copy the example code to a file named
simplejsp.jspand put the file in a directory namedsimplejsp. -
Create a
.ziparchive of thesimplejspdirectory. -
Create a public Amazon S3 bucket, upload
simplejsp.zipto the bucket, and make the file public.For a description of how to perform this task, see Get Started With Amazon Simple Storage Service.
Create a Stack
To run SimpleJSP you need a stack with the following layers.
-
A MySQL layer, that supports the back end MySQL server.
-
A custom layer that uses the Tomcat cookbook to support Tomcat server instances.
To create the stack
-
On the OpsWorks Stacks dashboard, click Add Stack to create a new stack and click Advanced >> to display all options. Configure the stack as follows.
-
Name–A user-defined stack name; this example uses TomStack.
-
Use custom Chef cookbooks–Set the toggle to Yes, which displays some additional options.
-
Repository type–Git.
-
Repository URL–
git://github.com/amazonwebservices/opsworks-example-cookbooks.git. -
Custom Chef JSON–Add the following JSON:
{
  "tomcat": {
    "base_version": 7,
    "java_opts": "-Djava.awt.headless=true -Xmx256m"
  },
  "datasources": {
    "ROOT": "jdbc/mydb"
  }
}
For the remaining options, you can accept the defaults.
The custom JSON does the following:
-
Overrides the Tomcat cookbook's
['base_version']attribute to set the Tomcat version to 7; the default value is 6. -
Overrides the Tomcat cookbook's
['java_opts']attribute to specify that the instance is headless and set the JVM maximum heap size to 256MB; the default value sets no options for instances running Amazon Linux. -
Specifies the
['datasources]attribute value, which assigns a JDBC resource name (jdbc/mydb) to the web app context name (ROOT), as discussed in tomcat::context.This last attribute has no default value; you must set it with custom JSON.

-
-
Click Add a layer. For Layer type, select MySQL. Then click Add Layer.
-
Click Instances in the navigation pane and then click Add an instance. Click Add Instance to accept the defaults. On the line for the instance, click start.
-
Return to the Layers page and click + Layer to add a layer. For Layer type, click Custom.s The example uses
TomCustomandtomcustomas the layer's name and short name, respectively.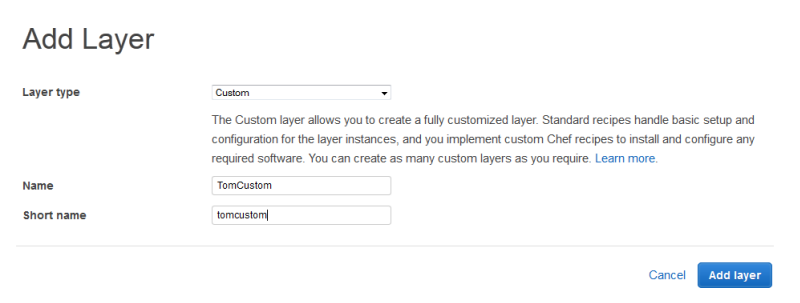
-
On the Layers page, for the custom layer, click Recipes and then click Edit. Under Custom Chef Recipes, assign Tomcat cookbook recipes to the layer's lifecycle events, as follows:
-
For Setup, type
tomcat::setupand click +. -
For Configure, type
tomcat::configureand click +. -
For Deploy, type
tomcat::deployand click +. Then click Save..

-
-
Click Apps in the navigation pane and then click Add an app. Specify the following options and then click Add App:
-
Name–The app's name; the example uses SimpleJSP and the short name generated by OpsWorks Stacks will be simplejsp.
-
App type–Set this option to Other.
OpsWorks Stacks automatically deploys standard app types to the associated server instances. If you set App type to other, OpsWorks Stacks simply runs the Deploy recipes, and lets them handle deployment.
-
Document root–Set this option to
ROOT.The Document root value specifies the context name.
-
Repository type–Set this option to S3 Archive.
-
Repository URL–Set this to the app's Amazon S3 URL that you created earlier.
Use default settings for the other options.

-
-
Use the Instances page to add an instance to the TomCustom layer and start it. OpsWorks Stacks automatically runs the Deploy recipes on a new instance after the Setup recipes complete, so starting the instance also deploys SimpleJSP.
-
When the TomCustom instance is online, click the instance name on the Instances page to see its details. Copy the public IP address. Then construct a URL as follows: http://
publicIP/tc/appname.jsp. For the example, this URL will look something likehttp://50.218.191.172/tc/simplejsp.jsp.Note
The Apache URL that forwards requests to Tomcat is set to the default
['tomcat']['apache_tomcat_bind_path']attribute,/tc/. The SimpleJSP document root is set toROOTwhich is a special value that resolves to/. The URL is therefore ".../tc/simplejsp.jsp". -
Paste the URL from the previous step into your browser. You should see the following:
Databases found:
information_schema
simplejsp
test
Note
If your stack has a MySQL instance, OpsWorks Stacks automatically creates a database for each app, named with the app's short name.
