Subscribing to Amazon QuickSight dashboard emails and alerts
Using Amazon QuickSight, you can subscribe to updates for certain events, such as dashboard updates and anomaly alerts.
Sign up for dashboard emails
You can sign up to get a dashboard in report form, and receive it in an email. You can also configure your report settings.
To change subscription and report settings for a dashboard
-
Open a dashboard that is shared with you.
-
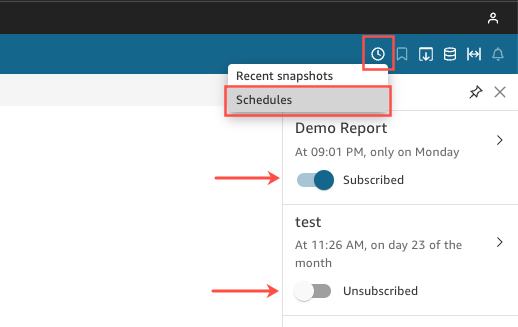
Choose the Schedules icon at upper right, and then choose Schedules in the dropdown.
-
The Schedules pane appears on the right. This pane shows all of the different scheduled reports that you are or can be subscribed to. Navigate to the report that you want and toggle the switch to subscribe or unsubscribe from the report.
Sign up for anomaly alerts
On a dashboard that has a narrative insight that's configured for anomaly detection, you can sign up to get alerts for anomalies and contribution analysis. You receive anomaly alerts when anomalies are updated. The alerts email displays the total number of anomalies, and provides detail on the top five, according to your personal alert configuration. You receive key driver contribution analysis when it's updated, provided that contribution analysis is configured to run with anomaly detection.
To set up anomaly alerts
-
Open a dashboard that is shared with you.
-
You can configure alerts from one of two screens. Choose one of the following, then go to the next step:
-
In the dashboard, locate the anomaly widget that you're interested in. Select it so that it has a highlighted box around it.
-
If you're in the dashboard and have the Explore Anomalies page open, you can configure the alert without returning to the dashboard view.
-
-
At upper right, choose Configure alert. The Alert configuration screen appears.
-
For Severity, choose the lowest level of significance that you want to see.
For Direction, choose to get alerts about anomalies that are Higher than expected or Lower than expected. You can also choose [ALL] to receive alerts about all anomalies.
-
Choose OK to confirm your choices.
-
To stop receiving to an anomaly alert, locate the anomaly widget in the dashboard and use the bell icon to unsubscribe. You can also use the To manage this alert link at the bottom of an alert email.
