Transfer contacts to a specific agent in Amazon Connect
There are two ways to route contacts directly to an agent:
-
Use routing criteria to prefer an agent. This method is better when:
-
You want the ability to target multiple agents simultaneously. For example, a four-person support team that is primarily supporting a customer.
-
You want the option to fallback to a broader pool of agents in the queue if the preferred agent(s) are not available.
-
You want the contact to be reported within the standard queue's metrics.
For this option, use the Set routing criteria block instead of the procedure in this topic.
-
-
Use the agent's queue. This method is usually better when:
-
The contact is intended for only that specific agent and no one else.
-
You don't want the contact to be reported under a standard queue. For information about standard queues and agent queues, see Queues: standard and agent.
This topic explains how to route contacts for this second scenario.
-
Agent queues enable you to route contacts directly to a specific agent. Following are a couple of scenarios where you might want to do this:
-
Route contacts to the last agent the customer interacted with. This provides a consistent customer experience.
-
Route contacts to agents who have specific responsibilities. For example, you might route all billing questions to Jane.
Note
A queue is created for all users in your Amazon Connect instance, but only users who are assigned permissions to use the Contact Control Panel (CCP) can use it to receive contacts. The Agent and Admin security profiles are the only default security profiles that include permissions to use the CCP. If you route a contact to someone who doesn't have these permissions, the contact can never be handled.
To route a contact directly to a specific agent
-
In Amazon Connect, choose Routing, Contact flows.
-
In the flow designer, open an existing flow, or create a new one.
-
Add a block in which you can select a queue to transfer a contact to, such as a Set working queue block.
-
Select the title of the block to open the block settings.
-
Select By agent.
-
Under Select an agent, enter the user name of the agent, or select the agent's user name from the drop-down list.
-
Choose Save.
-
Connect the Success branch to the next block in your flow.
You can also choose to use an attribute to select the queue created for the agent user account. To do so, after you choose By agent, choose Use attribute.
Use contact attributes to route contacts to a specific agent
When you use contact attributes in a flow to route calls to an agent, the attribute value must be either the agent's user name, or the agent's user ID.
To determine the user ID for an agent so that you can use the value as an attribute, use one of these options:
-
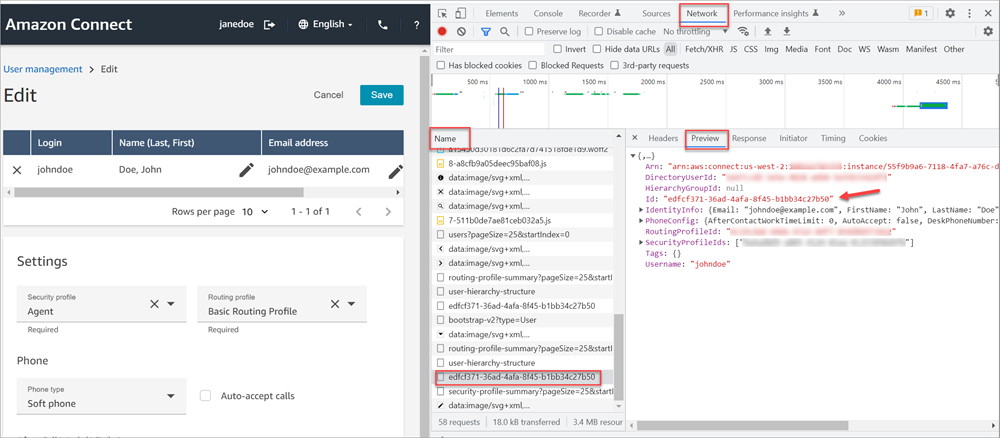
Use the Network tab of the browser debugger to retrieve the agent ID. For example:
-
In a Chrome browser, press F12 and go to the Network tab.
-
In Amazon Connect, in the navigation menu, choose Users, User management, and then select an agent. Monitor the content of the Network tab. In the Name list, choose the GUID.
-
Choose the Preview tab. The agent ID is displayed next to the
Idfield. The following image shows the location of the agent ID in the Preview tab.
-
-
Use the ListUsers operation to retrieve the users from your instance. The agent's user ID is returned with the results from the operation as the value of the
Idin the UserSummary object. -
Find the user ID for an agent by using Amazon Connect agent event streams. The agent events, which are included in the agent event data stream, include the agent ARN. The user ID is included in the agent ARN after
agent/.
In the following agent event data, the agent ID is 87654321-4321-4321-4321-123456789012.
{
    "AWSAccountId": "123456789012",
    "AgentARN": "arn:aws:connect:us-west-2:123456789012:instance/12345678-1234-1234-1234-123456789012/agent/87654321-4321-4321-4321-123456789012",
    "CurrentAgentSnapshot": {
        "AgentStatus": {
            "ARN": "arn:aws:connect:us-west-2:123456789012:instance/12345678-1234-1234-1234-123456789012/agent-state/76543210-7654-6543-8765-765432109876",
            "Name": "Available",
            "StartTimestamp": "2019-01-02T19:16:11.011Z"
        },
        "Configuration": {
            "AgentHierarchyGroups": null,
            "FirstName": "IAM",
            "LastName": "IAM",
            "RoutingProfile": {
                "ARN": "arn:aws:connect:us-west-2:123456789012:instance/12345678-1234-1234-1234-123456789012/routing-profile/aaaaaaaa-bbbb-cccc-dddd-111111111111",
                "DefaultOutboundQueue": {
                    "ARN": "arn:aws:connect:us-west-2:123456789012:instance/12345678-1234-1234-1234-123456789012/queue/aaaaaaaa-bbbb-cccc-dddd-222222222222",
                    "Name": "BasicQueue"
                },
                "InboundQueues": [{
                    "ARN": "arn:aws:connect:us-west-2:123456789012:instance/12345678-1234-1234-1234-123456789012/queue/aaaaaaaa-bbbb-cccc-dddd-222222222222",
                    "Name": "BasicQueue"
                }],
                "Name": "Basic Routing Profile"
            },
            "Username": "agentUserName"
        },
        "Contacts": []
},