Organize agents into teams and groups for reporting and access by creating hierarchies
Agent hierarchies are a way for you to organize agents into teams and groups for reporting purposes. It's useful to organize them based on their location and their skill sets. For example, you might want to create large groups, such as all agents who work on a specific continent, or smaller groups such as all agents working in a specific department.
You can also configure hierarchies with up to five levels, and segment agents or teams. Here are a couple of things to note about using hierarchies:
-
Removing agents from a level affects historical reporting.
-
When you use the Restrict contact access security profile permission, you can restrict contact search results based on the agent's hierarchy. For more information, see Manage who can search for contacts and access detailed information.
Contents
Required permissions
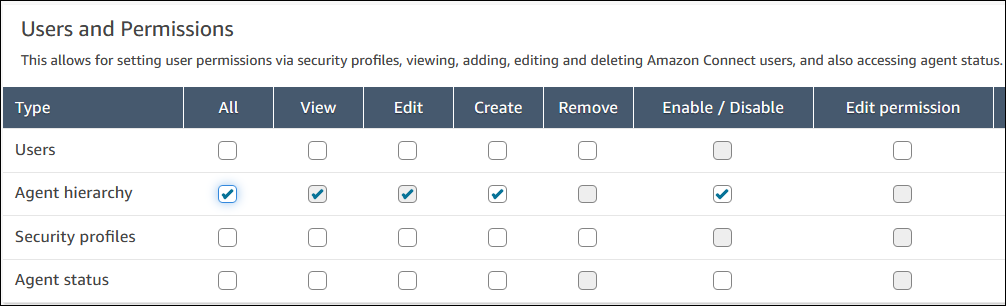
To create agent hierarchies, you need to be assigned to a security profile that has the Users and Permissions - Agent hierarchy - Create permission.
Note
Since agent hierarchies may include location and skill set data, you also need Agent hierarchy - View permission to view the agent hierarchy information in a real-time metrics report.
The following image shows the Users and Permissions - Agent hierarchy permissions on the Security profile permissions page.
Define your organization's hierarchy levels
You can specify up to 5 levels or tiers for your organization's hierarchy groups. For example, if your teams are organized by geography your levels might be Continent, Country, Region, State, Team. Levels need to be put in place before you can describe the groupings that you want to assign agents and other users to.
-
Log in to the Amazon Connect admin website with an Admin account, or an account assigned to a security profile that has Users and Permissions - Agent hierarchy - Create permission.
-
Choose Users, Hierarchies, and then choose Add level hierarchy structure, as shown in the following image.

-
Enter a name for the first level. Choose the + icon to add another level, such as Level 2, Start or Province. You can add up to five levels. In the following image, we've named Level 1 Country.

The following image shows a hierarchy structure with four levels for Country, State or Province, City, Neighborhood.

Tip
After you add groups to these levels, you must delete the groups before you can delete the level.
-
Choose Save to apply the changes, or Cancel to undo them. If the Save button isn't active, you don't have permissions in your security profile to create or edit the agent hierarchy.
Define groups and teams in your hierarchy
After you create hierarchy levels, you can add the groups that call within each, from the top down.
-
Scroll down the Hierarchies page to the Hierarchy groups section. Choose Add new
Level1_Name. For example, in the following image the name of Level 1 is Country.
-
Enter the name for the group, such as Australia, and then choose Save. Choose Add new Country to add another country. The following image shows we added Australia and United States.

-
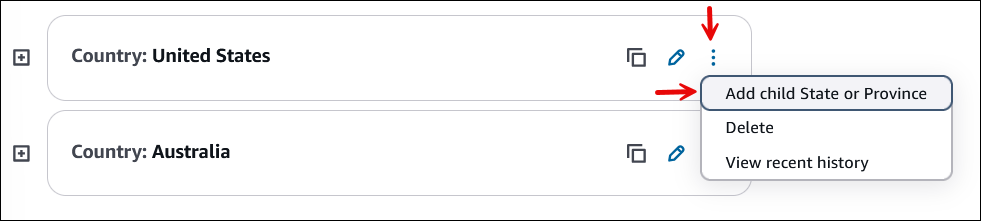
Next to the name of the group, choose Add child State or Province, as shown in the following image.
Choose Add child State or Province each time you want to add a group to level 2. When you're done, choose Save.
The following image shows we added New York and California.

-
For each state, choose Add child City each time you want to add group to level 3. When you're done, choose Save. The following image shows we added Los Angeles and San Francisco.

-
Choose Add child Neighborhood to add groups to Level 4, as shown in the following image. We added Hollywood to Los Angeles.

Choose View historical changes to view the change history. You can filter changes by date (between two dates) or by user name. If you cannot see the link, ensure that you have the proper permissions to view these changes.
Delete an agent hierarchy
Important
Deleting a hierarchy level severs the link to existing contacts. This action can not be reversed.
